WWW.NIKOLAOUTOOLS.GR
13
EN
CAUTION! Note that the use of spark plugs other than those specified may cause the
engine to malfunction or overheat and cause damage.
Muffler
WARNING!
Periodically inspect the muffler for loose fasteners, damage or corrosion. If any sign of exhaust leakage is found, stop using the
machine and have it repaired immediately. Failure to do so may cause the engine to catch fire.
Remove the muffler, insert a screwdriver into the exhaust port and wipe away any carbon
deposits. At the same time, wipe off any carbon build-up on the muffler exhaust port and cylinder
exhaust port.
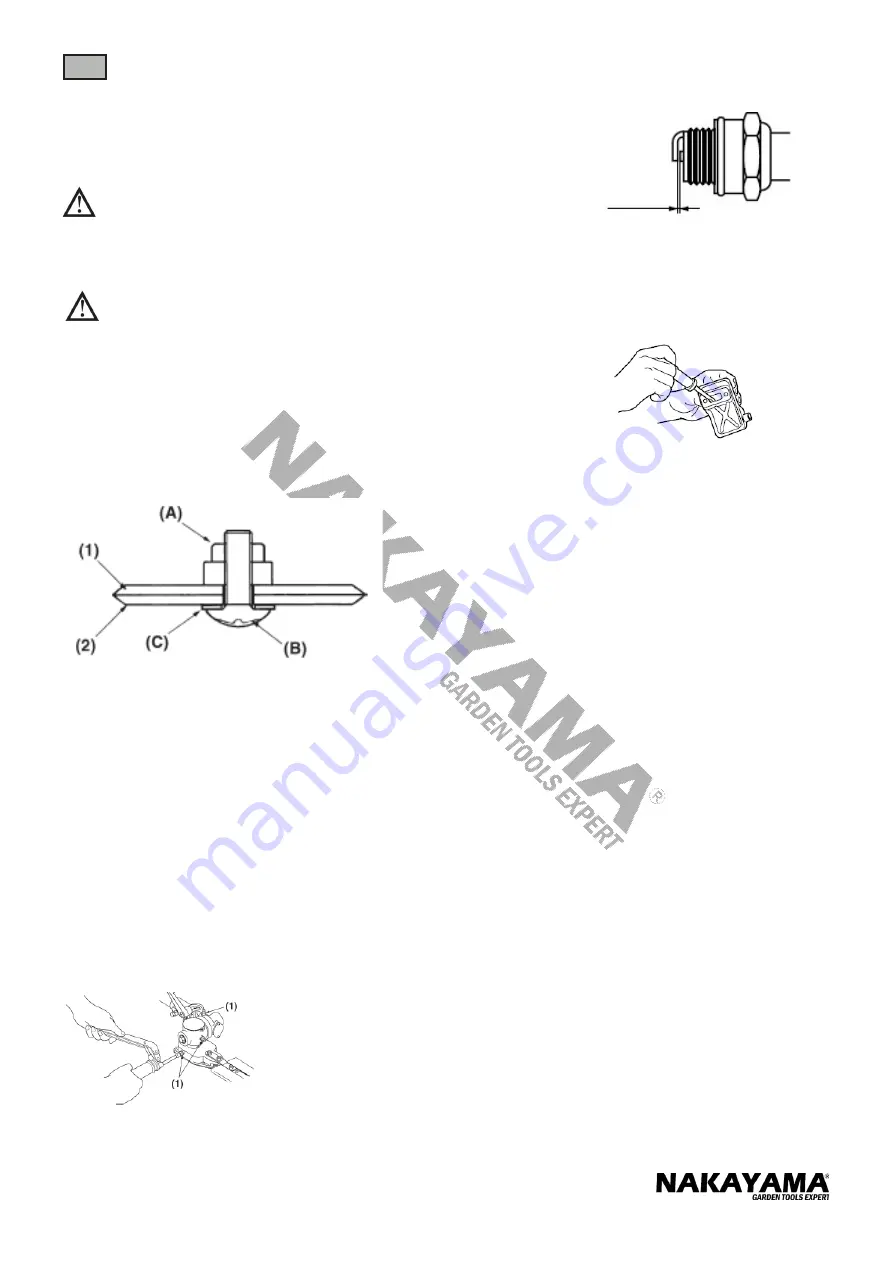
1. Loosen the lock nut (A) as shown in the diagram.
2. Tighten the screw (B) completely, then turn it back a third to one half turn.
3. Tighten the locknut while holding the screw to keep it in position.
4. Check that the flat washer (C) is loose enough that it can be turned by pressing on it.
NOTE:
• Tightening the screw too much can prevent the blades from moving. Conversely, if the screw is not tight enough, the trimmer blades may not work properly
and leaves and twigs may get caught in the trimmer blades.
• If the blades are so worn that it is no longer possible to close the gap between them, you should contact an authorised service center to have the blades
sharpened or replaced.
Transmission
The reduction gears are lubricated by multi-purpose grease in the gearbox.
Add new grease every 25 hours of use or more often depending on the operating conditions.
When adding grease, use a grease gun to inject grease into the three grease slots on the gearbox.
Blade
When refilling the tank or resting, it is often a good idea to use the time to oil
the cutting blades.
If a gap exists between the upper and lower blades, follow the procedure
below to adjust them so that they fit closer together.
(1) Upper blade
(2) Lower blade
Hedge trimmer
(1) Grease fittings
To install the spark plug, first turn it finger-tight, then tighten it a quarter turn using a socket
wrench.
Tightening torque: 9.8 ~ 11.8 N.m (1 ~ 1.2 kg.m)
0.6 ~ 0.7 mm
Summary of Contents for PS5170
Page 1: ...WWW NIKOLAOUTOOLS GR ART NO FR RO el SL EN IT BG PS5170 054115 2 2...
Page 47: ...EL WWW NIKOLAOUTOOLS GR 47 15...
Page 49: ...EL WWW NIKOLAOUTOOLS GR 49 1 2 3 4 5 1 2 3 4 5 3 m 6 1 2 3 4 1 2 1 2 3 4 5 6 7 8 9 10 11...
Page 51: ...EL WWW NIKOLAOUTOOLS GR 51 1 2 3 1 2 A 3 B 4 4 allen C 1 2 3 4 5 1 2 3 4 Allen 5 A B C...
Page 52: ...EL WWW NIKOLAOUTOOLS GR 52 1 2 1 2 3 1 2 3 4 5...
Page 53: ...EL WWW NIKOLAOUTOOLS GR 53 OFF 3 m 30 ml 1 lt 93RON 10 m 1 2 3...
Page 54: ...EL WWW NIKOLAOUTOOLS GR 54 4 5 STAR 6 7 8 1 2 1 2 STOP 40...
Page 55: ...EL WWW NIKOLAOUTOOLS GR 55 1 OFF 2 3 max min 5mm 1 2 3...
Page 56: ...EL WWW NIKOLAOUTOOLS GR 56 STOP 15 cm 30 15 cm 1 2...
Page 58: ...EL WWW NIKOLAOUTOOLS GR 58 1 2 3 4 C 25 1 2 1...
Page 59: ...EL WWW NIKOLAOUTOOLS GR 59 0 3 mm Sprocket 3 8LP 050 45DL 5 32 in 4 0 mm...
Page 60: ...EL WWW NIKOLAOUTOOLS GR 60 0 25 0 65mm 25...
Page 61: ...EL WWW NIKOLAOUTOOLS GR 61 0 65 mm 1 0 6 0 7 mm 2 3 4...
Page 62: ...62 WWW NIKOLAOUTOOLS GR 15 MAX MIN BG...
Page 64: ...64 WWW NIKOLAOUTOOLS GR 1 2 3 4 5 1 2 3 4 5 3 6 1 2 3 4 1 2 1 2 3 4 5 6 7 8 9 10 11 BG...
Page 66: ...66 WWW NIKOLAOUTOOLS GR A B C 1 2 3 1 2 A 3 B 4 4 C 1 2 3 4 5 1 2 3 5 4 BG...
Page 67: ...67 WWW NIKOLAOUTOOLS GR 1 2 1 2 3 1 2 3 4 5 BG...
Page 68: ...68 WWW NIKOLAOUTOOLS GR OFF 3 30 ml 1 lt 93RON 10 1 2 3 BG...
Page 69: ...69 WWW NIKOLAOUTOOLS GR 4 5 STAR 6 7 8 1 2 1 2 STOP 40 BG...
Page 70: ...70 WWW NIKOLAOUTOOLS GR 1 OFF 2 3 5 1 2 3 BG...
Page 71: ...71 WWW NIKOLAOUTOOLS GR STOP 15 cm 30 15 1 2 BG...
Page 72: ...72 WWW NIKOLAOUTOOLS GR 25 50 100 2 1 2 2 0 6 0 7 mm 2 2 1 2 NHSP LD L8RTF NGK BPMR7A BG...
Page 73: ...73 WWW NIKOLAOUTOOLS GR 1 2 1 A 2 B 3 4 C 25 1 9 8 11 8 N m 1 1 2 kg m 0 6 0 7 BG...
Page 74: ...74 WWW NIKOLAOUTOOLS GR 0 3 3 8LP 050 45DL 5 32 4 0 BG...
Page 75: ...75 WWW NIKOLAOUTOOLS GR 25 BG 0 25 0 65...
Page 76: ...76 WWW NIKOLAOUTOOLS GR 1 0 65 2 0 6 0 7 mm 3 4 BG...
Page 113: ......


