background image

EN

5

WWW.NAKAYAMATOOLS.COM

Changing the engine oil

Drain the oil while the engine is still warm to assure rapid and complete draining.

(1) Remove the oil filler cap/ dip stick and drain plug to drain the oil.

(2) Reinstall the drain plug and tighten securely.

(3) Refill with the recommended oil to the specified level 

Engine oil tank capacity: 0.35Littres

Please dispose of used motor oil in a manner that is compatible with the environment.

We suggest you take it in a sealed container to your local recycling centre or service station for reclamation. Do not throw it in the trash or pour it on the ground.

Air Cleaner maintenance instructions

A dirty air cleaner will restrict air flow to the carburettor. To prevent carburettor malfunction, service the air cleaner regularly. Service more frequently when 

operating the pump in extremely dusty areas.

Warning: Never use gasoline or low flash point solvents for cleaning the air cleaner element. A fire or explosion could result.

Never run the engine without the air cleaner. Rapid engine wear will result from contaminants, such as dust and dirt being drawn into the engine.

1. Unscrew the wing nut, remove the air cleaner cover and remove the foam element.

2. Wash the element in solution of household detergent and warm water, then rinse thoroughly, or wash in non-flammable or high flash point solvent. Allow 

the element to dry thoroughly.

3. Soak the element in dean engine oil and squeeze out the excess oil. The engine will smoke during initial start-up if too much oil is left in the element.

4. Reinstall the air cleaner element and the cover.

Spark plug maintenance instructions

In order to service the spark plug, you will need a spark plug wrench (commercially available).

Recommended spark plug: F7TC/F7RTC  

To ensure proper engine operation, the spark plug must be properly gapped and free of deposits.

Warning: If the engine has been running, the muffler will be very hot. Be careful not to touch the muffler.

1. Remove the spark plug cap.

2. Clean any dirt from around the spark plug base.

3. Use a spark plug wrench to remove the spark plug. 

4. Visually inspect the spark plug. Discard it if the insulator is cracked or chipped. Clean the spark plug with a wire brush if it is to be reused.

5. Measure the plug gap with a feeler gauge. Correct as necessary by carefully bending the side electrode. The gap should be: (0.70-0.80mm)

6. Check that the spark plug washer is in good condition, and thread the spark plug in by hand to prevent cross- threading.

After the spark plug is seated, tighten with a spark plug wrench to compress the washer.

If installing a new spark plug, tighten 1/2 turn after the spark plug seats to compress the washer. If reinstalling a used spark plug, tighten 1/8-1/4 turn after 

the spark plug seats to compress the washer.

Notice: The spark plug must be securely tightened.

An improperly tightened spark plug can become very hot and could damage the engine.

Never use spark plugs which have an improper heat range. Use only the recommended spark plugs or equivalent.

Transportation / storage

Warning: To avoid a fire, make sure to cool the water pump down thoroughly before transportation or storage in room.

Transport the water pump with the fuel cock turned off, besides, keep it horizontal to prevent fuel from spilling. Spilled gasoline and gasoline vapour may ignite.

1. Make sure the storage site for the water pump is dry and clean.

2. Clean the water pump inside.

If the water pump is used to pump water mud, sand or heavy debris, deposit of such may remain inside it. Before storage, operate the water pump to suck 

into fresh water to wash, otherwise impeller may be damaged once reuse. Finishing wash, drive off the water drain plug, then empty the water in the pump 

thoroughly, and reinstall the water drain plug.

3. Empty fuel inside the fuel tank.

a. Set the fuel cock to OFF, drive off the fuel drain plug of the carburettor floater room, drain out the fuel in the carburettor. Hold drained gasoline in a proper 

container.

b. Set the fuel cock to ON.

c. Reinstall the fuel drain plug of the carburettor floater room.

4. Replace engine oil.

S. Dismantle the spark plug, and fill clean specified engine oil into the cylinder about one soup spoon. Turn the engine several times to distribute oil evenly and 

then reinstall the spark plug.

6. Pull the starter handle until feel anti- action, and then continues pulling until the triangle mark on the starter wheel lines up with the starter screw hole. In 

this location, both the air inlet and exhaust valve s are closed, which may prevent the engine inside rusting.

7. Cover the water pump to protect from dust.

Troubleshooting

Engine cannot start

Check according to the following: 

1. Check if there is enough fuel.

2. Check if the fuel cock is turned on.

3. Check if the enters the carburettor. in the case that the fuel cook id turned on, check through dismantle the fuel drain plug at the bottom of the carburettor.

Warning: If fuel is spilled, be sure to wipe it dry before checking the spark plug and starting up the engine, otherwise spilled fuel or fuel vapour may ignite. 

4.Check if the engine switch is at ON.

5.Check if there is enough engine oil in the crankcase.

6.Check if there is spark plug spark.

a. Dismantle the spark plug cap. Clear away dirt around the spark plug, and then dismantle it.

b. Install the spark plug into the spark plug cap.

c. Set the engine plug into the spark plug cap.

Summary of Contents for SP9700

Page 1: ...Art Nr WWW NAKAYAMATOOLS COM en User Manual el fr Manuel de l Utilisateur it Manuale d uso bg srb nmk ALB Manuali i perdoruesit slo Navodila za uporabo hr Korisni ki priru nik v2 1 SP9700 017172...

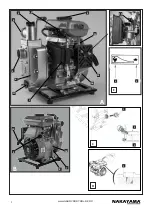
Page 2: ...2 WWW NAKAYAMATOOLS COM 3 4 C D 1 1 2 3 7 1 2 4 6 7 8 9 10 14 17 11 13 12 15 16 E A B 3 5...

Page 3: ...e commercially available hose hose joint and clamp The water inlet hose must be of continuous and be non folded The length of the hose should be as the same as or not more than that required In this c...

Page 4: ...N 2 Close the choke lever Do not use the choke if the engine is warm or the ambient temperature is high 3 Turn the engine switch to the ON position 4 Move the throttle lever downward slightly just pas...

Page 5: ...g a new spark plug tighten 1 2 turn after the spark plug seats to compress the washer If reinstalling a used spark plug tighten 1 8 1 4 turn after the spark plug seats to compress the washer Notice Th...

Page 6: ...ign and technical specifications without prior notice unless these changes signif icantly affect the performance and safety of the products The parts described illustrated in the pages of the manual t...

Page 7: ...7 WWW NAKAYAMATOOLS COM EL CO 4 97cc 2 5hp 170L min 15m 1 x1 A 1 2 3 4 5 6 7 9 ON OFF 10 11 12 13 14 15 16 17...

Page 8: ...8 WWW NAKAYAMATOOLS COM EL 90 3 4 1 2 3 ON 4 5 6 1800 3 5 C 1 2 3 D 1 SF SG API 1 2...

Page 9: ...9 WWW NAKAYAMATOOLS COM EL CO 1 2 3 0 35L 1 2 3 4 F7TC F7RTC 1 2 3 4 305m 1 2 OFF 1 SLOW 2 OFF 3 5 0 70 0 8mm 6 1 2 1 8 1 4...

Page 10: ...10 WWW NAKAYAMATOOLS COM EL 4 ON 5 6 7 2 1 2 3 4 5 6 Service 1 2 3 OFF ON 4 5 6 7 1 1 2 3...

Page 11: ...commerce Le tuyau d arriv e d eau doit tre continu et non pli La longueur du tuyau doit tre identique ou non sup rieure celle requise Dans ce cas non loin de la surface d approvisionnement en eau la...

Page 12: ...eau l int rieur sinon la pompe risque de surchauffer Un fonctionnement prolong de la pompe sans eau endommagera le joint de la pompe Si l eau de la pompe est puis e arr tez imm diatement le moteur et...

Page 13: ...t autour de la base de la bougie 3 Utilisez une cl bougie pour retirer la bougie 4 Inspectez visuellement la bougie Jetez le si l isolant est fissur ou br ch Nettoyez la bougie avec une brosse m talli...

Page 14: ...selon les points suivants 1 V rifiez s il y a suffisamment d eau 2 V rifiez si le filtre est bouch 3 V rifiez si le collier de serrage est bien serr 4 V rifiez si le tuyau d eau est endommag 5 V rifie...

Page 15: ...commercio Il tubo di alimentazione dell acqua deve essere continuo e non piegato La lunghez za del tubo flessibile deve essere uguale o non superiore a quella richiesta In questo caso non lontano dall...

Page 16: ...senza acqua all interno altrimenti la pompa si surriscalda Il funzionamento prolungato della pompa senza acqua dannegger la guarnizione della pompa Se l acqua nella pompa esaurita arrestare immediatam...

Page 17: ...ilizzare una chiave per candele per rimuovere la candela 4 Ispezionare visivamente la candela Scartarlo se l isolante rotto o scheggiato Pulire la candela con una spazzola metallica se deve essere riu...

Page 18: ...erificare secondo quanto segue 1 Controlla se c abbastanza acqua 2 Controllare se il filtro intasato 3 Verificare che la fascetta stringitubo sia serrata saldamente 4 Controllare se il tubo flessibile...

Page 19: ...19 WWW NAKAYAMATOOLS COM BG CO 1 2 3 D 1 API SF SG b 1 2 4 97cc 2 5hp 170L min 15m 1 x1 B 1 2 3 4 5 6 7 8 9 10 11 12 13 14 15 16 17...

Page 20: ...20 WWW NAKAYAMATOOLS COM BG 95 E 3 4 1 2 3 ON 4 5 1800 3 5 305 1 2 OFF 1 SLOW 2 OFF 3...

Page 21: ...21 WWW NAKAYAMATOOLS COM BG CO 1 2 3 0 35 1 2 3 4 F7TC F7RTC 1 2 3 4 5 0 70 0 80 6 1 2 1 8 1 4 1 2 3 4 S 6 7...

Page 22: ...e l affidabilit del prodotto e la validit della garanzia tutti i lavori di riparazione ispezione riparazione o sostituzione inclusi inter venti di manutenzione e regolazioni speciali devono essere es...

Page 23: ...23 WWW NAKAYAMATOOLS COM SRB 1 2 3 1 97cc 2 5hp 170L min 15m 1 x1 1 2 3 4 5 6 7 8 9 10 11 12 13 14 15 16 17...

Page 24: ...24 WWW NAKAYAMATOOLS COM SRB 1 2 95 3 4 1 2 3 4 5 1800 3 5 305 1 2 OFF 1 2 OFF 3...

Page 25: ...25 WWW NAKAYAMATOOLS COM SRB CO 1 2 3 0 35 1 2 3 4 7 7 1 2 3 4 5 0 70 0 80 6 1 2 1 8 1 4 1 2 3 4 6 7...

Page 26: ...26 WWW NAKAYAMATOOLS COM SRB 1 2 3 4 5 6 7 1 2 3 4 5 6...

Page 27: ...27 WWW NAKAYAMATOOLS COM CO C 1 2 3 1 4 SF SG API 1 2 4 97cc 2 5hp 170L min 15m 1 x1 1 2 3 4 5 6 7 8 9 10 11 12 13 14 15 16 17...

Page 28: ...28 WWW NAKAYAMATOOLS COM 95 E 3 4 1 2 3 ON 4 5 1800 3 5 305 1 2 OFF 1 2 OFF 3...

Page 29: ...29 WWW NAKAYAMATOOLS COM CO 1 2 3 0 35 1 2 3 4 F7TC F7RTC 1 2 3 4 5 0 70 0 80 6 1 2 1 8 1 4 1 2 3 4...

Page 30: ...30 WWW NAKAYAMATOOLS COM S 6 7 1 2 3 ID 4 5 6 P 7 1 2 3 4 5 6...

Page 31: ...sin n dispozicion komercial Gypi i hyrjes s ujit duhet t jet i vazhduesh m dhe t mos jet palosur Gjat sia e zorr s duhet t jet e nj jt me ose jo m shum se sa k rkohet N k t rast jo larg nga sip rfaqj...

Page 32: ...jaftuesh m KUJDES Mos u p rpiqni ta drejtoni motorin pa uj brenda p rndryshe pompa do t nxehet Vrapimi i zgjatur i pomp s pa uj do t d mtoj cop z n e pomp s N se uji n pomp p rdoret ndaleni motorin me...

Page 33: ...n dhom Transportoni pomp n e ujit me karin e karburantit t fikur p rve k saj mbajeni at horizontale p r t parandaluar derdhjen e karburantit Karburanti i derdhur dhe avulli i benzin s mund t ndizet 1...

Page 34: ...n e produkteve Pjes t e p rshkruara ilustruara n faqet e manualit q mbani n duar mund t ken t b jn me modele t tjera t linj s s produktit t prodhuesit me karakteristika t ngjashme dhe mund t mos p rfs...

Page 35: ...stopno cev cevni spoj in sponko Cev za dovod vode mora biti neprekinjena in ne sme biti zlo ena Dol ina cevi mora biti enaka ali ne ve ja od zahtevane V tem primeru bo nedale stran od povr ine oskrbe...

Page 36: ...motor in napolnite rpalko ko se ohladi Zagon motorja Slika E 3 visoka 4 nizka 1 Vklopite ventil za gorivo 2 Zaprite varnostno ro ico rpalke ne uporabljajte e je motor topel ali je temperatura okolja...

Page 37: ...zkri no navijanje Ko je sve a name ena privijte klju s sve ko da podlo ko stisnete e name ate novo sve ko zategnite 1 2 obrata za sede i v igalne sve ke da stisnete podlo ko e znova namestite rabljeno...

Page 38: ...ati vode se za pomo obrnite na prodajalca Proizvajalec si pridr uje pravico do manj ih sprememb zasnove izdelka in tehni nih specifikacij brez predhodnega obvestila razen e te spremembe bistveno vpliv...

Page 39: ...za dovod vode mora biti kontinuirano i ne mora se savijati Duljina crijeva treba biti jednaka ili ne ve a od tra ene U tom slu aju nedaleko od povr ine opskrbe vodom vodena pumpa e posti i svoje optim...

Page 40: ...ra Slika E 3 visoka 4 niska 1 Uklju ite ventil za gorivo 2 Zatvorite polugu prigu iva a Ne koristite prigu nicu ako je motor zagrijavan ili je temperatura okoline visoka 3 Okrenite sklopku motora u po...

Page 41: ...iranje perilice Ako ponovo postavljate upotrijebljeni svje ica zategnite 1 8 1 4 nakon okretanja sjedala svje ice za komprimiranje perilice Napomena svje ica mora biti vrsto zategnuta Nepravilno zateg...

Page 42: ...oizvo a zadr ava pravo na manje izmjene u dizajnu proizvoda i tehni kim specifikacijama bez prethodne najave osim ako te promjene zna ajno utje u na performanse i sigurnost proizvoda Dijelovi opisani...

Page 43: ...DISPOSE OF PACKAGING RESPONSIBLY DO NOT DISPOSE OF ELECTRICAL GOODS IN HOUSEHOLD WASTE...

Reviews: