background image

DANGER!

Make sure that the power supply is disabled.

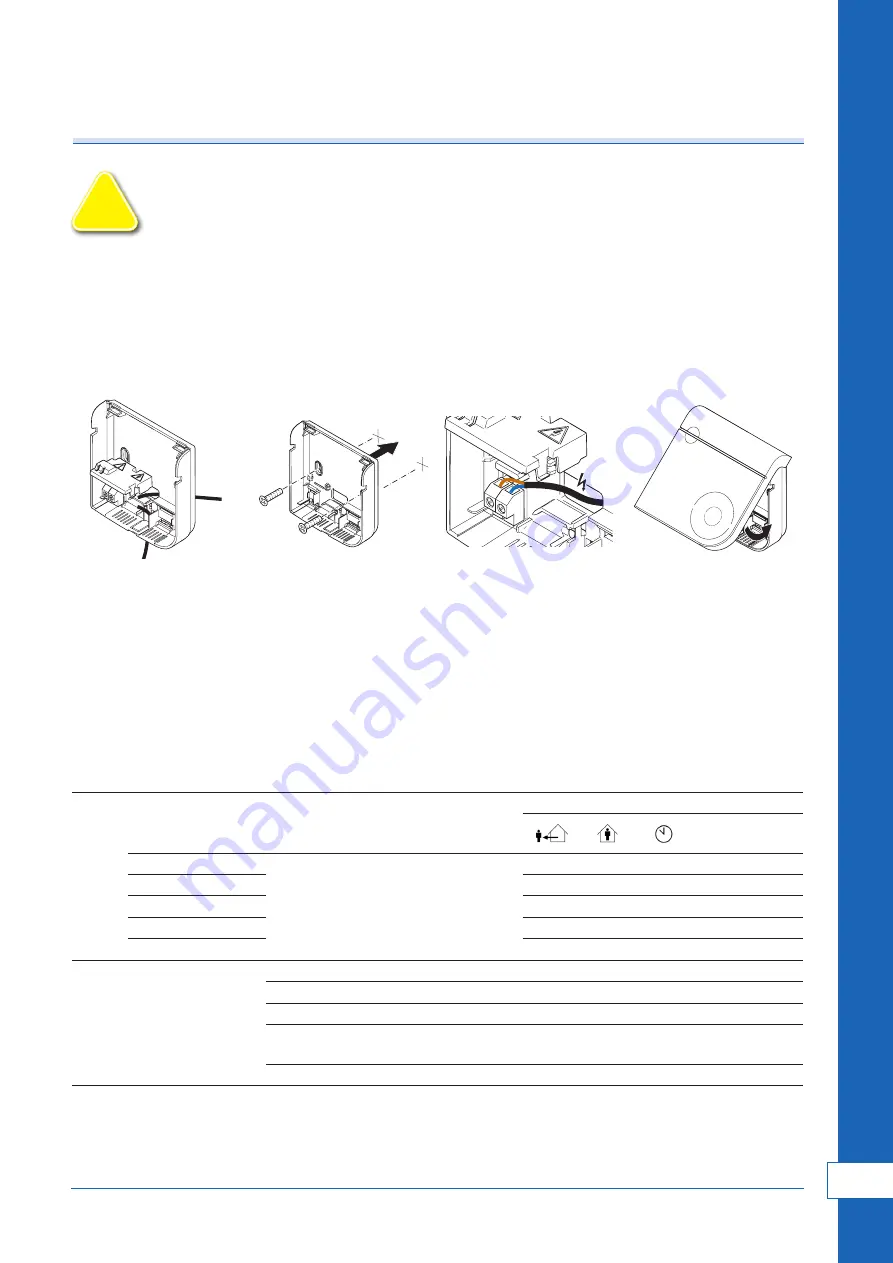
1. Lead the power cable through the back hole (A) or cable entrance (B) (fig 4).

2. Place the bottom section of the device.

3. Fasten the bottom section using the screws (fig 5).

4. Connect the power cable in the screw terminals (fig 6).

5. Place the top section of the device onto the bottom section.

a. Place the clips.

b. Close and press until it clicks (fig 7).

!

WARNING

A

B

A

B

A

B

A

B

Figure 4 - lead the power 

cable

Figure 5 - using the screw

Figure 6 - connect the power 

cable

Figure 7 - close and press 

until it clicks

Commissioning:

1. Enable the 230V power supply. All LEDs are ON for 3 seconds.

2. Wait until the status LED shows the binding mode. If the device shows another indication, the device is 

already bound. See 7. on how to bind the device again.

3. Make sure the HRU is in binding mode

4. Tap the button. The device tries to bind to the control device. It shows the result on the status LED. When 

the communication failed, make sure that the control device is in binding mode, and retry..

Configuration:

Step 1

Configuration

Status LED

Mode LEDs

Eco

Comfort

Low fan speed

Off

Medium fan speed

High fan speed

CO

2

 setpoint

Binding

Step 2

Value

Blue/red                         Low fan speed

Off

10%

20%

30%

40%

Blue/green                         Medium fan speed 30%

40%

50%

60%

70%

Red/green/blue                         High fan speed 60%

70%

80%

90%

100%

Blue flashing                         CO

2

 setpoint

700 

ppm

800 

ppm

900 

ppm

1000 

ppm

1100 

ppm

Red/green                         Binding

11

ALNOR

®


ventilation systems

is a legally protected trademark and technical patent. All rights reserved.

w

w

w

.al

nor

.com.
pl

User's manual


HRQ-PremAIR-SENS-CO2

Summary of Contents for HRQ-PremAIR-SENS-CO2

Page 1: ...INSTRUKCJA OBS UGI HRQ PremAIR SENS CO2 Wersja ver 032021 USER S MANUAL HRQ PremAIR SENS CO2...

Page 2: ...emicznych Nie malowa urz dzenia 2 Opis Urz dzenie s u y do nast puj cych cel w 1 Ustawianie poziomu wentylacji poprzez pr dko wentylator w na podstawie warto ci wprowadzonych przez u ytkownika lub zmi...

Page 3: ...urowanej warto ci UWAGA Urz dzenie zapisuje skonfigurowane warto ci pr dko ci wentylatora w sterowniku i z niego je uzyskuje Urz dzenie samo zapisuje nastawy CO2 i nie przesy a ich do innych urz dze 5...

Page 4: ...GA Nie umieszczaj urz dzenia w metalowej obudowie WARNING 1 Wci nij zaczep i zdejmij g rn cz z cz ci dolnej Rys 1 2 Otw rz os on bezpiecze stwa Poluzuj zaczep Rys 2 za pomoc ma ego rubokr ta p askiego...

Page 5: ...urz dzenia zob pkt 7 skonfiguruj ustawienia 3 Upewnij si e rekuperator jest w trybie przypisywania 4 Przyci nij przycisk Urz dzenie pr buje wykona przypisywanie do sterownika Wynik pokazany jest na d...

Page 6: ...jest na diodzie stanu urz dzenia Wykonaj resetowanie do ustawie fabrycznych 1 Przyci nij przycisk Diody trybu wskazuj nast pny wyb r 2 W razie potrzeby w ci gu 2 sekund przyci nij przycisk do czasu g...

Page 7: ...po w czeniu zasilania Okres stabilizacji po w czeniu zasilania 2 minuty 10 Aplikacja PremAIR Dost pna do pobrania w sklepach Google Play i App Store PremAIR Zrzuty z ekranu 7 ALNOR systemy wentylacji...

Page 8: ...paint the device 2 Description The device is designed for following purposes 1 To set the level of ventilation through the fan speed based on user input or measured CO2 level 2 To set parameters for t...

Page 9: ...pm above the configured value NOTE The device stores the configured fan speed values in the control device and requests them from there The device stores the CO2 setpoint itself and does not communica...

Page 10: ...ce the device in a metal casing WARNING 1 Press the clip and pull the top section from the bottom section fig 1 2 Open the safety cover Use a small flat tip screw driver to loosen the clip fig 2 When...

Page 11: ...g mode If the device shows another indication the device is already bound See 7 on how to bind the device again 3 Make sure the HRU is in binding mode 4 Tap the button The device tries to bind to the...

Page 12: ...ult on the status LED Perform a factory reset 1 Tap the button The mode LEDs show the next selection 2 If needed tap the button within 2 seconds until the selection shows the 5th LED 3 Press and hold...

Page 13: ...ptimum range 10min after power up Stabilization period after power up 2 minutes 10 PremAIR application Available for download in Google Play and App Store PremAIR Screen shot 13 ALNOR ventilation syst...

Reviews: