background image

26

S03


 FLUIDS

WATER QUALITY FOR MIXING WITH COOL-
ANT CONCENTRATE

Engine  coolants  are  a  combination  of  three  chemical 

components: ethylene glycol (EG) or propylene glycol (PG) 

antifreeze, inhibiting coolant additives, and quality water.

Water quality is important to the performance of the 

cooling system. Deionized or demineralized water is 

recommended for mixing with ethylene glycol and 

propylene glycol base engine coolant concentrate.

All water used in the cooling system should meet the 

following minimum specifications for quality:

Chlorides

<40 mg/L

Sulfates

<100 mg/L

Total solids

<340 mg/L

Total dissolved I hardness

<170 mg/L

pH

5.5—9.0


IMPORTANT!

Do not use bottled drinking water because it often con-

tains higher concentrations of total dissolved solids.

Freeze Protection

The relative concentrations of glycol and water in the en

-

gine coolant determine its freeze protection limit.

Ethylene Glycol

Freeze Protection Limit

40%

-24°C (-12°F)

50%

-37°C (-34°F)

60%

-52°C (-62°F)

Propylene Glycol

Freeze Protection Limit

40%

-21°C (-6°F)

50%

-33°C (-27°F)

60%

-49°C (-56°F)

DO  NOT  use  a  coolant-water  mixture  greater  than  60% 

ethylene glycol or 60% propylene glycol.

TESTING COOLANT FREEZE POINT

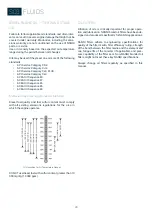
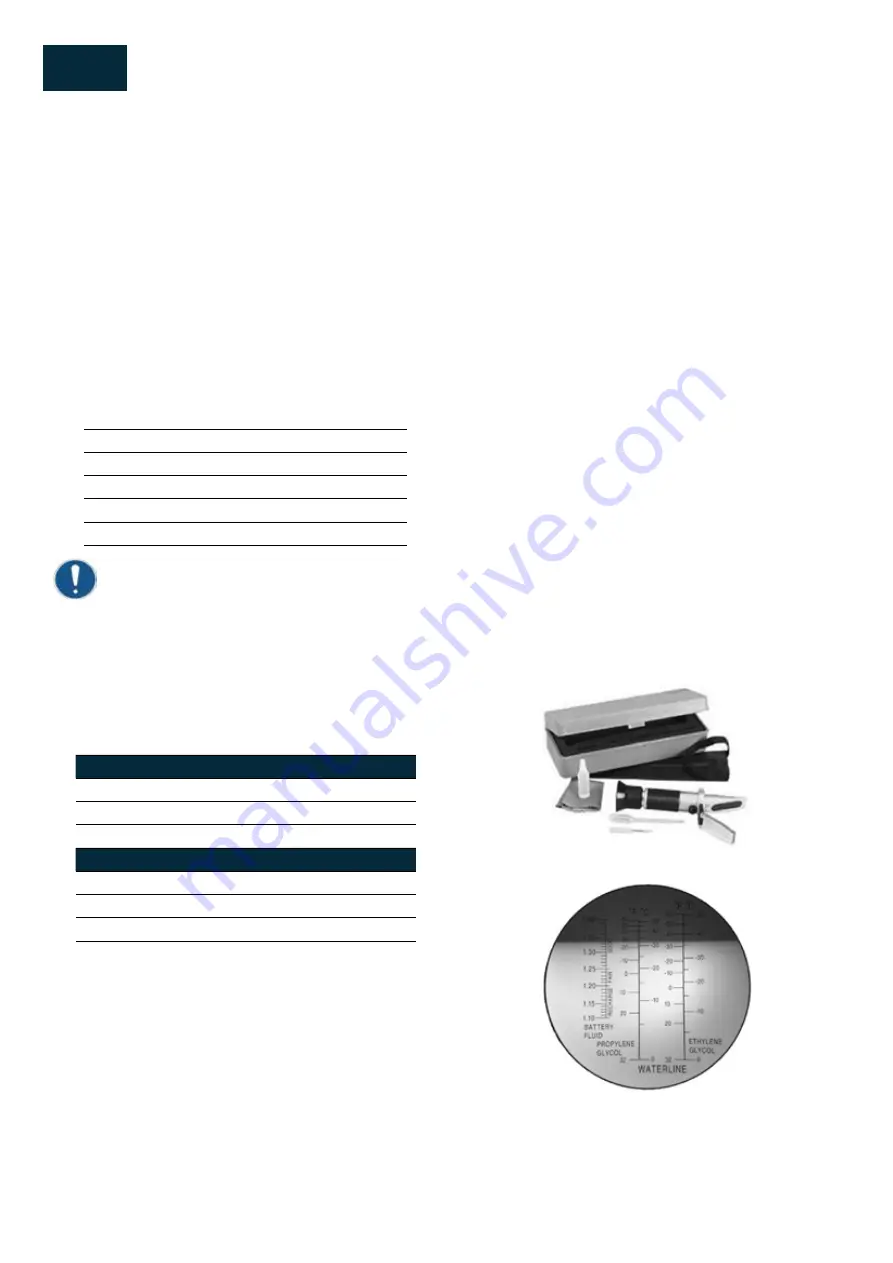
The  use  of  a  hand-held  coolant  refractometer  is  the 

quickest, easiest, and most accurate method to determine 

coolant freeze point. This method is more accurate than 

a test strip or a float-type hydrometer which can produce 

poor results.

A coolant refractometer can be used to provides an eco-

nomical solution to accurate freeze point determination 

in the field.

To use this tool:

1. 

Allow cooling system to cool to ambient tempera-

tures.

2. 

Open heat-exchanger cap to expose coolant.

3. 

With the included dropper, collect a small coolant 

sample.

4.  Open the lid of the refractometer, place one drop of 

coolant on the window and close the lid.

5.  Look through the eyepiece and focus as necessary.

6. 

Record the listed freeze point for the type of coolant 

(ethylene  glycol  coolant  or  propylene  glycol)  being 

tested.

Part Number 945400245

Image with a Drop of 50/50 Coolant 

Placed on the Refractometer Window

Summary of Contents for Q1500 Series

Page 1: ...NANNI GENERATOR SET USER MANUAL DGBXXT090049 Q1500 Series...

Page 2: ......

Page 3: ...HANGES TRACKED CHANGES CODE INDEX DATE INITIALS NATURE OF TRANSLATIONS PAGES DGBXXT09049 03 2023 PJ Creation Please note all changes and pages associated For further clarity please add a line in front...

Page 4: ...4 Q00 TRACKED CHANGES...

Page 5: ...Rotating Drive Lines 15 Paint Removal Before Heating 15 High Pressure Fuel System Opening Risk 15 Avoid High Pressure Fluids 15 Safe Cooling System Service 16 Avoid Heat Near Pressurized Fluid Lines...

Page 6: ...f the generator set 32 View N 2 of the generator set 33 View N 3 of the generator set 34 S06 STARTING RUNNING 43 COMMAND PANEL Si 2 44 Description of the generator set control panel 44 DISPLAY SCREENS...

Page 7: ...BLE SHOOTING 87 S10 STORAGE 89 STORAGE PROCEDURE 90 Long term storage 90 Long term storage procedure 90 Batteries 92 S11 TROUBLE SHOOTING 93 TROUBLE SHOOTING 93 The engine is difficult to start 93 Low...

Page 8: ...8 S00 SUMMARY...

Page 9: ...tact an authorized NAN NI INDUSTRIES S A S dealer for maintenance of your engine A list of dealers is available on our website www nannienergy com Read this manual carefully to learn how to properly o...

Page 10: ...vice manu al workshop manual On the following pages the reader will find numerous descriptions of the generator set its operation and maintenance as well as tips and guidelines for troubleshooting Spe...

Page 11: ...ise Protection 15 Genset Output Generated Power 15 Guards Requirements 15 Staying Clear Of Rotating Drive Lines 15 Paint Removal Before Heating 15 High Pressure Fuel System Opening Risk 15 Avoid High...

Page 12: ...tion contained on parts and components sourced from suppliers that is not reproduced in this Operator Manual Read Safety Instruction Carefully read all safety messages in this manual and on your gense...

Page 13: ...haust gases and components Exhaust parts and streams become very hot during operation Exhaust gases and components reach temperatures hot enough to burn people ignite or melt common materials WORK IN...

Page 14: ...s PROPER USE OF TOOLS Use tools appropriate to the work Makeshift tools and unfollowed procedures can create safety hazards Do not use U S mechanical tools on metric fasteners i e a 1 2 inch wrench on...

Page 15: ...int a minimum of 100 mm 4 in from area to be affected by heating If paint cannot be removed wear an approved respirator mask before heating or welding If you sand or grind paint avoid breathing the du...

Page 16: ...ng point and away from control units 6 After welding reverse Steps 1 5 STATIC ELECTRICITY RISK The removal of sulphur and other compounds in Ultra Low Sulphur Diesel ULSD fuel decreases its conductivi...

Page 17: ...ell ventilated area Wearing eye protection and rubber gloves Avoiding use of air pressure to clean batteries Avoiding breathing fumes when electrolyte is Avoiding spilling or dripping electrolyte Usin...

Page 18: ...turning engine to customer make sure engine is functioning properly especially the safety systems Make sure that all guards and shields are in place PREVENT ACCIDENTS When engine is OFF always set the...

Page 19: ...oper Coolant Concentration 24 Biodiesel 24 Winter fronts 24 DIESEL ENGINE COOLANTS 25 RECOMMENDED COOLANTS 25 WATER QUALITY 25 COOLANT DRAIN INTERVALS 25 OPERATING IN WARM TEMPERATURE CLIMATES 25 WATE...

Page 20: ...ptable for use at all percentage mixture levels Required Fuel Properties In all cases the fuel shall meet the following properties Cetane number of 40 minimum Cetane number greater than 47 is preferre...

Page 21: ...l and filter change interval IMPORTANT Do not mix used diesel engine oil or any other type of lu bricating oil with diesel fuel Improper fuel additive usage may cause damage on fuel injection equipmen...

Page 22: ...nce dose of a biocide will prevent microbial growth Contact your fuel supplier or NANNI dealer for recommendations RECOMMENDED FUEL Approved fuel Diesel approved by NANNI Industries on the engines of...

Page 23: ...ng biofuels IMPORTANT Biodiesel is not recommended by NANNI Raw pressed vegetable oils are NOT acceptable for use as fuel in any concentration in NANNI engines Their use could cause engine failure TES...

Page 24: ...ome engines to aid cold weather starting Ether An ether port on the intake is available to aid cold weather starting CAUTION Ether is highly flammable and not recommended by NAN NI Do not use ether wh...

Page 25: ...lloys such as brass from corrosion WATER QUALITY Water quality is important to the performance of the cooling system Deionized or demineralized water is recommended for mixing with ethylene glycol and...

Page 26: ...0 24 C 12 F 50 37 C 34 F 60 52 C 62 F Propylene Glycol Freeze Protection Limit 40 21 C 6 F 50 33 C 27 F 60 49 C 56 F DO NOT use a coolant water mixture greater than 60 ethylene glycol or 60 propylene...

Page 27: ...1000 2000 ppm REDUCES the oil and filter ser vice interval BEFORE using diesel fuel with sulfur content great er than 2000 mg kg 2000 ppm contact your NANNI dealer or qualified service provider DO NO...

Page 28: ...sity diesel engine oils are preferred Diesel fuel quality and fuel sulfur content must comply with all existing emissions regulations for the area in which the engine operates Oil Viscosities for Air...

Page 29: ...from debris and water always change engine fuel filters as specified in this manual ALTERNATIVE AND SYNTHETIC LUBRI CANTS Conditions in certain geographical areas may require lu bricant recommendation...

Page 30: ...n that all containers are properly marked to identify their contents Properly dispose of all old containers and any residual lu bricant they may contain MIXING OF LUBRICANTS In general avoid mixing di...

Page 31: ...king from them Wear gloves and eye protection glasses Follow all safety rules Wait for engine to cool down Do not let waste to drip on the ground down a city drain or into any water source Improperly...

Page 32: ...32 S03 FLUIDS...

Page 33: ...be quoted when ordering ser vice and replacement parts Depending of type of engine identification plate are as follows Or TYP Indicates the commercial designation of the engine NR Indicates the engin...

Page 34: ...operation instructions stated in the relevant manuals should be follow by the user Nanni s responsibility for the engine specification being in accordance with the certification will be void if one or...

Page 35: ...being carried out by an authorized Nanni representative NOTE Late or improper maintenance or use of spare parts other than NANNI original spare parts will invalidate NANNI s responsibility for the en...

Page 36: ...is listed on the Emissions Label When installed in accordance with the manufacturer s instructions Nanni Industries Marine Diesel Propulsion Engines without integral exhaust certified under Direc tive...

Page 37: ...29 S05 COMPONENTS 37 GENSET MAIN COMPONENTS 39 List of components 39 View N 1 of the generator set 40 View N 2 of the generator set 41 View N 3 of the generator set 42 S05 COMPONENTS...

Page 38: ...30 S05 COMPOSANTS...

Page 39: ...ernator belt 3 Starter motor 4 Control panel connector 5 Air filter 6 Fuel filter 7 Coolant drain valve 8 Fuel injection pump 9 Heat exchanger 10 Coolant filler cap 11 Coolant pump 12 Starter solenoid...

Page 40: ...32 S05 COMPOSANTS VIEW N 1 OF THE GENERATOR SET...

Page 41: ...33 S05 COMPOSANTS VIEW N 2 OF THE GENERATOR SET...

Page 42: ...the generating set in using the lifting eyelets Adjust the lifting slings to lift the unit horizontally For safety and operational reasons never insert any objects or block the vents of the generator...

Page 43: ...g and stop buttons 45 BEFORE STARTING 46 Fuel system 46 Raw water 46 Electric system 47 PRELIMINARY CHECKS 47 STARTING THE GENSET 48 Cold climate start up 48 Starting with back up batteries 48 RUNNING...

Page 44: ...ET button Use this button to deac tivate the horn output without acknowledging the alarms 4 FAULT RESET button Use this button to ac knowledge alarms and deactivate the horn output Inactive alarms wil...

Page 45: ...at the last record is displayed first STARTING USE STARTING AND STOP BUTTONS These buttons are used to start and stop the engine START button Works in MAN mode only Press this button to initiate the s...

Page 46: ...fuel filter It should never be installed on top of the engine because vibration affects the fuel water separation pro cess If the fuel tank is located under the engine fuel injection pump an additiona...

Page 47: ...eller will be damaged if it runs dry even for a few seconds and may cause the engine to overheat Perform the following before starting the engine 1 Open the sea cock Prime if required 2 Start the comp...

Page 48: ...lant heater for at least 2 hours be fore starting the engine Additional information on cold weather operation is available from your Nanni engine distributor or authorized dealer Synthetic oils improv...

Page 49: ...or during navigation or to repair it try to reduce the load delivered by the gen erator and check the whole system once back in port If necessary consult your local Nanni representative AFTER RUNNING...

Page 50: ...ION Do not forget to open the sea cock before restarting the group COLD CLIMATE PRECAUTIONS See maintenance chapter fore more details CAUTION Keep the battery fully charged An improperly charged batte...

Page 51: ...rsion 62 Tightening of screws clamps and raw water and coolant hoses 63 Raw water pump impeller replacement 63 COOLANT REPLACEMENT 64 Coolant draining 64 Coolant filling 65 Anti gel 65 Hose and clamp...

Page 52: ...52 S 07 MAINTENANCE Battery voltage 72 Battery specific gravity 72...

Page 53: ...53 S 07 MAINTENANCE...

Page 54: ...echnicians not trained in marine techniques are prohibited for obvious safety reasons Operations related to the timing and injection system are the ex clusive responsibility of Nanni s trained represe...

Page 55: ...attery electrolyte level Checking the connectors of the harness Checking the alternator belt tension Replacement 1 Control panel Indicator lights and alarms Engine generalities Flexible motor supports...

Page 56: ...CHECKING THE ENGINE COOLANT LEVEL Remove the expansion tank cap 1 and check that the coolant level is between the low and high marks If the coolant level is too low check the reason for the low coolan...

Page 57: ...check the level again Adjust the oil level if necessary IMPORTANT When using a different brand or viscosity of oil remove all the old oil Never mix two different types of oil Use the proper SAE engine...

Page 58: ...s a little Therefore make sure that the engine oil does not leak from the seal and read the oil level on the dipstick Then fill up the engine oil to the specified level IMPORTANT To prevent serious da...

Page 59: ...ement ALTERNATOR BELT Belt tensioning DANGER Stop the engine before working on the alternator belt Measure the deflection A by pushing the belt halfway between the crankshaft pulley and the alternator...

Page 60: ...dust from the tank and circuit are collected in this cartridge It should therefore be replaced at the first service visit and every 250 hours of operation or annually whichever comes first ENVIRONMEN...

Page 61: ...no longer rise Close the bleed valve 2 on top of the fuel injec tion pump NOTE Always keep the air bleed valve on the injection pump closed unless you are releasing air Otherwise it may cause the eng...

Page 62: ...ORTANT On this type of elbow there is no anode so there is no need to check or replace the zinc anodes Stainless steel dry exhaust elbow optional for the non soundproof version Disassembly Unscrew and...

Page 63: ...ge to the motor prevent dust and foreign objects from entering the pipes RAW WATER PUMP IMPELLER REPLACEMENT CAUTION Before replacing the seawater pump impeller make sure that the seawater valves are...

Page 64: ...cause motor failure or fire COOLANT REPLACEMENT DANGER Do not remove the pressure cap from the heat exchanger when the engine is hot Then loosen the cap slightly to release excess pressure before rem...

Page 65: ...e adding antifreeze for the first time clean the inside of the heat exchanger by pouring fresh cool water and draining it several times The procedure for mixing water and antifreeze differs de pending...

Page 66: ...e coolant 2 Unscrew all clamps 1 3 Remove seawater 2 and 3 4 Remove the coolant hoses 4 5 6 7 8 and 9 5 Remove the hose 9 under the seawater pump after loosening the two clamps 1 6 Inspect and replace...

Page 67: ...STAT REPLACEMENT DANGER Stop the engine before replacing the thermostat Do not remove the thermostat from the heat exchanger until the coolant temperature is too high The thermostat should be replaced...

Page 68: ...approximately 6 mm 0 2 in Specifications Thermostat valve opening temperature 69 5 72 5 C 157 1 162 5 F Temperature at which the thermostat opens fully 85 C 185 F CAUTION If the measurement is not ac...

Page 69: ...t the seawater system isolated Cleaning the heat exchanger core 1 Clean the cooler core on the coolant side with a par affin based engine detergent 2 Remove any internal deposits on the raw water side...

Page 70: ...d the motor may overheat Do not use antifreeze and scale inhibitor at the same time Never mix different types or brands of coolants or anti freeze See coolant replacement section RAW WATER PUMP REPLAC...

Page 71: ...O ring 7 Gasket 15 Ball bearing 8 Cam 16 Stop ring Raw water pump installation 1 Check the condition of the spacer contact surface be fore mounting the seal and the pump 2 Replace the gasket 2 and aft...

Page 72: ...g the voltage with a circuit tester across the battery terminals 1 Positive Terminal 2 Negative Terminal IMPORTANT If the battery voltage is below factory specifications check the density and recharge...

Page 73: ...refore using 20 C 68 F as a reference the specific gravity reading must be corrected by the following for mula Specific gravity at 20 C Measured value 0 0007 electrolyte temperature 20 C Specific grav...

Page 74: ...74 S 07 MAINTENANCE...

Page 75: ...Electrical connection 86 Rotation and sequence of phases 86 Winding connection methods 86 Starting and stopping operations 87 Cleaning and lubrication 87 Maintenance 88 Routine maintenance 88 Evaluati...

Page 76: ...76 S08 AL TERNATOR...

Page 77: ...ass 9 Power factor 10 Nominal power as a function of temperature 11 Maximum ambient temperature 12 Rated voltage 13 Rated current 14 Rated frequency N Identification 15 Class of nominal characteristic...

Page 78: ...with keyed fan The protection grade is IP21 on request it is possible to realize a higher protection grade Insulation is class H the impregnations in epoxy varnish for the rotating parts and the part...

Page 79: ...vices The safety features of the alternator are 1 Protective screen on the front shield 2 Terminal box cover 3 Rear cover DANGER During operation these guards must be in place Safety labels CAUTION Do...

Page 80: ...cordance with safety standards HANDLER This symbol identifies the type of operator responsible for the operation described This qualification requires a complete knowledge and understanding of the inf...

Page 81: ...rature Maximum ambient temperature to guarantee the rated power 40 C Maximum operating altitude to ensure power rating Less than 1000 m Install the alternator in a well ventilated area Insufficient ve...

Page 82: ...phases is L3 L2 L1 the order is reversed Winding connection methods The alternators are manufactured with 12 standard output cables to allow different output voltages for example at 50 Hz 115 V 200 V...

Page 83: ...d be done at reduced speed the operator should check that no abnormal noise can be detected If an abnormal noise is detected stop the system immediately and improve the mechanical coupling CLEANING AN...

Page 84: ...ct operation absence of abnormal noises or vibrations 3 Mechanical checks of all fastening bolts and in particular of the electrical connections 4 External cleaning of the generator The extraordinary...

Page 85: ...absence of abnormal noise or vibration Intervention type Operator PPE to wear Periodicity Every 2500 hours of use Materials and equipment Outils d atelier At regular intervals we recommend checking th...

Page 86: ...e used for external cleaning of the generator The use of hydro cleaners and detergent liquids is strictly forbidden The standard degree of protection of the generator is IP23 therefore the use of flui...

Page 87: ...n cables according to the attached drawings Low voltage at no load Reset the voltage potentiom eter Check the speed Check the windings High no load voltage Reset the voltage potentiom eter to zero Rep...

Page 88: ......

Page 89: ...89 S10 STORAGE 89 STORAGE PROCEDURE 90 Long term storage 90 Long term storage procedure 90 Batteries 92 S10 STORAGE...

Page 90: ...rocedure Shutdown of the generator set 1 Drain and change the engine oil 2 Replace the engine oil filter 3 Replace fuel filter and pre filter 4 Bring the engine to operating temperature 5 Stop the eng...

Page 91: ...less than 1 M EN60204 1 you will need to dry the alternator by blowing pressurized air at 50 60 C into the alternator air inlets and outlets 1 Clean the engine and check its condition 2 Drain and rep...

Page 92: ...y as often as possible to extend its life WARNING Do not leave the battery unattended for a long time it will be deeply discharged about 7 to 8 volts In such a situa tion the battery will not recover...

Page 93: ...ype of oil according to weather conditions Compression too low Valve piston cylinder and ring wear Flat battery Charge the battery In winter store the battery in a frost free place Recharge it peri od...

Page 94: ...Check the lubrication Replace the oil filter every second oil change Check bearing clearance EXHAUST SMOKE TOO BLACK Defect Solutions Fuel control defective Contact NANNI dealer Wrong fuel The fuel m...

Page 95: ...belt or adjust the tension Coolant level too low Check the system and top up with recommended fluid identical to that in the engine Too much antifreeze Add water and check the antifreeze concentration...

Page 96: ...96 S11 TROUBLE SHOOTING...

Page 97: ......

Page 98: ......

Reviews: