background image


979000-0000R 
August 2011 


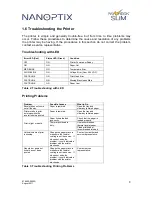
1.6 Troubleshooting the Printer 


The  printer  is  simple  and  generally  trouble-free,  but  from  time  to  time  problems  may 
occur.  Follow  these  procedures  to  determine  the  cause  and  resolution  of  any  problems 
the  printer  may  be  having.  If  the  procedures  in  this  section  do  not  correct  the  problem, 
contact a service representative. 
 

Troubleshooting with LED 


Error LED (Red)


Status LED (Green)


Condition


OFF 

ON 

Printer Powered or Ready 

ON 

ON 

Paper Out 

MED BLINK 

ON 

Temperature Error 

SLOW BLINK 

ON  

Voltage Error (Over 26.2 VDC) 

FAST BLINK 

ON 

Print Head Error 

FAST BLINK 

ON 

Missing Black Index Mark 

FAST BLINK 

ON 

Paper Jam 

Table 2: Troubleshooting with LED 


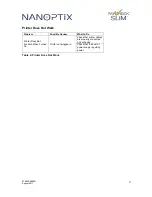
Printing Problems 


Table 3: Troubleshooting Printing Problems 

Problem 

Possible Causes 

What to Do 

Receipt does not come 
out all the way. 

Paper is jammed. 

Open the tray and 
clear any jammed paper. 

Printer starts to print, 
but stops while the 
receipt is being printed. 

Paper is jammed. 

Open the tray and 
clear any jammed paper. 

Print is light or spotty. 

Paper tickets loaded 
incorrectly.  

Check that the paper is 
loaded properly. 

Thermal printhead is 
dirty. 

Use recommended 
thermal receipt paper.   
Clean printhead at 
recommended intervals. 

Vertical column of print 
is missing. 

Change the paper stack to 
make sure the thermal 
coating is not the source.  If 
it does not solve the 
problem, it  could indicate a 
problem with the printer 
electronics. 

Contact your authorized 
service representative. 

One side or portion of 
ticket  has not been 
printed 

Change the paper stack to 
make sure the thermal 
coating is not the source.  If 
it does not solve the 
problem, it  could indicate a 
problem with the printer 
electronics. 

Contact service 
representative. 

Summary of Contents for PAYCHEK SLIM

Page 1: ...Owner s Manual First Edition January 2007 Latest Update August 2011 Document 979000 0000R ...

Page 2: ...roperty of their respective holders Federal Communications Commission FCC Radio Frequency Interference Statement Warning Changes or modifications to this unit not expressly approved by the party responsible for compliance could void the user s authority to operate the equipment Information to the User This equipment must be installed and used in strict accordance with the manufacturer s instructio...

Page 3: ...test the power supply and Nanoptix Inc printer for FCC and CE mark certification Communication Interface Cable An approved Nanoptix interface cable must be used with this product Use of a cable other than Nanoptix approved product will require that you test the cable with the Nanoptix Inc printer and your system for FCC and CE mark certification Power Cord A UL listed detachable power cord must be...

Page 4: ... 1 4 Changing Paper 6 1 5 Testing the Printer 7 1 6 Troubleshooting the Printer 8 Troubleshooting with LED 8 Printing Problems 8 Printer Does Not Work 9 2 Media and Supplies Guide 10 2 1 Media Specifications 10 2 2 Ordering Thermal Paper 10 2 3 Ordering Miscellaneous Supplies 11 Power Supply and Power Cord 11 Ordering Communication Cables 11 Communication Cables Pin Out 12 APPENDIX A Mechanical Dr...

Page 5: ...FIGURE 2 PRINTER RESET 3 FIGURE 3 PAPER FEED BUTTON 4 FIGURE 4 LED POSITIONS 5 FIGURE 5 TEST TICKET 7 FIGURE 6 SIDE VIEW MOUNTED IN POSITION A 13 FIGURE 7 SIDE VIEW MOUNTED IN POSITION B 14 FIGURE 8 SIDE VIEW MOUNTED IN POSITION C 15 FIGURE 9 FRONT VIEW 16 FIGURE 10 BACK VIEW 17 ...

Page 6: ...D 8 TABLE 3 TROUBLESHOOTING PRINTING PROBLEMS 8 TABLE 4 PRINTER DOES NOT WORK 9 TABLE 5 ORDERING THERMAL PAPER 10 TABLE 6 PART NUMBERS 11 TABLE 7 COMMUNICATION CABLES PART NUMBERS 11 TABLE 8 14 PIN RS 232 UNIVERSAL INTERFACE PIN OUT 12 TABLE 9 PIN OUT AND SIGNALS OF FRONT MOLEX FOR BEZEL 12 ...

Page 7: ...tix PayCheck Slim Printer is extremely fast quiet and very reliable With thermal printing technology there is no ribbon cassette to change and paper loading is very simple The printer s intuitive design enables it to fit in very narrow cabinets Figure 1 Nanoptix PayCheck Slim Printer ...

Page 8: ...MB RAM 2MB Flash and 1MBit EEPROM Resident Character Sets Arial Bold 6 sizes Note Other Character sets can be programmed quickly Integrated Bar Codes Interleaved 2 of 5 Code 39 Code 93 UPC A UPC E Codabar EAN 8 EAN 13 Code 128 Note Other Bar Codes can be programmed quickly Speed Up to 200 mm second monochrome Up to 125 mm second two color mode Sensors Paper in Tray open Top of form Paper low Human...

Page 9: ...gust 2011 3 1 3 Printer Controls Printer Reset Service use only To reset the printer simply unplug and plug the cable Once plugged in the printer goes through a startup routine and resets itself Figure 2 Printer Reset ...

Page 10: ...979000 0000R August 2011 4 Paper Feed Button Press on the Paper Feed Button to advance the paper The paper will automatically feed Figure 3 Paper Feed Button ...

Page 11: ...ller board shows the printer status Please refer to section 1 6 for LED status and troubleshooting with LED An optional external LED bezel can be connected through the front 3 pin Molex connector The pin out is described in section 2 3 Figure 4 LED positions ...

Page 12: ...t it may continue to accept data from the host computer Because the printer cannot print any transactions the data may be lost 1 Remove ticket cartridge 2 Drop ticket stack into ticket cartridge The maximum stack that will fit in the ticket cartridge is 200 3 Replace ticket cartridge 4 Feed ticket into printer mechanism until resistance is met 5 Paper will feed automatically paper is loaded and pr...

Page 13: ...mware PAY 1 79U Protocol NTL COMMUNICATION Interface Serial Baud Rate 9600 Data Bits 8 Parity NONE Handshaking PRT RTS Print mode NTL Aux Port Disabled PRINT CONTROL Print Method No HPQ Speed 150 mm sec Black Bar Index Right No HPQ Burn time 275 us Motor Current 2 Real Time Command Enabled Auto Reset Status Enabled PRINTER ENVIRONMENT CONDITIONS Voltage 23 8 Volts Temperature 24 Celcius SYSTEM RES...

Page 14: ...e Causes What to Do Receipt does not come out all the way Paper is jammed Open the tray and clear any jammed paper Printer starts to print but stops while the receipt is being printed Paper is jammed Open the tray and clear any jammed paper Print is light or spotty Paper tickets loaded incorrectly Check that the paper is loaded properly Thermal printhead is dirty Use recommended thermal receipt pa...

Page 15: ...ork Problem Possible Causes What to Do Printer Does Not Function When Turned On Printer not plugged in Check that printer cables are properly connected on both ends Check that the host or power supply is getting power Table 4 Printer Does Not Work ...

Page 16: ...hall be 1 3 0 4 lbs 0 59 0 18 Kg 2 2 Ordering Thermal Paper We recommend the following paper grade produced by Appvion and Kanzaki Specialty Papers There are a number of paper converters qualified to supply this paper provided the stacks are from these recommended grades We would be happy to provide a quote for qualifying additional grades not listed below Manufacturer Numbers Nanoptix part no Pap...

Page 17: ... Supply 24VDC 2 5A max 60W 210007 0401R Power cord North American 102080 0014 Power cord continental Europe 102080 0013 Table 6 Part Numbers Ordering Communication Cables Contact your sales representative to order the communication cables listed in the table The numbers are for reference only Suppliers may use other numbers Part Part Number RS232 communication and power cable 14 pin Molex to DB 9 ...

Page 18: ... 24V Power Input n a Power Input 7 Signal Ground Signal Ground n a Signal Ground 8 24V Power Input n a Power Input 9 Bezel_pwm 24V Output n a Bezel Driver 10 Signal Ground Signal Ground Signal Ground Signal Ground 11 PRT_RS232_RXD Input Output Data Receive 12 PRT_RS232_TXD Output Input Data Transmit 13 PRT_Status Output Input Pinter Ready 14 PRT_RS232_RTS Output Input Handshake Table 8 14 Pin RS 2...

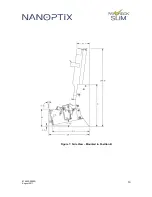
Page 19: ...sible the PayCheck Slim printer has three different mounting positions The three mounting options position A B and C along with their dimensions are described in the following pages The rear support bracket Figure 11 and mounting points remain the same for all three mounting options Figure 6 Side View Mounted in Position A ...

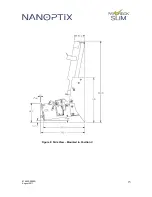
Page 20: ...979000 0000R August 2011 14 Figure 7 Side View Mounted in Position B ...

Page 21: ...979000 0000R August 2011 15 Figure 8 Side View Mounted in Position C ...

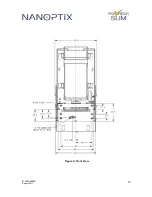
Page 22: ...979000 0000R August 2011 16 Figure 9 Front View ...

Page 23: ...979000 0000R August 2011 17 Figure 10 Back View ...

Reviews: