background image

EN

5.2 Fans under the top cover 

If you want to install additional fans at the top of the case, please remove the Nanoxia VentCovers 

first by removing the screws on the outside of the case. 

Next, hold the fans from the inside and secure them to the top by fastening the screws from 

the outside.

Case fans installed at the top of the case should exhaust air out of the case (fan rear side 
facing outwards). 


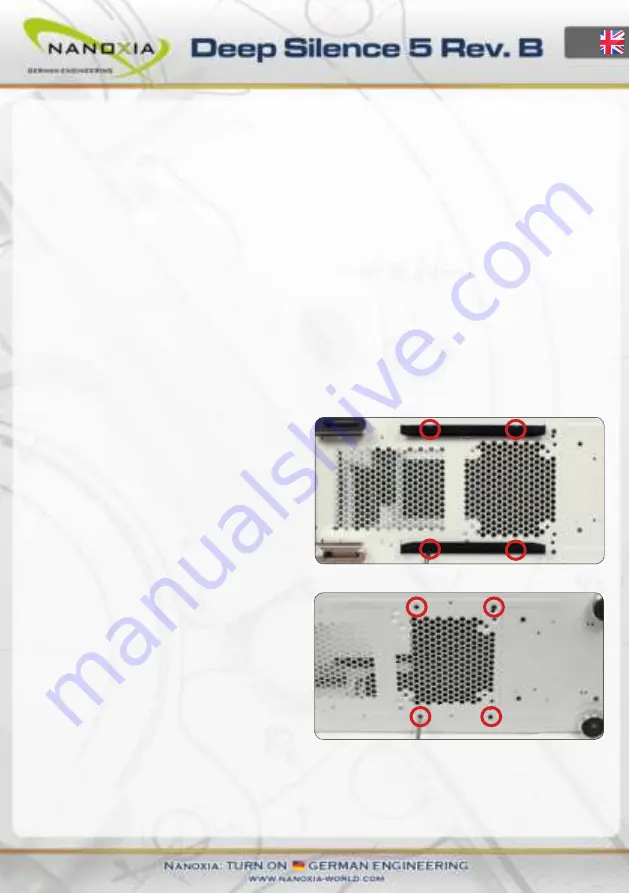
5.3 Fan at the bottom of the case


You can install a 120 or 140 mm fan on the bottom of the case. To do that, you must remove 

the secondary HDD-cage mounting rail from the case bottom. We recommend the following 

procedure:

a) 

Remove the dust filter and unscrew the 

screws on the two guide rails of the filter to 

remove it.


b) 

To remove the secondary hard drive 

bracket, please remove the four screws, as 

shown on the image.

c) 

Please place the fan on the inside of the case and secure it from the outside


d) 

Attach the dust filter mounts again to the case bottom and slide the dust filter back to its 

original position.


12

Summary of Contents for Deep Silence 5 Rev. B

Page 1: ......

Page 2: ...________________________________________________________02 _______________________________________________________________03 ________________________________________________________06 ________________...

Page 3: ...led mounting of up to six 2 5 inch drives In the new revision the Deep Silence 5 Tower provides plenty of space for your most demanding projects Due to the modular hard drive cages the case offers max...

Page 4: ...ss 2 channel fan control for up to 6 fans Nanoxia VentCover noise indulated 2 x top cover Noise Insulation The Nanoxia Deep Silence 5 Rev B has been developed with the aim to offer the buyer a low noi...

Page 5: ...e mounted The Nanoxia VentCover under the top can be removed at any time and allow the installation of 120 mm or 140 mm fans for optimized heat dissipation The Deep Silence axial flow fans have been s...

Page 6: ...panel a 120 or 240 mm radiator can be mounted Please note that the front HDD cages must be removed for this the HDD cage on the secondary mounting rail can usually remain in the case For compact wate...

Page 7: ...Mini ITX Attach the included EPS extension cable on to your motherboard do not connect it to the power supply yet Next you should mount the CPU cooler for very large CPU coolers the attachment of the...

Page 8: ...desire to place a 3 5 inch card reader you can use the internal adapter for this purpose Please remove at first the 5 25 inch cover see chapter 2 1 Open the two quick release of the bottom 5 25 inch b...

Page 9: ...Figure 3B To lock the drive push the bracket with the drive back installed back into the slot until the bracket is re engaged 3 2 Conversion and removal of the HDD cages Your new case is equipped wit...

Page 10: ...rd disks please remove the mounting frame Insert your 2 5 inch drives If you want to remove the lower hard drive cage in order to install a water cooling radiator simply loosen the 8 screws holding th...

Page 11: ...when removing the front vertically in the frame and secure them on both sides with the 2 5 inch mounting screws long Then push the frame with the hard drives into the HDD cage in the position you pre...

Page 12: ...ngs are equipped with easy to clean dust filters We recommend that you clean them on a regular basis 5 1 Front Fans To switch the fans in the front or to clean the dust filters first open the lower fr...

Page 13: ...an at the bottom of the case You can install a 120 or 140 mm fan on the bottom of the case To do that you must remove the secondary HDD cage mounting rail from the case bottom We recommend the followi...

Page 14: ...p to three fans per channel 6 1 Connecting the fans to the fan control The fan controller is powered by a 4 pin Molex connector that is connected directly to the power supply The controller has two ch...

Page 15: ...e recommend the installation of the radiator behind the front panel 7 1 Installation of a radiator or compact water cooling solution behind the front Thanks to the modular HDD cages you can mount a 12...

Page 16: ...the installation please check carefully if the distance to the motherboard compo nents is sufficient 8 The I O Panel The I O panel includes connectors for exter nal USB devices 2 x USB 2 0 2 x USB 3...

Page 17: ...ies quickly and professionally Likewise we would appreciate your suggestions and comments about our case very much Customers from Germany and other European countries can use the following e mail addr...

Page 18: ...Nanoxia 2015...

Reviews: