CONTENTS OF PACKING BOX
AND
OPTION DEVICES
PACKING BOX
Please first check the contents of packing box after unpacking. The contents
should be:
•
One PR9 passbook Printer.
•
One Power Cord.
•
One Ribbon Cartridge.
•
CD-ROM of the User
'
s Manual
•
One Printed out default menu configuration.
CAUTION: Please contact YOUR PRINTER SUPPLIER instantly if any of list
above is missed.
WARNING
:
Please do not connect the printer’s power cord at this
moment, otherwise printer may be damaged permanently.
CAUTION
:
Put the packing box aside in case of future use
.
OPTION DEVICES
Following option devices can be provided:
Hardware option: horizontal magnetic stripe R/W, parallel interface, serial
interface port2, USB interface and so on.
Add the second interface port
Printer has basic configuration of one standard serial communication
interface. At the rear of printer there is a second interface installation slot,
which is for option interface. The slot can be installed with option boards
and cards as below:
•
parallel interface board
•
second serial interface board and USB interface board
•
second serial interface board
•
USB interface board
CAUTION: When printer equipped with second or more other data
communication interface boards, interface’s working mode
can be selected by menu setup configuration.
1 Working with single communication port
Printer can only work according to the interface mode and emulation
selected by menu configuration, even if printer has been equipped with
more interface boards.
2 Working with dual-port
•
If printer has been equipped with option interface board, operator can
set up printer’s working mode to be dual-port mode through the
operator panel to meet different usage requirement.
•
If printer has been installed second serial port board and USB interface
board, there are only two serial ports( first serial port and second serial
port) can work synchronously. Under this configuration, printer can
check witch port is active. Any one of these two ports, if its data has
been received, printer will be under the contol of this port, and be kept
in this state till this port’s task is end. Two ports are independent. And
two ports have the same configuration except emulation mode.
Emulation mode can be shifted by commands.
•
If printer has been installed with second parallel interface board and
configured as dual-port activity, it will check witch port’s buffer has data.
If any one of these two ports detect data has been received, printer will
be under the control of the port and it will be kept in this state till port’s
task is end. Dual-port functionality and corresponding parameters can
be selected though operator panel. Under the especial circumstance,
each port can has its own emulation mode, and emulation mode can be
shifted by using commands.
•
If
printer’s hardware configuration has two interface and the setup item
‘interface’ in the menu is ‘DUAL’, then it can print out two interface’s
corresponding emulation configuration in self-test sheet. Printer can set
which port to be active and emulation mode according to host’s
communication port.
DEFINITION OF TERMS
ON-LINE: Printer is ready after normal power on sequence.
STOP MODE: When printer is ON-LINE, if STOP
■
key is pressed down or
printer cover is opened, printer will enter STOP mode.
OFF-LINE
:
Press down STATION2 and COMPRESS
▼
key synchronously
when power on printer, or press down STATION2 and
COMPRESS
▼
key synchronously when printer is ON-LINE, printer
will enter OFF-LINE mode.
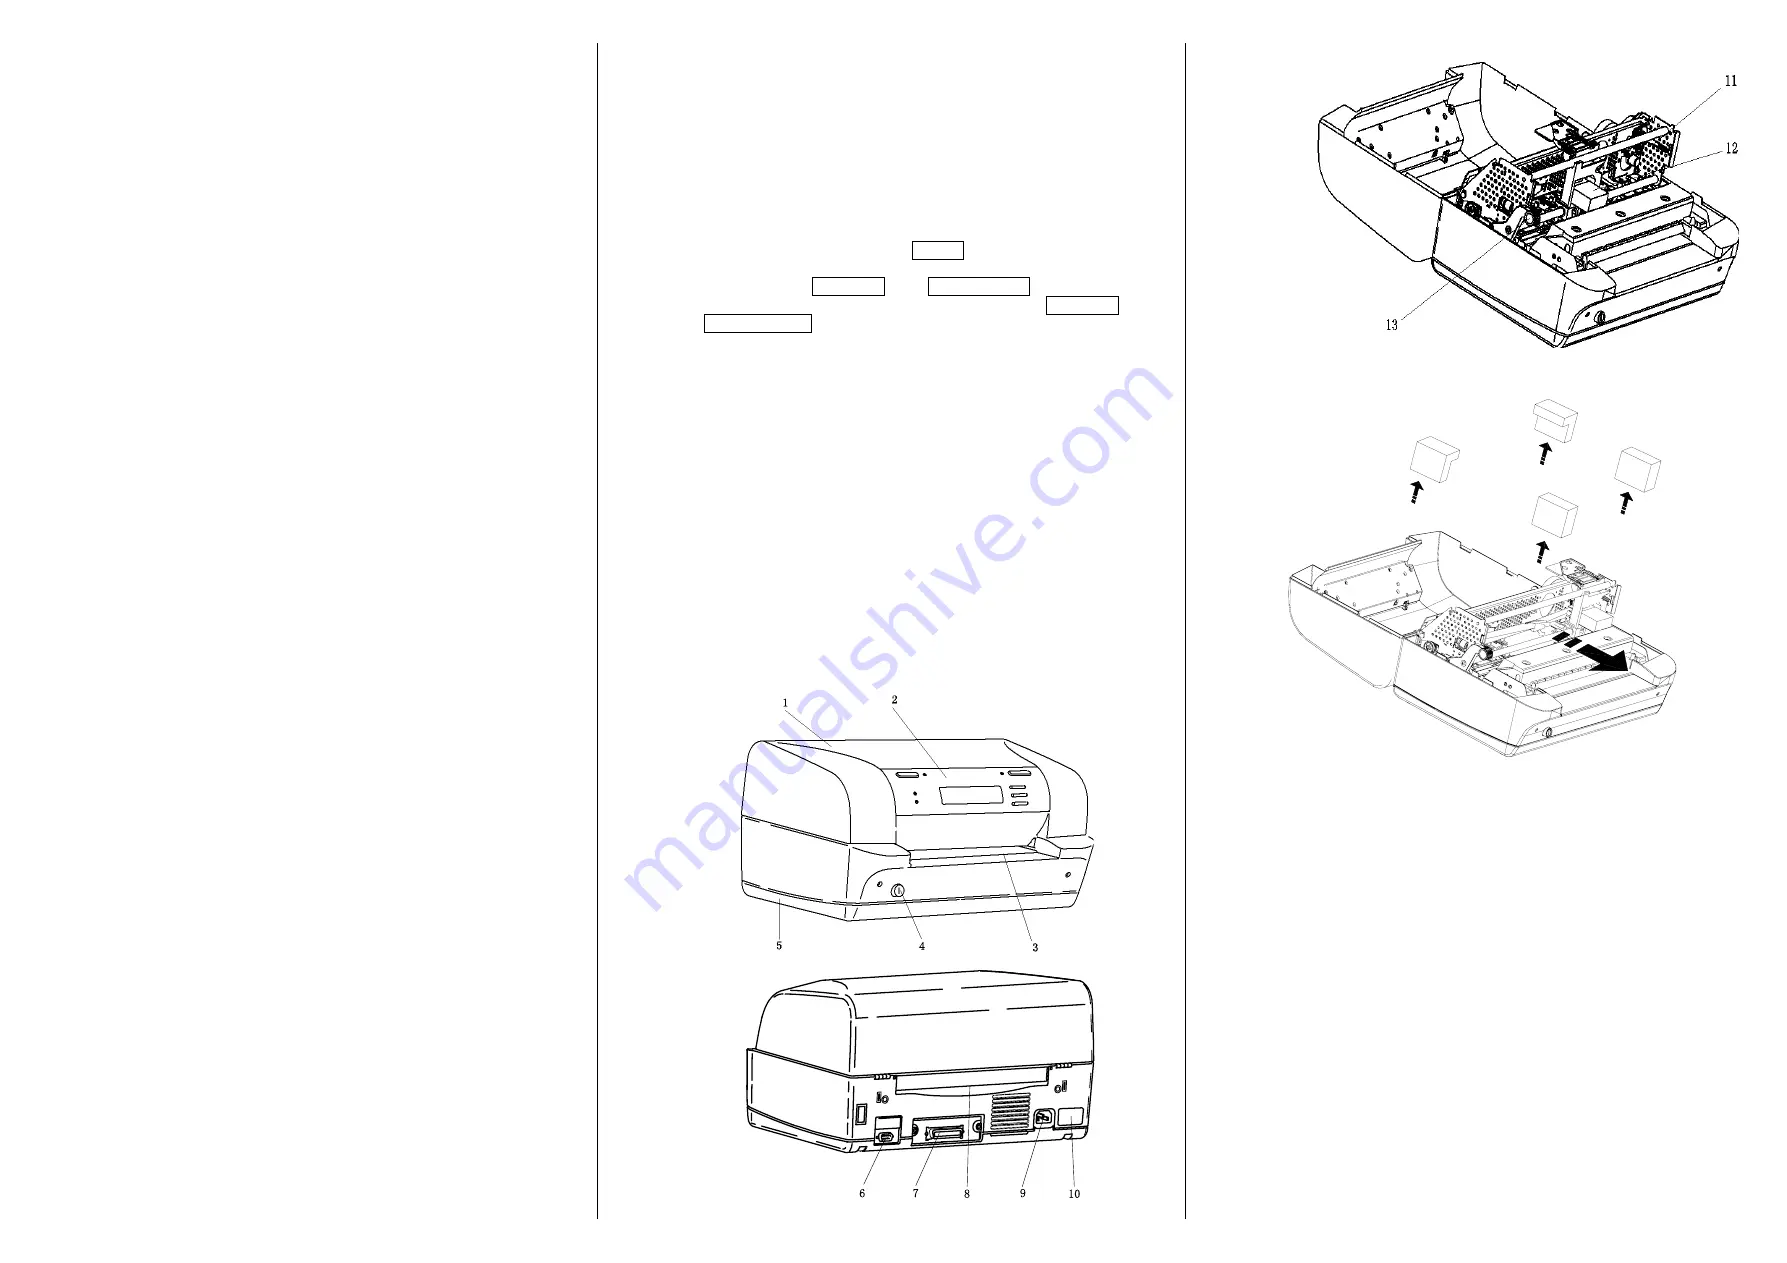
PRINTER SKETCH
·Front appearance
(
refer to figure 1.2-1
)
(
1
)
top cover
(
2
)
operator panel
(
3
)
front paper feeding platform
(
4
)
power switch
(
5
)
bottom frame
·Rear appearance
(
refer to figure 1.2-2
)
(
6
)
serial communication interface connector
(
7
)
option interface board slot
(
8
)
rear paper feeding path
(
9
)
power cord socket
(
10
)
electrical label
·cover opened appearance
(
refer to figure 1.2-3
)
(
11
)
ribbon rotation shaft
(
12
)
print head
(
13
)
print unit lift handle
Figure 1.2-1 Front appearance
Figure 1.2-2 Rear apprearance
Quick Reference Guide PR9
Figure 1.2-3 Cover opened apprearance
REMOVE TRANSPORTATION PROTECTION CLIP
OPEN TOP COVER
Open top cover with about 90 degrees. Be careful not to overexert to avoid
damage of cover gemel.
TAKE OUT THE BLACK IRON CLIP AND RED LABEL.
The black iron clip and red label are on the left side of print head.
TAKE OUT THE FOUR FOAM-RUBBER CUSHIONS WHICH ON THE BOTH
SIDES OF CARRIAGE.
WARNING
:
The black iron clip ,
yellow label and four foam-rubber
cushions must be taken out from carriage belt before
power on printer. Otherwise printer will be damaged.
Please keep the clip for future use.
ENVIRONMENTAL CONDITIONS
This printer is designed to be installed in a typical office environment. We claim
that customer must follow these operation explanation as below for printer’s well
working status and safety of operator:
Make sure that the electrical wall outlet to which the printer is connected has a
valid ground and that it is able to supply the power needed by the machine. A
wall outlet without ground can cause functional problems and can be a safety
hazard.


