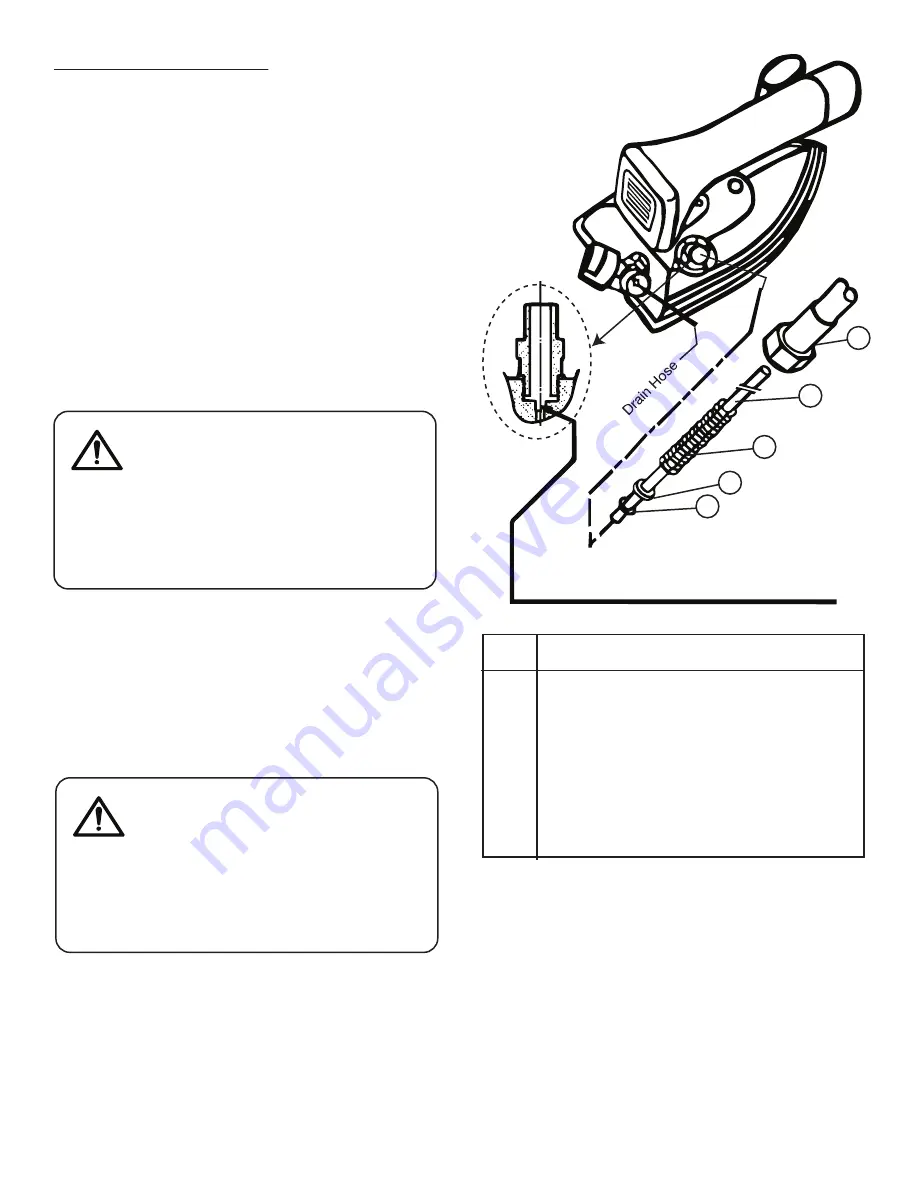
Inside Cross
Section
Insert tip of the Teflon - Hose into this hole.
5. INSTALL & ASSEMBLE
When setting up the iron, be sure also to
read carefully instruction manuals of related
equipment such as the boiler and ironing
table beforehand
5.1 Set Up of Hoses
- 2 (two) hoses for steam-supply and drain are
required for this iron. Please purchase each
exclusive hose.
If the Inner-Tube is needed to avoid drain
water. It is necessary for minor diameter of
internal of the steam-supply hose to be more
than 5mm at the narrowest part (mouthpiece
part).
5.2 Installation of Hoses
CAUTION
Please do not use any other steam
supply hose than the Naomoto Extra-
Hose especially for steam pressure that
does not exceed 0.3 MPa (3 bar). Naoflon hose
should be used for the drain hose. Use of a non-
genuine hose of which proof pressure is not
confirmed may cause malfunction.
Before setting the Special Extra-Hose to the
iron, clean the inside of the hose by washing
out any dust and dirst. To do this, first fix the
Special Extra-Hose to the boiler, then open
the boiler’s steam valve, and steam flow will
wash out dust and dirt.
CAUTION
While the above cleaning work is being
carried out, place a receptacle (like the
NAOMOTO cartridge-type water tank at
the open end of the Extra Hose to catch the flow
of steam gushing out. Do not touch the Hose with
bare hands as it can be extremely hot. In addition,
take care not to get scalded by the gushing steam
No.
Name
1
NAOFLON EXTRA HOSE
2
Inner Tube
(Teflon Hose with Dia. 3-4 mm.)
(Lengthen hose more for more drain water)
3
Hose Joint Spring
4
O-ring Stopper
5
Silicone O-ring (P-4)
When water drops do not come out of the iron
while steaming, above inner tube is not
necessary.
- Installation of the Steam Supply Hose
Insert the inner tube(2) into the hose joint
spring(3), the O-ring stopper(4) and the
O-ring(5), then insert the tube-tip into the
back hole in the steam supply hose joint
of the iron.
1
2
3
4
5


