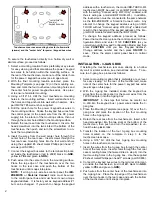
11
1. Put the control panel into Keypad Configuration Mode by
moving the configuration jumper to the bottom two pins
("
CONFIG
" ), located inside the control panel.
2. Using the IBR-TOUCH hardwired tablet, at the Home
Screen tap "
SECURITY
" then "
OTHER OPTIONS
" and
select "
KEYPAD MODE
". After putting the control panel
into Keypad Configuration Mode, it normally takes up to
40 seconds for the keypad on the IBR-TOUCH to read
"out of system". The keypad will display "
01 Out of Sys-
tem RCM MODULE
".
3. Press
1 1 1 2 3
FUNCTION
to enter Keypad Configura-
tion Mode.
4. Tap
FUNCTION
repeatedly until the configuration keypad
displays "
Keypad Address
".
5. Enter the correct address and tap
ON/OFF
to save.
(
Note:
Keypad address will not change until you tap
ON/OFF
).
6. Tap
FUNCTION
repeatedly until the keypad displays
"
Keypad TYPE RP1CAE2
".
7. Tap
INTERIOR
or
INSTANT
to toggle between the key-
pad model names. Either select "
RP1CAE2
" for the
"Classic" keypad type or "
K1CA
" for the "K Style" (Stay/
Away) keypad type. When selected, tap
ON/OFF
or
EN-
TER
to save, and then tap
RESET
to exit.
8. Return the control panel
CONFIG
jumper back to the top
two pins ("
NORM
"). "
System Ready
" should appear
on the keypad if all zones are closed.
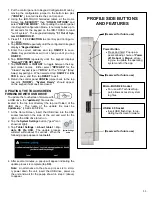
UPDATING THE TOUCHSCREEN
FIRMWARE WITH USB DRIVE
To update the touchscreen firmware with
a USB drive, the "
update.zip
" file must be
located in the top root directory (the top root folder) of the
USB drive. The name of the update file must be
"
update.zip
" (cAsE sEnSiTiVe).
1. At the Home Screen, insert the USB drive into the USB
socket located on the side of the unit and wait for the
light on the USB drive to turn on.
2. Tap the
System Settings
button ("gear" icon,
shown at right).
3. Tap
Tablet Settings
>
About tablet
>
Up-
date OS Via USB
. The update process
will start within about 15 seconds. When the
following popup appears, tap
Install
.
4. After several minutes, a popup will appear indicating the
update process is complete (tap
OK
).
Note:
An alternative to the above process is to simp-
ly power down the unit, insert the USB drive, power up
the unit and wait for the popup shown in step 3 (above)
to appear.
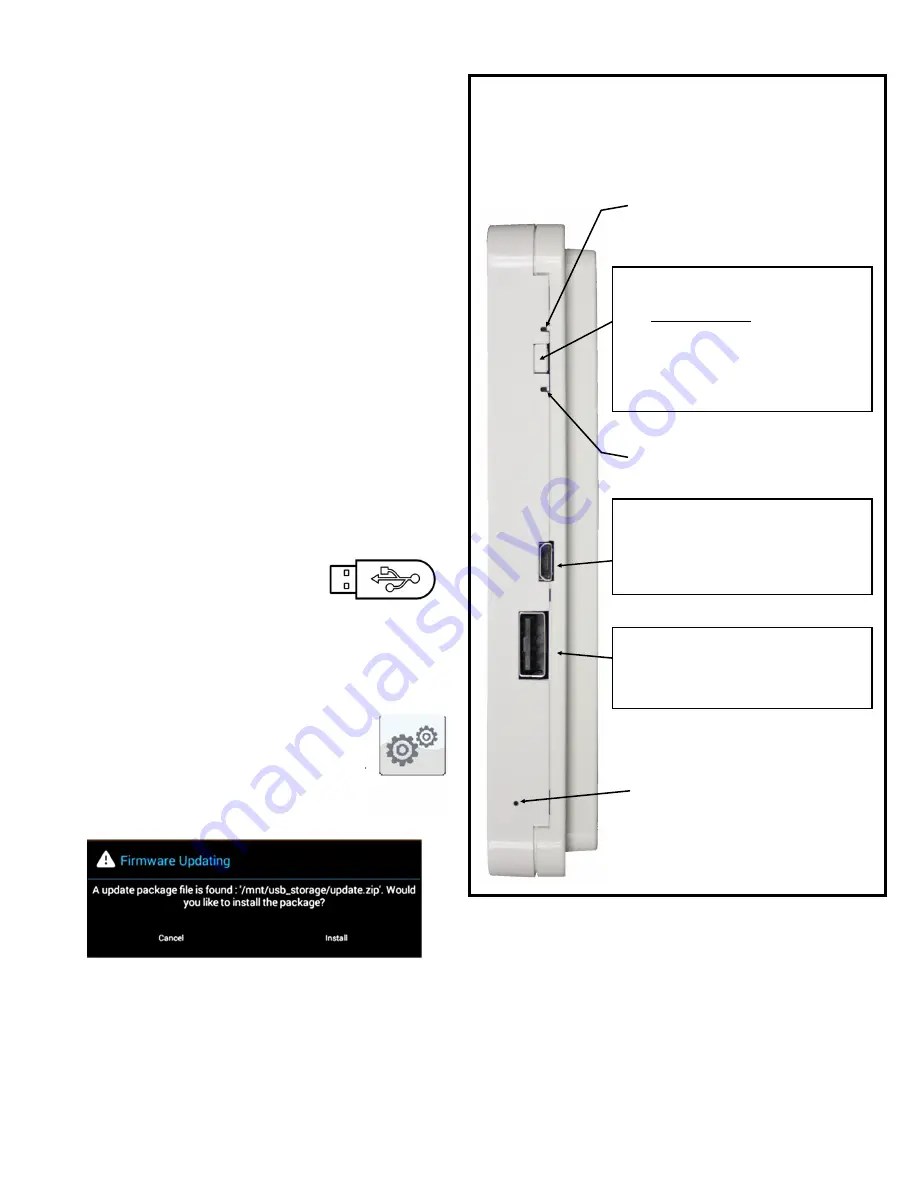
PROFILE SIDE BUTTONS
AND FEATURES
(Reserved for future use)
Power Button
Press and hold: Popup ap-
pears allowing choice of
Power
off
,
Reboot
or
Menu+
, allow-
ing you to update the operating
system and/or the app.
Micro-B USB 2.0 Socket
For use with Technical Sup-
port, allows access to system
log files.
USB-A 2.0 Socket
Insert USB flash drive for up-
dating touchscreen firmware.
(Reserved for future use)
(Reserved for future use)
System Settings
button


