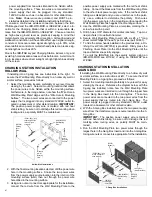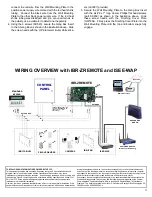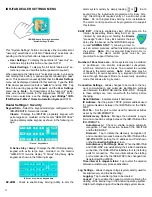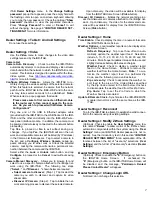
7
ITAB
Dealer Settings
menu. In the
Change Settings
password
popup that appears, press the empty field with
the flashing cursor to open an onscreen keyboard, allowing
you to type the new password. Check the optional "
Show
password
" checkbox to view the populated characters.
Press "
Change Password
" to enter or "
Cancel
" to exit
without changing. See page 6 "
IBR-ITAB DEALER SET-
TINGS MENU
" for more information.
Dealer Settings > Tablet > Android Settings
Do not use these settings.
Dealer Settings > Video
Use the
Video
menu to make changes to the video data
settings received by the IBR-ITAB.
Camera List
Camera Auto Discovery
- Check to allow the IBR-ITAB to
automatically attempt to capture and display video stream
data found within the network to which the IBR-ITAB is con-
nected. This feature is designed to operate within the iSee-
Video system. See
http://www.napcosecurity.com/video.
html
for more information.
Configure Wireless Camera
- Allows the IBR-ITAB to re-
motely change the wireless settings of the selected camera.
When this feature is selected, be aware that the network
path from the IBR-ITAB to the ISEE-WAP and to the cam-
era may take several seconds to be established.
Note:
When selected, a popup appears, that reads:
"
Please make sure to first connect an Ethernet cable
to the router and to then connect power to the cam-
era. Do you wish to proceed with Wireless Camera
Configuration?
"
Plug one end of the USB to Ethernet adapter cable
(provided with the IBR-ITAB) to the USB Socket of the IBR-
ITAB, and the other end directly into the ISEE-WAP wire-
less panel interface module. In addition, the camera must
be powered and wirelessly connected to the network before
proceeding.
Tap
Yes
to proceed or
No
to exit without saving any
changes. If you tap
Yes
, the IBR-ITAB will scan the net-
work and all available cameras will be listed (by IP address)
in the Camera List that appears. Tap to select a camera in
the list, and a
Configure Wireless Camera
popup ap-
pears, allowing you to either Lock or Unlock the selected
camera. Locking the camera will ensure a permanent con-
nection between the camera and the IBR-ITAB.
Select either the
Lock
or
Unlock
radio button, and tap
Configure
to proceed or tap
Cancel
to exit without saving
changes.
Camera Manual Discovery
- Allows you to browse for and
select to use a specific camera attached to the iBridge net-
work using the IBR-ITAB. The following two steps
("
Select
…" and "
Discover
…" shown below are required:
•
Select camera to discover:
(Step 1): Tap to select the
camera you wish to discover and capture its video
stream data.
•
Discover IP Camera:
(Step 2): Tap to initiate the net-
work scanning process to discover the selected camera.
Upon discovery, the video will be available for display
from the IBR-ITAB Home Screen (
Video
button).
Discover All Cameras
- Initiates the network scanning proc-
ess that discovers all cameras attached to the iBridge net-
work. Upon discovery, the video for the discovered cam-
eras will be available for display from the IBR-ITAB Home
Screen (
Video
button).
Dealer Settings > Home
Time Enable
- Check to display the time in a numeric format on
the IBR-ITAB's Home Screen.
Weather Options
- Local weather reports can be displayed on
the Home Screen.
Refresh Frequency:
Tap to set how often to auto-
matically update the weather report feed. Selections
include 5, 10, 15, 20, 30, 40, 50, 70, 80, 90 and 100
minutes. More frequent updates increase data use and
slightly decrease battery life between charges.
Weather Feed:
Check to display a weather report
feed on the Home Screen. Uncheck to remove the
weather feed from the Home Screen.
Note:
To cus-
tomize the weather report feed to a particular Zip
Code, see the following menu entries below.
Zip code entry:
Check to associate the weather re-
port feed to the area of the United States specified
by the Zip Code entered in the field below. Uncheck
to disassociate the weather feed from this Zip Code.
Zip Code:
Tap to set the Zip Code to which the
Weather Feed is associated.
Update Z-Remote Clock
- Synchronizes the IBR-ZREMOTE
module internal clock with the same time as the IBR-
ITAB.
Dealer Settings > Reconnect
Tap for the IBR-ITAB to attempt to establish a valid connec-
tion to the network using its existing settings.
Dealer Settings > Modify Z-Wave Settings
(Optional) Check to enable the
User Settings
menu fea-
ture named "
Z-wave
", to allow control of the Z-Wave home
automation components within the system using the "
User
Settings
" menu (an IBR-ITAB Dealer password is not re-
quired). See the introductory text in this section "
IBR-ITAB
DEALER SETTINGS MENU
" for an explanation of the dif-
ferences between the list of "user-only" selections (
User
Settings
) and the full list of "dealer-only" selections (
Dealer
Settings
).
Dealer Settings > Emergency Button
(Optional) Check to enable the "
E
" (Emergency) button on
the IBR-ITAB Home Screen. If unchecked, the
"
E
" (Emergency) button on the IBR-ITAB Home Screen will
be disabled and the message, "
Permission Denied.
Please Contact Dealer.
" will appear.
Dealer Settings > Change Login URL
Not Used; do not change this selection.


