LIBRA LIB-P432EX Series Programming Instructions
NAPCO Security Systems
Page 8
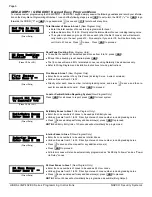
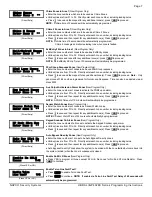
Enable Burg Output Chirp on KeyFob?
•
Press YES ("
r
" or
p
) to enable Burg Output Chirp on Keyfob Arm / Disarm.
•
Press PRIOR ("
X
" or
q
) to continue.
NOTE:
The Burg Output will chirp once on Keyfob Arm and twice on Keyfob Disarm.
Enable SIA CP-01 Features?
•
Press YES ("
r
" or
p
) to enable.
•
Press PRIOR ("
X
" or
q
) to continue.
The SIA CP-01 Features are designed to reduce the incidence of false alarms.
NOTE:
Do not
enable unless reporting, otherwise system trouble
Fail to Communicate
may occur.
Number of Keypads in Area 1
•
Enter the total number of Keypads to be installed in Area 1.
•
Valid entries are from 01 to 07. Directly enter the number of keypads, including leading zeros.
Press
u
to save. Press YES ("
r
" or
p
) to proceed.
NOTE:
Area 2-4 keypads must be assigned in Direct Address Programming. See Keypad Options.
Central Station Receiver 1 Telephone Number
•
Enter telephone number of up to 16 digits.
•
Press
1
through
9
for digits 1–9;
G0
for a zero and
0
for a blank (•).
•
Press
G1
through
G5
for letters B–F, respectively.
•
Pre-Dial Delay = “D” (
G4
); Dial-Tone Detection = “E” (
G5
).
•
Press
u
to save and press YES ("
r
" or
p
) to proceed.
NOTE:
Central Station Receiver 2 and 3 Telephone Numbers must be entered in Direct Address
Programming. See CS Receiver Options.
Central Station Receiver 1 Account Number
•
Enter an account number of up to four digits.
•
Press
0
through
9
for digits 0–9, and
G0
for a blank (•).
•
Press
u
to save and press YES ("
r
" or
p
) to proceed.
NOTE:
Central Station Receiver 2 and 3 Account Numbers
must be entered in Direct Address Programming. See CS
Reporting Options.
Central Station Receiver 1 Format
•
From the table at the right enter the receiver format.
•
Press
0
through
9
, and
G0
for blank (•).
•
Press
G1
through
G4
for letters B–E.
•
Press
u
to save and press YES ("
r
" or
p
) to proceed.
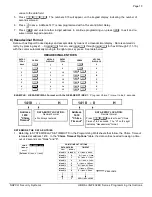
Enter User Codes
(Press
w
to set cursor.)
For default program, enter up to 64 User Codes, with Area 1, 2, 3 & 4 Options.
•
Press the (
w
) button once to set the cursor to the User Code.
•
Press
0
through
9
to enter a code from 3 to 6 digits, leave blank (•) any trailing boxes.
•
Press
w
to set the cursor to the Area 1 Options Level. Refer to the table below for available options. For Area 2 Options, press the
w
button once again. For Area 3 & 4 Options, press
w
a third and fourth time.
•
If “Enable Global Ambush Code” (Address 1422) is enabled and “Global Ambush Code” (Address 2045) is
not
left blank (•),
do not
program the
first two digits of ANY User Code the same as the “Global Ambush Code”. See Address 2045 further in this manual for more information.
•
Press
u
to save.
Note:
Duplicate User Codes are not allowed; therefore a duplicate Code entered in the LCD Window will erase when
u
is
pressed. To proceed to the next User Code, press
w
to set the cursor to the User Number and change it using the number buttons. Press
YES ("
r
" or
p
) to proceed.
(Direct Entry)
Centr al Phone #
(Direct Entry)
Central Station
Account # (____)
DATA
ENTRY
CS RECEIVER 1 FORMAT
•
(blank)
Ademco Slow, Silent Knight
Slow
2
Radionics Fast
3
Silent Knight Fast
4
Radionics, DCI, Franklin Slow
5
Universal High Speed
B
SIA
C
Ademco Point ID
E
Pager
(Direct Entry)
S e e W I f o r I n f o
R c v r F o r m a t ( 0 )
E n t e r u s e r c o d e - >
U 0 1 1 2 3 - 9 -
User# User Code Area 1 Area 2
Example:
Program a code of “2222” for user
02, with area 1 options of “Arm/Disarm” and
“User Program”. Enter “2222” for a user code,
“• (blank) 9” for area 1 options and “• (blank) •
(blank)” for area 2 options.
(Direct Entry)
# Are a 1 Keypad s
Enter # KPs 0 1
(Press YES or NO)
Enable SIA CP-01?
Y/N
(Press YES or NO)
Enable Burg Out
Chirp? Y/N
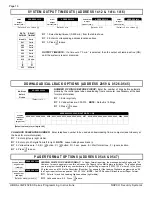
USER AREA OPTIONS
DATA ENTRIES
L
R
blank(•)
blank(•)
Disabled
blank(•)
1
Arm/Disarm
blank(•)
2
Arm Only
blank(•)
3
Service
blank(•)
4
Access
blank(•)
5
Ambush
blank(•)
Add 8
* User Program
4
blank(•)
Bypass Enable
OPTION
ENABLED
USER OPTIONS
USER CODE
(UP TO 6 DIGITS)
AREA 1
OPTIONS
AREA 2
OPTIONS
AREA 3
OPTIONS
AREA 4
OPTIONS


