background image

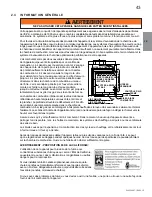
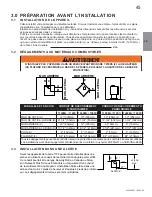
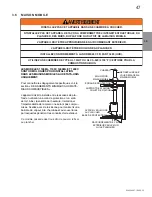
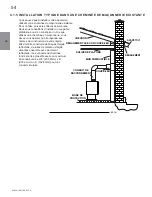
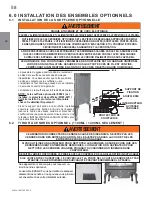
NE JAMAIS INSTALLER UN CONDUIT DE RACCORDEMENT À PAROI SIMPLE DANS UNE ENCEINTE. 

LES TEMPÉRATURES PLUS ÉLEVÉES DE CE CONDUIT PEUVENT IRRADIER SUFFISAMMENT DE 

CHALEUR AUX MATÉRIAUX COMBUSTIBLES POUR CAUSER UN INCENDIE.

NE RACCORDEZ PAS CET APPAREIL AU CONDUIT D’UNE CHEMINÉE DESSERVANT UN AUTRE 

APPAREIL.

POUR ÉVITER LE RISQUE D'INCENDIE, VOUS DEVEZ SUIVRE TOUTES LES INSTRUCTIONS À LA 

LETTRE, INCLUANT LES DÉGAGEMENTS ENTRE LE SYSTÈME DE CONDUITS ET L'ENCEINTE. AFIN DE 

PROTÉGER LES PIÈCES EXPOSÉES AUX INTEMPÉRIES CONTRE LA CORROSION, NOUS 

CONSEILLONS QUE LE DESSUS DE L'ENCEINTE SOIT PEINT AVEC UNE PEINTURE ANTIROUILLE. 

NE REMPLISSEZ AUCUN ESPACE CHARPENTÉ AUTOUR DU CONDUIT AVEC DE L’ISOLANT OU TOUT 

AUTRE MATÉRIAU. L’ISOLANT POSÉ DANS CET ESPACE POURRAIT CAUSER LES MATÉRIAUX 

COMBUSTIBLES AVOISINANTS À SURCHAUFFER.

CONSERVEZ UN DÉGAGEMENT MINIMAL DE 2" À TOUTES LES PIÈCES DU SYSTÈME DE CONDUITS 

EN TOUT TEMPS. OMETTRE DE CONSERVER CE DÉGAGEMENT DE 2" CAUSERA UN INCENDIE. NE 

REMPLISSEZ CET ESPACE AVEC AUCUN TYPE DE MATÉRIAU.

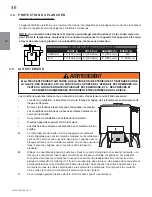
NE COUPEZ PAS DE CHEVRONS NI DE SOLIVES DE PLAFOND SANS AVOIR CONSULTÉ AU 

PRÉALABLE LES AUTORITÉS EN BÂTIMENT POUR VOUS ASSURER QUE L’INTÉGRITÉ DE LA 

STRUCTURE N’EST PAS COMPROMISE.

DES ESPACEURS COUPE-FEU DOIVENT ÊTRE UTILISÉS LORSQUE LE SYSTÈME DE CONDUITS 

TRAVERSE UN PLAFOND/PLANCHER.

LA LONGUEUR TOTALE DE LA COURSE HORIZONTALE NE DEVRAIT PAS EXCÉDER 40 % DE LA 

HAUTEUR DE LA CHEMINÉE À PARTIR DU DESSUS DU POÊLE. TOUTES LES COURSES 

HORIZONTALES DOIVENT AVOIR UNE PENTE MINIMALE VERS LE HAUT DE 1/4” PAR PIED ET TOUS 

LES RACCORDEMENTS DOIVENT ÊTRE SCELLÉS ET FIXÉS PAR TROIS VIS AUTOPERCEUSES 

ESPACÉES ÉGALEMENT. UN TUYAU DE RACCORDEMENT NON ISOLÉ NE DOIT PAS TRAVERSER UN 

GRENIER, UN ENTRETOIT, UN PLACARD OU AUTRE ENDROIT DISSIMULÉ, OU TRAVERSER UN 

PLANCHER, UN PLAFOND, UN MUR OU UNE CLOISON, OU TOUTE AUTRE CONSTRUCTION 

COMBUSTIBLE.

N’UTILISEZ AUCUN MATÉRIAU DE FORTUNE DURANT L’INSTALLATION.

!

AVERTISSEMENT

W415-1467 / 04.23.15

FR

 49

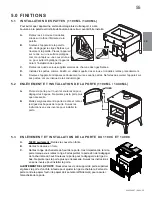
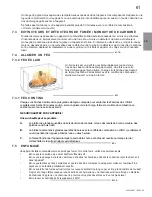
4.1 CHEMINÉE

Votre appareil peut être raccordé à une cheminée de maçonnerie ou préfabriquée. Si vous utilisez une chemi-
née préfabriquée, elle doit se conformer aux normes ULCS629 (au Canada) ou UL103 (É.-U.). Elle doit donc 
être de type 6” HT (2100 °F).  Il est extrêmement important qu’elle soit installée selon les spéci

fi

 cations du 

fa-bricant. Les directives d’installations du fabricant et les dégagements spéci

fi

 és doivent toujours être respec-

tés en fonction des normes locales et nationales. Conformez-vous aux codes d’installation CSA B365 et CSA 
C22.1 au Canada et aux codes ANSI NFPA 70 et ANSI NFPA 211 aux États-Unis.

La cheminée et le conduit de raccordement doivent être gardés en bonne condition et propres.

Summary of Contents for 1100ML

Page 1: ...firebricks Do not use an elevated grate or otherwise raise the fire At least 14 square inches 90 3 square centimeters of outside air must be admitted to the room or directly to the unit through a 4 10...

Page 2: ...OVAL INSTALLATION 1100ML 1400ML 19 5 3 1100C 1400C DOOR REMOVAL INSTALLATION 19 5 4 1400C CAST LID LEVELLING 20 5 5 DOOR HANDLE INSTALLATION 20 5 6 BRICKS AND BAFFLES INSTALLATION 21 6 0 OPTIONAL KIT...

Page 3: ...OPTIONAL BLOWER KIT INSTALLATION section Ash drawer see OPTIONAL ASH DRAWER KIT section Door see DOOR AND HANDLE INSTALLATION section Draft see AIR CONTROL section 1400PL ILLUSTRATED Rating Plate see...

Page 4: ...appliance must not be connected to a chimney flue pipe servicing a separate solid fuel burning appliance Do not operate the appliance with the glass door removed cracked or broken Replacement of the...

Page 5: ...E 32 813mm 28 1 2 724mm 32 813mm 28 1 2 724mm CHAMBER D W H 13 1 2x18x12 13 1 2x18x12 18x18x12 18x18x12 CAPACITY 1 7ft3 0 5m3 1 7ft3 0 5m3 2 25ft3 0 7m3 2 25ft3 0 7m3 APPROX AREA HEATED 600 1500 ft2 6...

Page 6: ...ure DURING THIS PROCESS DO NOT OVERFIRE THE APPLIANCE REDUCE THE AMOUNT OF AIR COMING INTO THE APPLIANCE IF THE APPLIANCE OR CHIMNEY BECOMES RED 4 7 ALL WIRING SHOULD BE DONE BY A QUALIFIED ELECTRICIA...

Page 7: ...ustion chamber is lined with high temperature firebrick on 2 sides the back and across the bottom with a layer of fibre baffles at the top to maintain a high temperature in the combustion chamber so t...

Page 8: ...EZ SEULEMENT DANS UN FOYER COMBUSTIBLE SOLIDE NE RETIREZ PAS DE MORTIER NI BRIQUES DU FOYER COMBUSTIBLE SOLIDE INSTALLEZ AVEC UNE GAINE CONFORME ET UNE PLAQUE DE RECOUVREMENT CONTACT LOCAL BUILDING FI...

Page 9: ...IGHT WARNING BACK WALL B SIDE WALL A BACK WALL C SIDE WALL F D E E PARALLEL CORNER SINGLE WALL CONNECTOR DOUBLE WALL CONNECTOR 1100ML 1100C 1400ML 1400C 1100ML 1100C 1400ML 1400C SIDEWALL A 12 305mm 1...

Page 10: ...back must be covered with sheet metal to avoid cold air spillage into the room A cover plate is available from your Wolf Steel Ltd dealer Avoid cutting away floor joists wall studs electrical wires o...

Page 11: ...imney and outside air pipe penetrations This model is equipped with holes so that the appliance can be bolted securely to the floor DO NOT INSTALL IN SLEEPING ROOM THE STRUCTURAL INTEGRITY OF THE MOBI...

Page 12: ...UCE THE POSSIBILITY OF APPLIANCE SMOKING OR AIR FLOW REVERSAL THE OUTSIDE AIR INLET MUST REMAIN CLEAR OF LEAVES DEBRIS ICE AND OR SNOW IT MUST BE UNRESTRICTED WHILE APPLIANCE IS IN USE TO PREVENT ROOM...

Page 13: ...ED FIRESTOP SPACERS MUST BE USED WHENEVER THE CHIMNEY PENETRATES A CEILING FLOOR AREA THE TOTAL HORIZONTAL VENT LENGTH SHOULD NOT EXCEED 40 OF THE CHIMNEY HEIGHT ABOVE THE STOVE ALL HORIZONTAL SMOKE P...

Page 14: ...10 2m to 3m In the case of vertical installation the total length of the connector can be longer and connected without problem to the chimney at the ceiling level There should never be more than two 9...

Page 15: ...3 feet 1m above its point of contact with the roof and at least 2 feet 0 6m higher than any wall roof building or obstacle within 10 feet 3m horizontally 59 1B 3 FT 1m MIN 3 FT 1m MIN 10 FT 3m OR MORE...

Page 16: ...ling that the chimney passes through If your chimney system is enclosed within the attic area a rafter radiation shield is required C Hold a plumb bob from the underside of the roof to determine where...

Page 17: ...for any specific requirements Consult with your dealer regarding special connection components available for use for wall pass throughs Use only parts that have been tested and listed for use in a wal...

Page 18: ...built in compliance with the specifications of the Building Code in your region It must normally be lined with fire clay bricks metal or clay tiles sealed together with fire cement Round flues are th...

Page 19: ...ance up on its legs as this could result in damage to the legs 5 0 FINISHING PINS A Pivot the door open and lift up to clear the bushings Do not pivot the door any further than necessary B Carefully s...

Page 20: ...T WARNING 5 4 1400C CAST LID LEVELLING A Loosen the clinching nut 4 places B Tighten or loosen the levelling screw in the adjusting nut C Tighten the clinching nut LEVELLING SCREW ADJUSTING NUT CLINCH...

Page 21: ...RICKS AND BAFFLES INSTALLATION OPERATION OF THE APPLIANCE WITHOUT THE BAFFLES CAN RESULT IN EXCESSIVE TEMPERA TURES THAT COULD DAMAGE THE APPLIANCE CHIMNEY AND THE SURROUNDING ENCLOSURE WARNING 1100ML...

Page 22: ...RD BOXES DUMP IN BACK YARDS OR STORE IN GARAGES IF USING A VACUUM TO CLEAN UP ASHES BE SURE THE ASHES ARE ENTIRELY COOLED USING A VACUUM TO CLEAN UP WARM ASHES COULD CAUSE A FIRE INSIDE THE VACUUM NEV...

Page 23: ...logs that result in a smouldering inefficient fire and dirty glass As soon as the door is closed you will observe a change in the flame pattern The flames will get smaller and lazier because less oxy...

Page 24: ...ed by the fire which can be measured by an appliance thermometer Adjusting the air control regulates the temperature The draft can be adjusted from a low burn rate with the handle in fully to a fast b...

Page 25: ...91 1A All homes with a solid fuel burning appliance should have at least one fire extinguisher in a central location known to all at least one smoke detector and carbon monoxide CO detector in the roo...

Page 26: ...sh well Since some models will not have ash pans shovel some ashes out through the door into a metal container with a tight fitting lid The ashes should be retained in the closed container until all c...

Page 27: ...ng another fire Also check combustibles around the chimney and the roof WARNING A CHIMNEY FIRE CAN PERMANENTLY DAMAGE YOUR CHIMNEY SYSTEM THIS DAMAGE CAN ONLY BE REPAIRED BY REPLACING THE DAMAGED COMP...

Page 28: ...ASS UNTIL COOLED CARE MUST BE TAKEN WHEN REMOVING AND DISPOSING OF ANY BROKEN DOOR GLASS OR DAMAGED COMPONENTS BE SURE TO VACUUM UP ANY BROKEN GLASS FROM INSIDE THE APPLIANCE BEFORE OPERATION DO NOT S...

Page 29: ...ntil the fire is out and do not operate the appliance again until the glass has been replaced available from your Authorized dealer DO NOT SUBSTITUTE MATERIALS 5 3 HOT GLASS WILL CAUSE BURNS DO NOT TO...

Page 30: ...e wood so that it will fit horizontally front to back making for easier loading and less of a likelihood that the wood will roll onto the glass Manufactured firelogs made by compressing 100 natural wo...

Page 31: ...0005 W090 0005 W090 0005 W090 0005 BRICK RIGHT G W090 0016 W090 0016 W090 0016 W090 0016 BRICK H W090 0017 W090 0017 W090 0017 W090 0017 BRICK E W090 0018 W090 0018 W090 0018 W090 0018 BRICK F W090 00...

Page 32: ...T N A ASH DRAWER KIT 34 115KT 115KT 115KT 115KT OUTSIDE AIR KIT 35 N A W470 0020 N A W470 0020 MAJOLICA BROWN ENAMEL TOUCH UP AND BRUSH 36 EP62 1 EP62 1 EP62 1 EP62 1 VARIABLE SPEED BLOWER 37 EPA RK N...

Page 33: ...spect chimney Smokes when door is open Cold air blockage Burn a piece of paper to establish a draft Insufficient draft Add more pipe Let air stabilize before opening door Ensure baffles are positioned...

Page 34: ...APOLEON NAPOLEON reserves the right to have its representative inspect any product or part thereof prior to honouring any warranty claim All parts replaced under the President s Limited Lifetime Warra...

Page 35: ...EN W415 1467 04 22 15 35 43 1 12 0 SERVICE HISTORY...

Page 36: ...T t 8PPE 4UPWFT FBUJOH PPMJOH t MFDUSJD JSFQMBDFT t 0VUEPPS JSFQMBDFT t BT SJMMT JSFQMBDFT FBUJOH PPMJOH DBMM t SJMMT DBMM napoleonproducts com BQPMFPO 3PBE BSSJF 0OUBSJP BOBEB BZWJFX SJWF BSSJF 0OUBS...

Page 37: ...ssence de l huile moteur etc Cet appareil a t con u pour br ler du bois naturel uniquement Ne br lez pas de d chets des r sidus de tonte de pelouse de caoutchouc des produits p troliers r siduels de l...

Page 38: ...1400ML 55 5 3 ENL VEMENT ET INSTALLATION DE LA PORTE DU 1100C ET 1400C 55 5 4 MISE DE NIVEAU DU COUVERT DU 1400C 56 5 5 INSTALLATION DE LA PORTE ET DE LA POIGN E DE PORTE 56 5 6 INSTALLATION DES BRIQU...

Page 39: ...ONNELLE Tiroir cendres voir la section ENSEMBLE DE TIROIR CENDRES OPTIONNEL Porte voir la section INSTALLATION DE LA PORTE ET DE LA POIGN E DE PORTE Retour d air voir la section CONTR LE D AIR 1400PL...

Page 40: ...is e Le remplacement de la vitre devra tre effectu par un technicien de service certifi ou qualifi Ne frappez pas et ne claquez pas la porte vitr e de l appareil Ne faites fonctionner l appareil qu av...

Page 41: ...PI3 2 25 PI3 SURFACE CHAUFF E APPROX 600 1 500 PI2 600 1 500 PI2 1 000 2 000 PI2 1 000 2 000 PI2 D BIT DE CHALEUR MAXIMALE 55 000 BTU Hr 55 000 BTU Hr 70 000 BTU Hr 70 000 BTU Hr D BIT DE CHALEUR 11...

Page 42: ...ALLATION ET SUIVEZ LES LA LETTRE AVERTISSEMENT W415 1467 04 23 15 FR 42 2 3 INSTRUCTIONS G N RALES Avant d installer cet appareil contactez les autorit s locales en b timent ou le service des incendie...

Page 43: ...par l ouverture arri re monte par l arri re le long du tube d air secondaire jusqu au collecteur install au sommet o l air est propuls lat ralement pour oxyder les gaz sous la sortie de fum e La chamb...

Page 44: ...OMBUSTIBLE HEARTH PAD THAT EXTENDS 8 200mm BEYOND THE STOVE SIDES AND BACK AND 18 455mm TO THE FRONT SI LE PO LE EST INSTALL SUR UN PLANCHER COMBUSTIBLE IL DOIT TRE PLAC SUR UNE BASE DE PROTECTION INC...

Page 45: ...23 15 FR 45 3 0 PR PARATION AVANT L INSTALLATION 3 1 INSTALLATION DE L APPAREIL 3 2 D GAGEMENTS AUX MAT RIAUX COMBUSTIBLES PARALL LE ET EN COIN CONDUIT DE RACCORDEMENT PAROI SIMPLE CONDUIT DE RACCORDE...

Page 46: ...tre recouverte d une plaque de m tal afin d emp cher l air froid de se r pandre dans la pi ce Une plaque de recouvrement est disponible chez votre d taillant Wolf Steel lt e vitez de sectionner les so...

Page 47: ...OULONN AU PLANCHER BASE DE PROTECTION RACCORDEMENT DE L AIR EXT RIEUR PAR LE MUR OU LE PLANCHER W415 1467 04 23 15 FR 47 3 6 MAISON MOBILE LES MOD LES 1100ML 1100C 1400ML ET 1400C SONT HOMOLOGU S POUR...

Page 48: ...DE LA PRISE D AIR DOIT DEMEURER D GAG E DE FEUILLES DE D BRIS DE GLACE OU DE NEIGE ELLE DOIT TRE D GAG E LORSQUE L APPAREIL FONCTIONNE AFIN QUE LA PI CE NE SOIT PAS PRIV E D AIR CE QUI PEUT CAUSER DES...

Page 49: ...DOIVENT TRE UTILIS S LORSQUE LE SYST ME DE CONDUITS TRAVERSE UN PLAFOND PLANCHER LA LONGUEUR TOTALE DE LA COURSE HORIZONTALE NE DEVRAIT PAS EXC DER 40 DE LA HAUTEUR DE LA CHEMIN E PARTIR DU DESSUS DU...

Page 50: ...ans le conduit de raccordement de l appareil de s couler dans la chambre de combustion Chaque joint du conduit de raccordement doit tre fix l aide d au moins trois vis autoperceuses Les recommandation...

Page 51: ...a toiture et 2 0 6m de tout mur toit ou difice se trouvant l int rieur d une distance horizontale de 10 3 1m 59 1B 3 PI 1m MIN 3 PI 1m MIN 10 PI 3m OU PLUS TOIT PLAT MUR FA TE MOINS DE 10 PIED 3m 2 PI...

Page 52: ...an de protection pour chevrons est requis C Tenez un fil plomb partir du dessous du toit pour d terminer o doit se trouver l ouverture du toit D coupez et charpentez une ouverture dans le toit tout en...

Page 53: ...de raccordement muraux dont vous auriez besoin N utilisez que les pi ces qui ont t test es et certifi es pour des installations travers un mur 61 1A BASE DE PROTECTION TOIT SOLIN DE TOIT COLLET DE SOL...

Page 54: ...re r gion Elle doit tre construite de briques d argile r fractaire de tuiles de m tal ou d argile ciment s ensemble avec du ciment r fractaire Les conduits de chemin e ronds sont les plus efficaces La...

Page 55: ...ouvrir et soulevez la pour d gager les bagues Ne pivotez pas la porte plus que n cessaire B Mettez soigneusement la porte de c t et retirez les tiges des bagues de la porte Suivez les instructions en...

Page 56: ...UVERT DU 1400C A Desserrez l crou rivet 4 endroits B Serrez ou desserrez la vis de nivellement dans l crou de r glage C Serrez l crou rivet VIS DE NIVELLEMENT CROU DE R GLAGE CROU RIVET SUPPORT DE CHA...

Page 57: ...e vacu s de la chambre de combustion C Installez les briques de plancher de l arri re vers l avant de l appareil D Installez les 4 briques devant l ouverture de l appareil NOTE Ne faites pas fonctionn...

Page 58: ...NDIE DANS L ASPIRATEUR NE FAITES JAMAIS FONCTIONNER L APPAREIL AVEC LE COUVERCLE DE LA GRILLE RETIR SI APPLICABLE SI LE JOINT ENTRE L OUVERTURE LE COUVERCLE ET LA PORTE DE LA CHUTE CENDRE N EST PAS TA...

Page 59: ...mier s feu x de l appareil sera seront difficile s partir et maintenir tout en produisant qu un peu de chaleur Ceci est le r sultat de l humidit manant des briques r fractaires Durant la p riode de ro...

Page 60: ...s morceaux de bois d allumage sec Le bois d allumage devrait avoir un diam tre quivalent celui de votre pouce Votre appareil n met pas assez de chaleur Une ou deux choses peuvent causer cela La porte...

Page 61: ...d clenche corrigez la cause mais ne d sactivez pas ou ne relocalisez pas le d tecteur de fum e Si le d tecteur de monoxyde de carbone sonne l alarme d placer imm diatement une r gion qui a l air frais...

Page 62: ...utes les cendres exc dentaires mais laissez une paisseur d un pouce sur le plancher de la chambre de combustion pour aider conserver un lit de braises chaudes NOTE Les tiroirs cendres optionnels ne so...

Page 63: ...CHEMIN E NE SONT PAS COUVERTS PAR LA GARANTIE VIE LIMIT E 86 1 La chemin e et l appareil doivent tre inspect s et nettoy s s il y a lieu au moins une fois l an En cas d utilisation fr quente du chauff...

Page 64: ...saire L cran et le joint du syst me autonettoyant situ s l int rieur de l appareil au dessus de la porte devraient tre inspect s et remplac s s ils sont d t rior s NOTE Ne faites pas fonctionner l app...

Page 65: ...it t remplac e par une nouvelle disponible chez votre d taillant autoris N UTILISEZ PAS DE MAT RIAUX SUBSTITUTS 5 3 UNE SURFACE VITREE CHAUDE PEUT CAUSER DES BR LURES LAISSER REFROIDIR LA SURFACE VITR...

Page 66: ...isque que le bois roule sur la vitre Les b ches artificielles obtenues par la compression de fibre de bois 100 naturelle peuvent tre utilis es sans danger comme combustible N utilisez pas des b ches a...

Page 67: ...D W090 0005 W090 0005 W090 0005 W090 0005 BRIQUE DROITE G W090 0016 W090 0016 W090 0016 W090 0016 BRIQUE H W090 0017 W090 0017 W090 0017 W090 0017 BRIQUE E W090 0018 W090 0018 W090 0018 W090 0018 BRIQ...

Page 68: ...ISE D AIR EXT RIEUR 35 N A W470 0020 N A W470 0020 PEINTURE MAIL POUR RETOUCHES ET PINCEAU SP CIFIEZ LA COULEUR 36 EP62 1 EP62 1 EP62 1 EP62 1 SOUFFLERIE VITESSE VARIABLE 37 EPA RK N A EPA RK N A GARD...

Page 69: ...un morceau de papier journal pour cr er un tirage Tirage insuffisant Ajoutez des conduits Laissez l air se stabiliser avant d ouvrir la porte Assurez vous que les d flecteurs sont bien positionn s Pre...

Page 70: ...arantie vie limit e du Pr sident ne peuvent faire l objet que d une seule r clamation Durant les dix premi res ann es NAPOL ON remplacera ou r parera les pi ces d fectueuses qui sont couvertes par la...

Page 71: ...23 15 FR 71 Date 43 1 Probl mes particuliers Travail effectu Nom du technicien D taillant Historique d entretien Wolf Steel Cet appareil doit tre entretenu annuellement selon son usage 12 0 HISTORIQUE...

Page 72: ...E FBV 1P MFT CPJT t 1SPEVJUT 7 t PZFST MFDUSJRVFT t PZFST FYU SJFVST t SJMT HB EF RVBMJU PZFST IBVGGBHF FU MJNBUJTBUJPO SJMT DPNQPTF napoleonproducts com 3PVUF 5SBOTDBOBEJFOOF POUS BM 2V CFD 5 BQPMFPO...

Reviews: