background image

7

W415-0762 / A / 07.19.10

2.4 GENERAL 

INFORMATION

DO NOT OPERATE THIS APPLIANCE WITHOUT THE LEGS INSTALLED.

!

WARNING

Your appliance has been specifi cally designed over many months of research to meet the 1990 U.S.A. EPA particulate 
emission standards and have been extensively tested in Canadian and American laboratories. This system is the most 
effi cient, simple and trouble free we know and works as follows:

The chimney vent system used on your wood burning appliance should be designed with the least amount of 
restriction possible to enable the exhaust products to easily fl ow through it.  Chimney vent systems that are 
too short or too long can also have an adverse affect on the fl ow of exhaust through it.  The wood burning 
appliance and chimney vent system also require a suffi cient supply of combustion air not only to support the 
combustion in the combustion chamber but to replace the exhaust leaving it so it can fl ow freely up through 
the vent system and out into the atmosphere.  It is the correct balance of combustion air and the chimney vent 
system that will ensure the appliance provides you with its optimum performance.

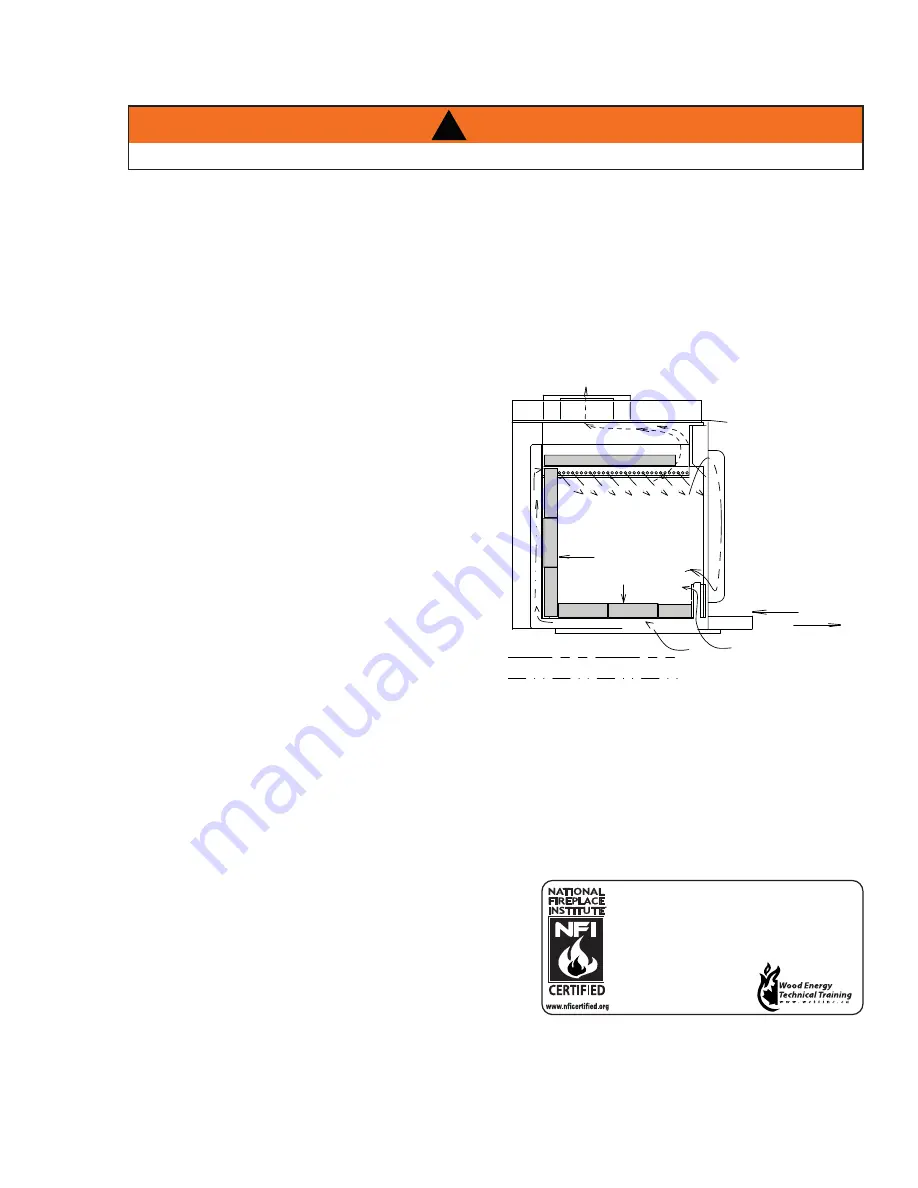
Combustion air enters through two holes in the bottom 
covered by a single draft control. Air from the front hole 
goes up on either side of the door into a preheating airwash 
located across the top and then down the window to feed 
the fi re and also to ensure that the glass remains clean. 
Air from this hole also feeds directly into the combustion 
chamber at hearth level. Secondary air from the rear hole 
travels up the back in the secondary air housing to the 
manifold located at the top and shoots out laterally to oxidize 
the gases below the smoke exit.

The combustion chamber is lined with high temperature 
fi rebrick on 2 sides, the back and across the bottom, 
with a layer of fi bre baffl es at the top to maintain a high 
temperature in the combustion chamber so that gases 
mixing with the preheated air from the secondary air 
manifold tube are easily ignited and burned. The appliance 
sides and back are shielded to direct the heat upwards and forwards into the room.

Be sure to provide suffi cient combustion air. There are many other appliances in your home competing for air such as: 
a kitchen range hood, forced air heating devices or a bathroom exhaust fan. 

Expansion / contraction noises during heating up and cooling down cycles are normal and to be expected.

After extended periods of non-operation such as following a vacation or a warm weather season, the appliance may 
emit a slight odour for a few hours. This is caused by dust particles on the fi rebox burning off. Open a window to 
suffi ciently ventilate the room.

CALIFORNIA PROP 65 WARNING:

Use of this product may produce smoke which contains 
chemicals known to the State of California to cause cancer, birth 
defects, or other reproductive harm.

If optional ash drawer is purchased, ensure that the ash dump 
door is tightly closed, allow the door to snap shut dislodging 
anything (ashes or pieces of coal) that may be stuck in the 
opening.

If you experience smoking problems, you may been to open a door, a window or otherwise provide some method of 
supplying combustion air to the appliance.

HOT SECONDARY AIR
FIBRE BRICKS
REFRACTORY

2 SIDES, BACK
& BOTTOM

SECONDARY AIR

PRIMARY AIR

FLUE GLASS

CERAMIC
GLASS

AIR CONTROL

COMBUSTION AIR
INTAKE

OPEN

CLOSED

We suggest that our woodburning hearth products 

be installed and serviced by professionals who are 

certified in the U.S. by the National Fireplace 

Institue® (NFI) as NFI Woodburning Specialists or 

who are certified in Canada by 

Wood Energy Technical 

Training (WETT).

Summary of Contents for 1100PL

Page 1: ...al building or fire authority and follow their guidelines Operate only with the door tightly closed Burn wood behind the log retainer directly on the firebricks Do not use an elevated grate or otherwi...

Page 2: ...TION 1100PL 1400PL 19 5 2 DOOR REMOVAL INSTALLATION 1100PL 1400PL 19 5 3 1100C 1400C DOOR REMOVAL INSTALLATION 19 5 4 1400C CAST LID LEVELLING 20 5 5 DOOR HANDLE INSTALLATION 20 5 6 BRICKS AND BAFFLES...

Page 3: ...OVERVIEW Legs see LEG INSTAL LATION section Blower see OPTIONAL BLOWER KIT INSTAL LATION section Ash drawer see OPTIONAL ASH DRAWER KIT section Door see DOOR AND HANDLE INSTALLATION section Draft see...

Page 4: ...o circumstances should this appliance be modified This appliance must not be connected to a chimney flue pipe servicing a seperate solid fuel burning appliance Do not operate the appliance with the gl...

Page 5: ...4 12 3 4 14 HEIGHT LEG MODEL E 32 28 1 2 32 28 1 2 CHAMBER D W H 13 1 2x18x12 13 1 2x18x12 18x18x12 18x18x12 CAPACITY 1 7ft3 1 7ft3 2 25ft3 2 25ft3 APPROX AREA HEATED 600 1500 ft2 600 1500 ft2 1000 20...

Page 6: ...re DURING THIS PROCESS DO NOT OVERFIRE THE APPLIANCE REDUCE THE AMOUNT OF AIR COMING INTO THE APPLIANCE IF THE APPLIANCE OR CHIMNEY BECOMES RED 4 7 ALL WIRING SHOULD BE DONE BY A QUALIFIED ELECTRICIAN...

Page 7: ...stion chamber is lined with high temperature firebrick on 2 sides the back and across the bottom with a layer of fibre baffles at the top to maintain a high temperature in the combustion chamber so th...

Page 8: ...MINIMUM CLEARANCE OF 18 457mm TO THE CHIMNEY CONNECTOR MAY BE REQUIRED BY THE AUTHORITY HAVING JURISDICTION RENSEIGNEZ VOUS AUPR S DESAUTORIT S LOCALES DU B TIMENT ET DU SERVICE DES INCENDIESAU SUJET...

Page 9: ...FEET CEILING OF ENCLOSURE TO APPLIANCE BOTTOM EXCLUDING HEARTH HEIGHT WARNING BACK WALL B SIDE WALL A BACK WALL C SIDE WALL F D E E PARALLEL CORNER SINGLE WALL CONNECTOR DOUBLE WALL CONNECTOR 1100PL...

Page 10: ...xhaust house air The house has tight fitting windows and or is equipped with a well sealed vapour barrier 3 5 1 Connection from the appliance s air intake to the outside is mandatory in mobile homes o...

Page 11: ...licone to maintain a vapour barrier at the chimney and outside air pipe penetrations DO NOT INSTALL IN SLEEPING ROOM THE STRUCTURAL INTEGRITY OF THE MOBILE HOME FLOOR WALL AND CEILING ROOF MUST BE MAI...

Page 12: ...E THE POSSIBILITY OF APPLIANCE SMOKING OR AIR FLOW REVERSAL THE OUTSIDE AIR INLET MUST REMAIN CLEAR OF LEAVES DEBRIS ICE AND OR SNOW IT MUST BE UNRE STRICTED WHILE APPLIANCE IS IN USE TO PREVENT ROOM...

Page 13: ...MISED FIRESTOP SPACERS MUST BE USED WHENEVER THE CHIMNEY PENETRATES A CEILING FLOOR AREA THE TOTAL HORIZONTAL VENT LENGTH SHOULD NOT EXCEED 40 OF THE CHIMNEY HEIGHT ABOVE THE STOVE ALL HORIZONTAL SMOK...

Page 14: ...to 10 In the case of vertical installation the total length of the connector can be longer and connected without problem to the chimney at the ceiling level There should never be more than two 90 elb...

Page 15: ...ney must extend at least 3 feet above its point of contact with the roof and at least 2 feet higher than any wall roof building or obstacle within 10 feet horizontally 59 1A 3 FT MIN 3 FT MIN 3 FT MIN...

Page 16: ...hat the chimney passes through If your chimney system is enclosed within the attic area a rafter radiation shield is required C Hold a plumb bob from the underside of the roof to determine where the o...

Page 17: ...or any specific requirements Consult with your dealer regarding special connection components available for use for wall pass throughs Use only parts that have been tested and listed for use in a wall...

Page 18: ...you are using a masonry chimney it is important that it be built in compliance with the specifications of the Building Code in your region It must normally be lined with fire clay bricks metal or clay...

Page 19: ...n all four legs Do not pivot appliance up on its legs as this could result in damage to the legs 5 0 FINISHING 5 2 DOOR REMOVAL INSTALLATION 1100PL 1400PL PINS 5 2 1 Pivot the door open and lift up to...

Page 20: ...E DOOR WHEN THE APPLIANCE IS HOT WARNING DOOR HANDLE NUT DOOR HANDLE LATCH LOCK WASHER DOOR SPACER SPRING WASHER FRONT VIEW NOTE Position of door handle latch NOTE DOOR MAY NOT BE AS ILLUSTRATED 5 4 1...

Page 21: ...the rear of the firebox leaving a minimum of a 1 gap along the front This will allow the flue gases to escape the firebox 5 6 3 Install the 4 bricks along the front NOTE Do not operate if baffle and...

Page 22: ...ows for convenient removal of excess ash This kit can be purchased through your authorized dealer distributor 6 0 OPTIONAL KIT INSTALLATIONS IMPROPER DISPOSAL OF ASHES RESULT IN FIRES DO NOT DISCARD A...

Page 23: ...liance will perform normally During the break in period the first 2 or 3 fires create only small hot fires using kindling this will allow the firebrick to cure Do not be alarmed if small hairline crac...

Page 24: ...ppliance ensure that the two upper fibre baffles are not lifted up and off their ledge For maximum efficiency when the appliance is thoroughly hot load it fully to the top of the door opening and burn...

Page 25: ...installed appliance should not smoke If yours does check the following Has the chimney had time to get hot Is the smoke passage blocked anywhere in the appliance chimney connector or chimney Is the r...

Page 26: ...CREOSOTE FORMATION AND REMOVAL 8 1 1 APPLIANCES WITHOUT ASH PAN Since some models will not have ash pans shovel some ashes out through the door into a metal container with a tight fitting lid The ashe...

Page 27: ...ct the chimney for stress and cracks prior to lighting an other fire Also check combustibles around the chimney and the roof A CHIMNEY FIRE CAN PERMANENTLY DAMAGE YOUR CHIMNEY SYSTEM THIS DAMAGE CAN O...

Page 28: ...or frame down careful not to scratch the paint 8 5 2 Remove the screws and brackets holding the glass in place Remove all broken glass 8 5 3 Wrap the edges of the new glass with a U shaped strip of fi...

Page 29: ...ntil the fire is out and do not operate the appliance again until the glass has been replaced available from your Authorized dealer DO NOT SUBSTITUTE MATERIALS 5 3 HOT GLASS WILL CAUSE BURNS DO NOT TO...

Page 30: ...the wood will roll onto the glass DO S Build a hot fire Use only dry wood Several pieces of medium sized wood are better than a few big pieces Clean chimney regularly Refuel frequently using medium si...

Page 31: ...5 W090 0005 W090 0005 BRICK 4 RIGHT 6 W090 0016 W090 0016 W090 0016 W090 0016 BRICK 5 7 W090 0017 W090 0017 W090 0017 W090 0017 BRICK 6 8 W090 0018 W090 0018 W090 0018 W090 0018 BRICK 8 9 W090 0019 W0...

Page 32: ...T 34 115KT 115KT 115KT 115KT OUTSIDE AIR KIT 35 N A W470 0020 N A W470 0020 MAJOLICA BROWN ENAMEL TOUCH UP AND BRUSH 36 EP62 1 EP62 1 EP62 1 EP62 1 VARIABLE SPEED BLOWER 37 EPA RK N A EPA RK N A SOLID...

Page 33: ...kage Inspect chimney Smokes when door is open Cold air blockage Burn a piece of paper to establish a draft Insufficient draft Add more pipe Let air stabilize before opening door Ensure baffles are pos...

Page 34: ...ed NAPOLEON neither assumes nor authorizes any third party to assume on its behalf any other liabilities with respect to the sale of this product NAPOLEON will not be responsible for over firing downd...

Page 35: ...35 W415 0762 A 07 19 10 43 1 12 0 SERVICE HISTORY...

Page 36: ...36 W415 0762 A 07 19 10 44 1 13 0 NOTES...

Reviews: