background image

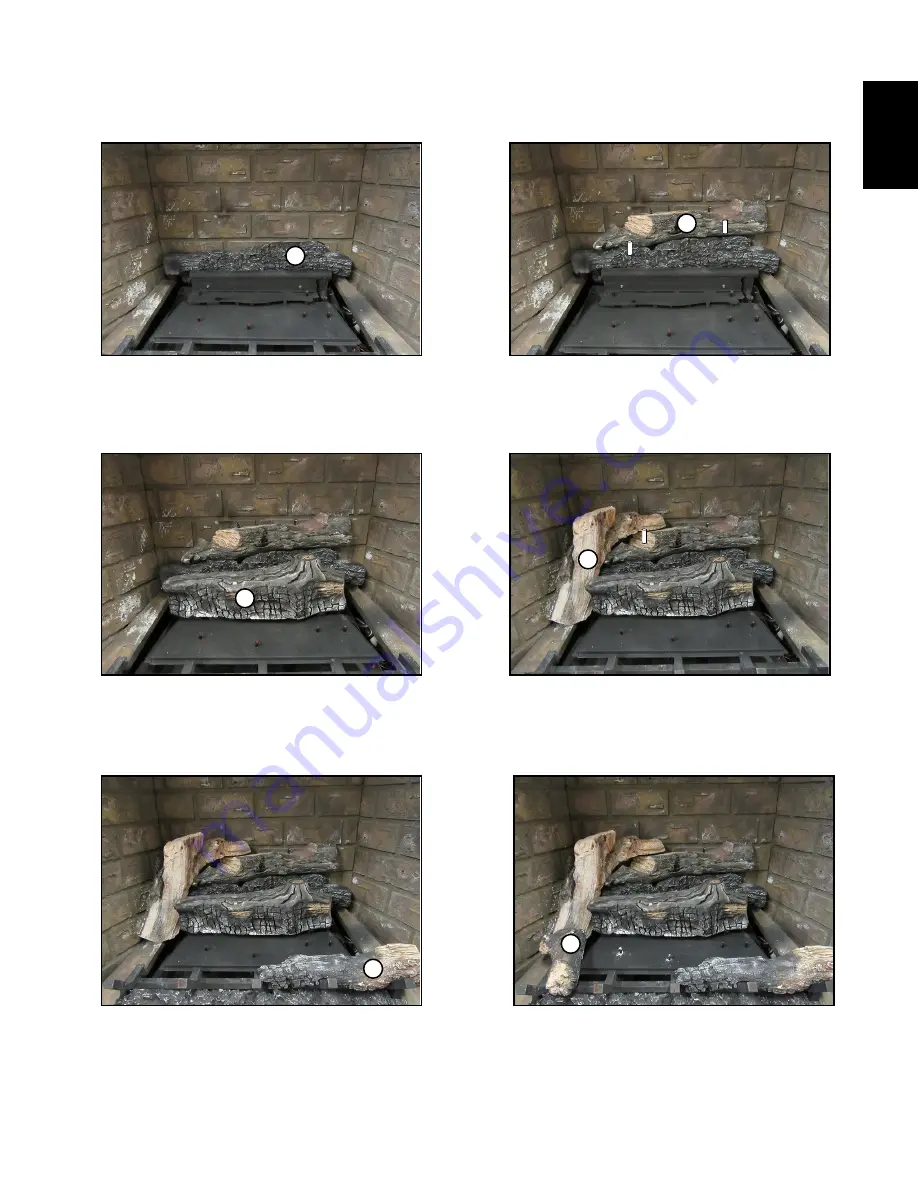
2.5  HEARTH LOG & LOG PLACEMENT

A. 

Align the 2 holes in the bottom of the 

bottom rear log with the studs located 

on the rear log support.

B. 

Align the 2 pins in the bottom of the top 

rear log with the holes in the top of the 

bottom rear log.

C.


Align the 2 holes in the bottom in the 

middle log with the studs located on 

the front log support.

D. 

Align the hole in the rear left log with the 

left pin of the top rear log.

A

B

C

D

E. 

Line the notches in the bottom of the 

front right log with the 4th and 5th grate 

posts. Make sure not to cover any 

ports.

F. 

Line the notch in the front left log with 

the front left corner of the burner.

E

F

5

W415-2193 / A / 10.21.16

EN

Summary of Contents for B35NTL

Page 1: ...your gas supplier call the re department Installation and service must be performed by a quali ed installer service agency or the supplier CERTIFIED FOR CANADA AND UNITED STATES USING ANSI CSA METHOD...

Page 2: ...GENERAL INFORMATION 2 0 INSTALLATION 2 1 ACCESS PANEL 2 2 BURNER ASSEMBLY 1 0 GENERAL INFORMATION 2 2 0 INSTALLATION 2 2 1 ACCESS PANEL 2 2 2 BURNER ASSEMBLY 2 2 3 BULKHEADS 3 2 4 HEARTH PANEL INSTALL...

Page 3: ...Connection Pilot Tube Gas Connection Pilot Electrode Lead Bulkhead 2 3 BULKHEADS B Connect the pilot electrode lead to the bulkhead matching the 3 16 flag with the 3 16 bulkhead spade Do the same with...

Page 4: ...ace When shipped the hearth panel range in varying shades of Sandstone New Port During initial use the panels will darken temporarily The appearance of the panel will permanently lighten in color with...

Page 5: ...rear log C Align the 2 holes in the bottom in the middle log with the studs located on the front log support D Align the hole in the rear left log with the left pin of the top rear log A B C D E Line...

Page 6: ...he notches in the bottom rear log and the front right log pushing back against the rear panel J Align the hole and the pin in the right crossover log with the hole in the top right log K Place the not...

Page 7: ...lite around the charcoal embers NOTE Vermiculite is not to be placed on the burner 2 9 GLOWING EMBERS Tear the embers into pieces and place along the front row of ports covering all of the burner area...

Page 8: ...mmediately allow 15 to 30 minutes for the final flame colour to be established AIR SHUTTER ADJUSTMENT MUST ONLY BE DONE BY A QUALIFIED INSTALLER AIR SHUTTER OPENING VENTURI BURNER ORIFICE 49 2 DRAFT I...

Page 9: ...4 WEEK PERIOD FOR MOST CASES PARTS IDENTIFIED AS SO ARE SPECIAL ORDER AND CAN TAKE UP TO 90 DAYS FOR DELIVERY FAILURE TO POSITION THE PARTS IN ACCORDANCE WITH THIS MANUAL OR FAILURE TO USE ONLY PARTS...

Page 10: ...NUT PAL 3 4 16 UNF 2A REF PART NUMBER DESCRIPTION STOCKED 1 2 W010 3884 SER ASSY GRATE YES YES YES YES YES 3 4 5 W100 0210 SER BURNER COMPLETE 6 W010 3818 ASSY PILOT HIGH TEMP 3 WAY 7 W080 1645 BRACKE...

Page 11: ...BER DESCRIPTION STOCKED 5 4 3 8 2 6 10 1 9 7 10 1 2 W010 3884 SER ASSY GRATE 3 4 5 W100 0210 SER BURNER COMPLETE 6 W010 3818 ASSY PILOT HIGH TEMP 3 WAY 7 W080 1645 BRACKET PILOT SHIELD 8 W010 3996 SER...

Page 12: ...12 W415 2193 A 10 21 16 EN 44 1 5 0 NOTES...

Page 13: ...13 W415 2193 A 10 21 16 EN 44 1...

Page 14: ...laces Outdoor Fireplaces Gas Grills Fireplaces Heating Cooling call 705 721 1212 Grills call 705 726 4278 napoleonproducts com 24 Napoleon Road Barrie Ontario Canada L4M 0G8 214 Bayview Drive Barrie O...

Page 15: ...s d essence ou autres liquides et vapeurs inflammables proximit de cet ap pareil ou tout autre appareil QUE FAIRE SI VOUS D TECTEZ UNE ODEUR DE GAZ N allumez aucun appareil Ne touchez aucun interrupte...

Page 16: ...e appareil 1 0 INFORMATION G N RALE 2 0 INSTALLATION 2 1 PANNEAU D ACC S 2 2 ASSEMBLAGE DU BR LEUR 1 0 INFORMATION G N RALE 16 2 0 INSTALLATION 16 2 1 PANNEAU D ACC S 16 2 2 ASSEMBLAGE DU BR LEUR 16 2...

Page 17: ...s Raccords de gaz Raccord de veilleuse 2 3 RACCORDS B Branchez les fils d lectrode de la veilleuse au raccord en faisant correspondre l embout femelle de 3 16 l embout m le de 3 16 Faites de m me avec...

Page 18: ...panneaux pour les mettre en place La couleur des panneaux exp di s varie de diff rentes teintes de gr s Lors de l utilisation initiale les panneaux fonceront de fa on temporaire pour ensuite p lir de...

Page 19: ...b che inf rieure arri re C Alignez les deux trous du dessous de la b che centrale sur les goujons situ s sur le support b ches avant D Alignez le trou dans la b che arri re gauche sur la tige gauche d...

Page 20: ...de la b che inf rieure arri re et de la b che avant droite appuy e sur le panneau arri re J Alignez le trou et la tige de la b che transversale droite avec le trou de la b che sup rieure droite K Plac...

Page 21: ...n de bois NOTE La vermiculite ne doit pas tre plac e sur le br leur 2 9 BRAISES INCANDESCENTES D faites les braises en morceaux puis placez les le long de la rang e avant des orifices de fa on recouvr...

Page 22: ...DOIT ENVELOPPER LA PARTIE SUP RIEURE DE LA SONDE DE FLAMME DE 3 8 9 5mm 1 2 12 7mm LECTRODE LA SONDE DE FLAMME VEILLEUSE 3 8 1 2 9 5mm 12 7mm L ouverture du volet d air a t pr r gl e en usine selon l...

Page 23: ...FACTURE ORIGINALE SERA REQUISE AFIN DE POUVOIR HONORER LA DEMANDE Lorsque vous commandez des pi ces donnez toujours l information suivante Mod le et num ro de s rie de l appareil Date d installation...

Page 24: ...CROU 3 4 16 PAL 2A UNF ASSEMBLAGE DE GRILLE ASSEMBLAGE DE BR LEUR ASSEMBLAGE DE VILLEUSE BOITIER DE VEILLEUSE ASSEMBLAGE TUBE BR LEUR WELDEMENT N255 0002 SER W432 0543 SER W450 0036 R F NO DE PI CE DE...

Page 25: ...DE GRILLE ASSEMBLAGE DE BR LEUR ASSEMBLAGE DE VILLEUSE BOITIER DE VEILLEUSE ASSEMBLAGE TUBE BR LEUR WELDEMENT N255 0002 SER W432 0543 SER W450 0036 R F NO DE PI CE DESCRIPTION EN STOCK 1 2 W010 3884 S...

Page 26: ...26 W415 2193 A 10 21 16 FR 44 1 5 0 NOTES...

Page 27: ...27 W415 2193 A 10 21 16 FR 44 1...

Page 28: ...s lectriques Foyers ext rieurs Grils gaz de qualit Foyers Chauffage et Climatisation Grils composez 514 737 6294 napoleonproducts com 7200 Route Transcanadienne Montr al Qu bec H4T 1A3 24 Napoleon Roa...

Reviews: