background image

EN

W415-1299 / D / 

12.03.14

FR
PG
33

INSTALLER:  LEAVE THIS MANUAL WITH THE APPLIANCE.

CONSUMER:  RETAIN THIS MANUAL FOR FUTURE REFERENCE.

NEVER LEAVE CHILDREN OR OTHER AT RISK INDIVIDUALS ALONE WITH THE APPLIANCE.

INSTALLATION AND 

OPERATING INSTRUCTIONS

1.16C

Wolf Steel Ltd., 24 Napoleon Rd., Barrie, ON, L4M 0G8 Canada / 

103 Miller Drive, Crittenden, Kentucky, USA, 41030

Phone (705)721-1212 • Fax (705)722-6031 • www.napoleonfi replaces.com • ask@napoleonproducts.com

SAFETY INFORMATION

!

WARNING

If the information in these instructions are 
not followed exactly, a fi re or explosion 
may result causing property damage, 
personal injury or loss of life.

- Do not store or use gasoline or other fl ammable 
vapors and liquids in the vicinity of this or any 
other appliance.


$10.00

CERTIFIED UNDER CANADIAN AND AMERICAN NATIONAL STANDARDS: CSA C22.2 No-46 / UL 2021

BEF33H & BEF40H

ELECTRIC FIREPLACE

Summary of Contents for BEF33H

Page 1: ...enden Kentucky USA 41030 Phone 705 721 1212 Fax 705 722 6031 www napoleonfireplaces com ask napoleonproducts com SAFETY INFORMATION WARNING If the information in these instructions are not followed ex...

Page 2: ...ISHING 16 5 1 GLASS DOOR REMOVAL AND INSTALLATION 16 5 2 BRICK PANEL INSTALLATION AND REMOVAL 17 6 0 MAINTENANCE 18 6 1 LOG GRATE AND EMBER BED ASSEMBLY REMOVAL 18 6 2 LOG AND LOG LED REPLACEMENT 19 6...

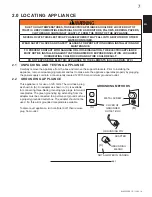
Page 3: ...t from carpeting bedding material etc The appliance area must be kept clear and free from combustible materials gasoline and other flammable vapors and liquids Under no circumstances should this appli...

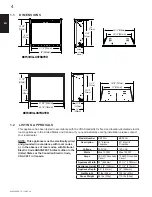
Page 4: ...he Canadian Electric Code CSA C22 1 in Canada Model Number BEF33H BEF40H Description 33 Electric Fireplace 40 Electric Fireplace Voltage 120V AC 120V AC Watts Max 1500W Max 1500W Amps 15 AMP Grounded...

Page 5: ...RNING READ THESE INSTRUCTIONS COMPLETELY BEFORE BEGINNING INSTALLATION FAILURE TO FOLLOW THEM COULD CAUSE AN APPLIANCE MALFUNCTION RESULTING IN SERIOUS INJURY AND OR PROPERTY DAMAGE ALL ELECTRIC APPLI...

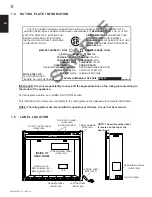
Page 6: ...rating plate according to the model of the appliance For rating plate location see LABEL LOCATION section This illustration is for reference only Refer to the rating plate on the appliance for accura...

Page 7: ...AND SAFETY GLASSES FOR PROTECTION DURING INSTALLATION AND MAINTENANCE TO PREVENT CONTACT WITH SAGGING OR LOOSE INSULATION THE ELECTRIC APPLIANCE MUST NOT BE INSTALLED AGAINST VAPOR BARRIER OR EXPOSED...

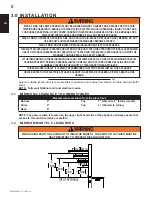
Page 8: ...SORIES NOT SPECIFICALLY TESTED FOR THIS ELECTRIC APPLIANCE COULD VOID THE WARRANTY AND OR RESULT IN A SAFETY HAZARD IF THE INFORMATION IN THESE INSTRUCTIONS IS NOT FOLLOWED EXACTLY A FIRE OR EXPLOSION...

Page 9: ...bed assembly and the glass door to the appliance NOTE In order to avoid the possibility of exposed insulation or vapour barrier coming in contact with the appliance body it is recommended that the wal...

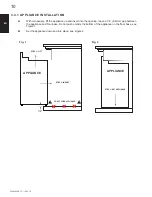
Page 10: ...nce and floor base Do not push or slide the bottom of the appliance on the floor base see Figure 1 B Set the appliance down and into place see Figure 2 MANTEL TABLETTE APPLIANCE APPAREIL STEP 3 SET AP...

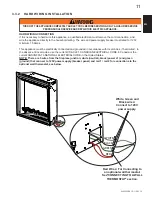
Page 11: ...current ANSI NFPA 70 NATIONAL ELECTRICAL CODE in the United States WARNING TURN OFF THE APPLIANCE COMPLETELY AND LET COOL BEFORE SERVICING ONLY A QUALIFIED SERVICE PERSON SHOULD SERVICE AND REPAIR THI...

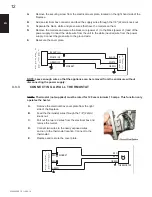
Page 12: ...e from the power supply Connect the green wire to the ground wire E Resecure the cover plate BLACK WHITE BLACK WHITE 4 6 1 1 1 0 8 3 6 5 0 3 1 GREEN GREEN L1 N G MARRET 6 5 0 3 1 MARRET RED RED RED RE...

Page 13: ...ll switch D Run a wire from the wall switch to the power supply E Connect the white wire neutral from the power supply to the white neutral wire coming from the electrical box on the fireplace NOTE Us...

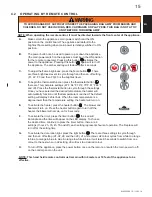
Page 14: ...Control Panel are located on the top front of the appliance as illustrated 4 1 MAIN POWER SWITCH AND CONTROL PANEL POWER SWITCH HEATER FLAME INDICATOR A Turn main power switch ON the flame will be at...

Page 15: ...automatically function until that temperature is reached The default setting will display Fahrenheit When the room temperature is a degree lower than the temperature setting the heater will turn on E...

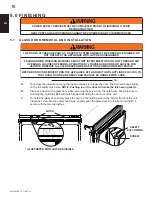
Page 16: ...VED TURN THE APPLIANCE OFF AND WAIT UNTIL APPLIANCE IS COOL TO THE TOUCH DOORS ARE HEAVY AND FRAGILE SO HANDLE WITH CARE 75 1 A To remove the glass door swing the top two latches to release the door T...

Page 17: ...MOVAL A Slide the panels into place and secure it using the 2 screws provided 6 x 3 8 B Ensure the brick panels are positioned appropiately in the unit and are not angled or sticking out from the unit...

Page 18: ...S THAT EXCEED SPECIFIED MAXIMUM WATTS 6 1 LOG GRATE AND EMBER BED ASSEMBLY REMOVAL A Remove the card board holding the logs grate and ember bed assembly to the unit B Pinch the back of the assembly an...

Page 19: ...glass The glass will fall down to 2 holding tabs B Tilt the glass forward on the bottom with both hands lift the glass up and out of the unit C Place the glass on a soft non abrasive surface 6 2 LOG A...

Page 20: ...from the motor B Unplug the quick connect motor wire from the wire harness C Remove the 2 screws holding the motor and take the motor out of the unit 6 6 CONTROL BOARD REPLACEMENT A To prevent stripp...

Page 21: ...ECEIVER THERMOSTAT REPLACEMENT A To replace LED lights in the ember bed flame and or decorative lights disconnect the quick connect plug from the control board and replace with a new one B To replace...

Page 22: ...screws holding the control panel to the bracket E Replace the new control panel plug control panel remote receiver and decorative LED to the control board 6 9 CONTROL PANEL REPLACEMENT FIG 1 CONTROL P...

Page 23: ...ug the wires connected to the heater and blower NOTE Use pliers to pinch the connector free from the heater tabs for easier removal C Remove the 6 screws that secure the heater and blower assembly to...

Page 24: ...SERVICING ONLY A QUALIFIED SERVICE PERSON SHOULD SERVICE AND REPAIR THIS ELECTRIC APPLIANCE FLAME LED EMBER BED LED MOTOR LOG LED LOG LED PLUG WIRE NUT WIRE NUT WIRE NUT MOTOR FAN BLOWER AC N MAIN PC...

Page 25: ...replacement parts always give the following information Model Serial Number of appliance Installation date of appliance Part number Description of part Finish IDENTIFIES ITEMS WHICH ARE NOT ILLUSTRATE...

Page 26: ...MAIN PCB BOARD WITH SPACER W190 0065 SER DECORATIVE LED LIGHT WITH SPACER EMBER LED LIGHT WITH SPACER LOG LED LIGHT X2 FUSE 2A 250V 5X20mm CONTROL PANEL SYNCHRONOUS MOTOR BLOWER DOOR GLASS FRAME ASSE...

Page 27: ...ESCRIPTION 23 24 REF PART NO DESCRIPTION 25 26 ITEMS MAY NOT APPEAR EXACTLY AS ILLUSTRATED G135 0006 SER LEFT SIDE LOG G135 0007 SER RIGHT SIDE LOG W185 0032 SER G135 0005 SER GRATE ASSEMBLY EMBER BED...

Page 28: ...NTROL PANEL SYNCHRONOUS MOTOR BLOWER W660 0157 SER HIGH LIMIT SWITCH W245 0041 SER HEATING ELEMENTS W010 0058 SER REFLECTOR WITH BUSHING ADAPTOR TEMPERATURE SENSOR G190 0001 SER REMOTE CONTROL RECEIVE...

Page 29: ...G ASSEMBLY REF PART NO DESCRIPTION 23 24 REF PART NO DESCRIPTION 25 26 ITEMS MAY NOT APPEAR EXACTLY AS ILLUSTRATED G135 0008 SER LEFT SIDE LOG G135 0009 SER RIGHT SIDE LOG W185 0001 SER G135 0010 SER...

Page 30: ...hen turn it on House circuit breaker has tripped Appliance s fuse has blown Reset house circuit breaker Replace the fuse Appliance will not come on when switch is flipped to ON Appliance is not plugge...

Page 31: ...appliance brass trim or other component due to water weather damage long periods of dampness condensation damaging chemicals or cleaners will not be the responsibility of NAPOLEON The bill of sale or...

Page 32: ...ces Outdoor Fireplaces Gourmet Grills Fireplaces Heating Cooling call 705 721 1212 Grills call 705 726 4278 napoleonproducts com 24 Napoleon Road Barrie Ontario Canada L4M 0G8 214 Bayview Drive Barrie...

Page 33: ...s com ask napoleonproducts com CONSIGNES DE S CURIT Si ces instructions ne sont pas suivies la lettre un incendie ou une explosion pourraient s ensuivre causant des dommages mat riels des blessures co...

Page 34: ...ON DE LA PORTE VITR E 48 5 2 ENL VEMENT ET INSTALLATION DES PANNEAUX DE BRIQUE 49 6 0 ENTRETIEN 50 6 1 RETRAIT DES B CHES DE LA GRILLE ET DU LIT DE BRAISES 50 6 2 REMPLACEMENT DES B CHES ET DES LUMI R...

Page 35: ...t vapeurs inflammables Cet appareil ne devra tre modifi en aucun cas N utilisez pas cet appareil si une partie quelconque a t submerg e Contactez imm diatement un technicien de service qualifi pour in...

Page 36: ...tricit CSA C22 1 au Canada 28 5 8 728mm 34 864mm 9 3 4 249mm 27 3 4 704mm 28 712mm 25 1 4 641mm 32 1 2 826mm BEF33H ILLUSTRATED BEF40H ILLUSTRATED 31 7 8 810mm 40 1 4 1022mm 30 7 8 784mm 31 1 4 793mm...

Page 37: ...UIVRE CES INSTRUCTIONS POURRAIT CAUSER UN MAUVAIS FONCTIONNEMENT DE L APPAREIL ET ENTRA NER DES BLESSURES GRAVES ET OU DES DOMMAGES MAT RIELS TOUS LES APPAREILS LECTRIQUES CONTIENNENT DES COMPOSANTS I...

Page 38: ...NSTALLAT INSTALLA COUCH COUCH APPR APP MA M OLTAGE TAGE 120 VAC 120 V FREQUENCY QUENCY 60 60 POWER POWER 1 DATE CODE ATE CODE IGNED IN NORTH NED IN NORTH BY WOL BY WOL ROAD AD L4M 0G8 CANADA L4M 0G8 C...

Page 39: ...TIEN AFIN D VITER TOUT CONTACT AVEC DE L ISOLANT QUI S AFFAISSE L APPAREIL LECTRIQUE NE DOIT PAS TRE INSTALL CONTRE UN COUPE VAPEUR OU DE L ISOLANT D COUVERT UNE SURCHAUFFE LOCALIS E PEUT SURVENIR ET...

Page 40: ...ISATION D ACCESSOIRES OPTION NELS QUI N ONT PAS T SP CIFIQUEMENT TEST S POUR CET APPAREIL LECTRIQUE ANNUL ERA LA GARANTIE DE L APPAREIL ET OU PR SENTERA DES RISQUES POUR LA S CURIT SI CES INSTRUCTIONS...

Page 41: ...u de brique voir la section ENL VEMENT ET INSTALLATION DES PANNEAUX DE BRIQUE b ches de la grille et du lit de braises et la porte verre l appareil NOTE Afin d viter que de l isolant ou un coupe vapeu...

Page 42: ...du plancher Ne faites pas glissez l appareil plancher ou d autres surfaces peintes peuvent rayer voir Figure 1 B Placez l appareil vers le bas sur la plancher en place voir Figure 2 MANTEL TABLETTE A...

Page 43: ...t appareil doit tre raccord lectriquement et mis la terre conform ment aux codes locaux En l absence de tels codes utilisez la version courante du Code canadien de l lectricit CSA C22 1 au Canada ou d...

Page 44: ...ez le fil vert au fil de mise la terre E Replacez la plaque de recouvrement et fixez la NOIR BLANC NOIR BLANC 5 5 0 0 5 0 0 5 VERT VERT L1 N G MARRET MARRET ROUGE ROUGE VERT VERT THERMOSTAT ROUGE ROUG...

Page 45: ...autre extr mit l interrupteur mural D Acheminez un c ble de l interrupteur mural jusqu l alimentation lectrique E Raccordez le fil blanc neutre de l alimentation lectrique au fil blanc neutre du bo t...

Page 46: ...appareil comme illustr e 4 1 INTERRUPTEUR ET PANNEAU DE COMMANDE L INTERRUPTEUR CHAUFFERETTE FLAMME INDICATEUR A Mettez l interrupteur principal MARCHE le jeu de flammes sera r gl au maximum et la cha...

Page 47: ...ure s affiche en Fahrenheit Lorsque la temp rature ambiante est un degr inf rieur la temp rature r gl e la chaufferette se met en marche E Pour actionner la chaufferette appuyez sur le bouton chauffer...

Page 48: ...eux loquets sup rieurs FIL DE S CURIT VIS LOQUET ILLUSTR DE FA ON VOIR LES LOQUETS OUVERT AVERTISSEMENT LE RACCORDEMENT PAR C BLE DOIT TRE COMPL T AVANT LA FINITION AFIN D VITER TOUTE RECONSTRUCTION L...

Page 49: ...IQUE A Glissez les panneaux en place et fixez avec les 2 vis fourni 6 x 3 8 B Assurez vous que les panneaux de briques sont correctement positionn s ne sont pas inclin s ou en train de d passer l unit...

Page 50: ...TTOYER DE PROC DER SON ENTRETIEN OU DE LE RELOCALISER TOURNEZ LES CONTR LES OFF ET RETIREZ LA FICHE DE LA PRISE DE COURANT OU FERMEZ LE DISJONCTEUR DU CIRCUIT DE VOTRE APPAREIL NE PAS INSTALLER D AMPO...

Page 51: ...ra dans deux pattes de retenue B Inclinez le bas de la vitre vers l avant avec les deux mains soulevez la vitre hors de l unit C Placez la vitre sur une surface douce et non abrasive 6 2 REMPLACEMENT...

Page 52: ...r connexion rapide du harnais de fils C Retirez les deux vis de fixation du moteur et retirez le moteur de l unit A Pour viter de briser les filets des bouchons en plastique l arri re du panneau de co...

Page 53: ...L d coratives ou celles du lit de braises ou du jeu de flammes d branchez le raccord rapide du panneau de contr le et remplacez les par de nouvelles B Pour remplacer les fils du r cepteur et du thermo...

Page 54: ...le au support E Remplacez le nouveau panneau de contr le branchez le panneau de contr le t l commande et DEL d coratif de la carte de contr le DEL D CORATIVES 6 9 REMPLACEMENT DE PANNEAU DE CONTR LE F...

Page 55: ...r la chaufferette en glissant vers le haut et l ext rieur du bo tier reportez vous la Figure 3 F Retirez la seule vis l arri re de la chaufferette puis coude les 2 pattes vers le haut qui fixent les f...

Page 56: ...L ENTRETIEN OU LA R PARATION DE CET APPAREIL LECTRIQUE DEL DU LIT DE BRAISES DEL DU JEU DE FLAMMES CONNECTEUR DE FILS CONNECTEUR DE FILS CONNECTEUR DE FILS CARTE DE CIRCUIT IMPRIM PRINCIPAL R CEPTEUR...

Page 57: ...sque vous commandez des pi ces donnez toujours l information suivante Mod le et num ro de s rie de l appareil Date d installation de l appareil Num ro de la pi ce Description de la pi ce Fini IDENTIFI...

Page 58: ...001 SER G190 0002 SER W750 0310 SER W405 0013 SER W475 0952 SER W475 0953 SER W010 3317 SER 18 16 17 19 20 21 22 14 15 W300 0181 SER VERRE FLAMME CES ARTICLES PEUT DIFF RER DE CELLE ILLUSTR T L COMMAN...

Page 59: ...HES BEF33H REF PART NO DESCRIPTION 23 24 REF PART NO DESCRIPTION 25 26 G135 0006 SER B CHE DU C T GAUCHE G135 0007 SER B CHE DU C T DROITE W185 0032 SER G135 0005 SER GRILLE LIT DE BRAISES 4 1 4 2 4 3...

Page 60: ...001 SER G190 0002 SER W750 0310 SER W405 0013 SER W475 0952 SER W475 0953 SER W010 3317 SER 18 16 17 19 20 21 22 14 15 W300 0181 SER VERRE FLAMME CES ARTICLES PEUT DIFF RER DE CELLE ILLUSTR T L COMMAN...

Page 61: ...HES BEF40H REF PART NO DESCRIPTION 23 24 REF PART NO DESCRIPTION 25 26 G135 0008 SER G135 0009 SER W185 0001 SER G135 0010 SER 4 1 4 2 4 3 4 4 B CHE DU C T GAUCHE B CHE DU C T DROITE GRILLE LIT DE BRA...

Page 62: ...Le disjoncteur de la maison s est d clench R initialisez le disjoncteur L appareil ne s allume pas lorsque l interrupteur est mis ON L appareil n est pas branch dans une prise de courant V rifiez la f...

Page 63: ...s p riodes d humidit la condensation des produits chimiques ou produits d entretien nuisibles ne seront pas la responsabilit de NAPOL ON La facture ou sa copie sera requise ainsi que le num ro de s ri...

Page 64: ...s lectriques Foyers ext rieurs Grils gaz de qualit Foyers Chauffage et Climatisation Grils composez 514 737 6294 napoleonproducts com 7200 Route Transcanadienne Montr al Qu bec H4T 1A3 24 Napoleon Roa...

Reviews: