background image

WS-415-63 / 11.24.98

GAS-FIRED

GAS-FIRED

GAS-FIRED

GAS-FIRED

GAS-FIRED GRA

 GRA

 GRA

 GRA

 GRAVITY DIRECT VENT

VITY DIRECT VENT

VITY DIRECT VENT

VITY DIRECT VENT

VITY DIRECT VENT W

 W

 W

 W

 WALL FURNACE

ALL FURNACE

ALL FURNACE

ALL FURNACE

ALL FURNACE

INST

INST

INST

INST

INSTALLA

ALLA

ALLA

ALLA

ALLATION AND OPERA

TION AND OPERA

TION AND OPERA

TION AND OPERA

TION AND OPERATION INSTRUCTIONS FOR:

TION INSTRUCTIONS FOR:

TION INSTRUCTIONS FOR:

TION INSTRUCTIONS FOR:

TION INSTRUCTIONS FOR:

NATURAL GAS 

 MODEL


GDS3700 - N

GDS3700 - N

GDS3700 - N

GDS3700 - N

GDS3700 - N

PROPANE GAS  

MODEL


GDS3700 - P

GDS3700 - P

GDS3700 - P

GDS3700 - P

GDS3700 - P

INSTALLER: THESE INSTRUCTIONS MUST BE CONVEYED TO AND REMAIN WITH THE HOMEOWNER.

CERTIFIED UNDER CANADIAN AND AMERICAN NATIONAL STANDARDS, CSA 2.33  AND ANSI Z21.88 RESPECTIVELY FOR VENTED GAS-FIRED SPACE HEATING APPLIANCES.

Fax:

 (705)722-6031       

Email:

 ask@napoleon.on.ca

Web:

 www.napoleon.on.ca

Wolf Steel Ltd., RR#1, 9 Napoleon Rd.,

Barrie, ON., Canada  L4M 4Y8  (705)721-1212

R-2000

•  Immediately call your gas supplier from
a neighbour's phone. Follow the gas
supplier's instructions.
•  If you cannot reach your gas supplier,
call the fire department.

W

W

W

W

WARNING:

ARNING:

ARNING:

ARNING:

ARNING:      If the information in these instructions is not followed exactly, a fire or

explosion may result causing property damage, personal injury or death.

FOR YOUR SAFETY

FOR YOUR SAFETY

FOR YOUR SAFETY

FOR YOUR SAFETY

FOR YOUR SAFETY

Do not store or use gasoline or other flammable vapours and liquids in the vicinity of

this or any other appliance.

WHA

WHA

WHA

WHA

WHAT

T

T

T

T  T

  T

  T

  T

  TO DO IF YOU SMELL

O DO IF YOU SMELL

O DO IF YOU SMELL

O DO IF YOU SMELL

O DO IF YOU SMELL GAS:

 GAS:

 GAS:

 GAS:

 GAS:

•  Do not try to light any appliance.
•  Do not touch any electrical switch.
•  Do not use any phone in your building.

Installation and service must be performed by a qualified installer, service

agency or the gas supplier.

Summary of Contents for GDS3700-N

Page 1: ...22 6031 Email ask napoleon on ca Web www napoleon on ca Wolf Steel Ltd RR 1 9 Napoleon Rd Barrie ON Canada L4M 4Y8 705 721 1212 R 2000 Immediately call your gas supplier from a neighbour s phone Follo...

Page 2: ...tical Venting Installation Stove Vent Connection 10 10 10 10 10 GAS INST GAS INST GAS INST GAS INST GAS INSTALLA ALLA ALLA ALLA ALLATION TION TION TION TION 11 11 11 11 11 FINISHING FINISHING FINISHIN...

Page 3: ...proval of an authorized company official Labour costs work however requires the prior approval of an authorized company official Labour costs to the account of to the account of to the account of to t...

Page 4: ...or the ANSI NFPA 70 1990 NATIONAL ELECTRICAL CODE in the United States The blower power cord must be connected into a properly grounded receptacle The grounding prong must not be removed from the cord...

Page 5: ...ts burners and circulating blower and its passageway in the stove and venting system are kept clean The stove and its venting system should be inspected before use and at least annually by a qualified...

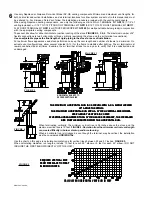
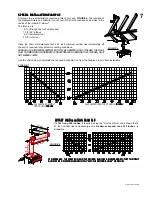
Page 6: ...E IMMEDI AL RUN WITH A 57 INCH VERTICAL RISE IMMEDI AL RUN WITH A 57 INCH VERTICAL RISE IMMEDI AL RUN WITH A 57 INCH VERTICAL RISE IMMEDI AL RUN WITH A 57 INCH VERTICAL RISE IMMEDI A A A A ATEL TEL TE...

Page 7: ...A ALLA ALLA ALLATION EXAMPLE TION EXAMPLE TION EXAMPLE TION EXAMPLE TION EXAMPLE If a first run of 48 inches is required using the First Vent Run chart shows that a 51 inch vertical rise is necessary...

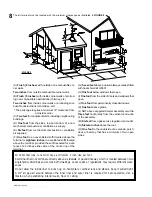
Page 8: ...as illustrated in FIGURE 9 FIGURE9 G Seven feet above public walkways unless fitted with heat shield kit GD301 H One foot below windows that open I One foot from the side of doors and windows that ope...

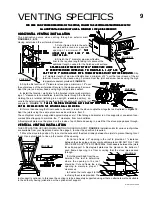
Page 9: ...12 3 Slip the first section of 7 diameter stove pipe a minimum of 2 over the outer sleeve of the air terminal Secure to the sleeve using 3 screws Seal the joint and screw heads using high temperature...

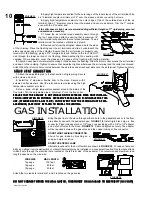
Page 10: ...INSTALLA ALLA ALLA ALLA ALLA TION IS COMPLETED AN OPTIONAL DECORA TION IS COMPLETED AN OPTIONAL DECORA TION IS COMPLETED AN OPTIONAL DECORA TION IS COMPLETED AN OPTIONAL DECORA TION IS COMPLETED AN O...

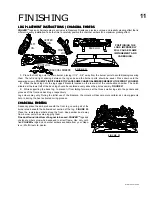
Page 11: ...ated on the rear wall of the combustion chamber The notch situated at the lower left of the back log should be centered evenly above the pilot assembly FIGURE 21 3 While supporting the back log to pre...

Page 12: ...supplier from a neighbour s phone Follow the gas supplier s instructions If you cannot reach your gas supplier call the fire department FOR YOUR SAFETY READ BEFORE OPERATING A This fireplace is equip...

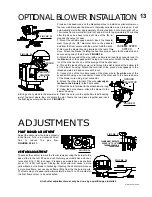
Page 13: ...will run for approximately 30 minutes after the stove has been turned off Use of the fan in creases the output of heat 1 Mount the variable speed switch insert the rheostat stem through the 3 8 diame...

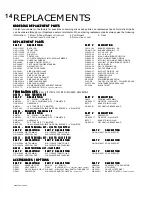
Page 14: ...SCOPE TERMINAL KIT GD180 PERISCOPE TERMINAL KIT GD180 PERISCOPE TERMINAL KIT PART PART PART PART PART DESCRIPTION DESCRIPTION DESCRIPTION DESCRIPTION DESCRIPTION PART PART PART PART PART DESCRIPTION D...

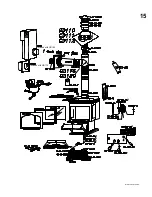
Page 15: ...15 WS 415 63 11 24 98 included with GD180 included with GD175 I H L O L F F N T I O O P O...

Page 16: ...ooled Allow approximately 60 seconds for the thermocouple to cool Pilot flame is not large enough turn up the pilot flame Pilot flame is not engulfing the thermocouple turn up pilot flame replace pilo...

Page 17: ...moved as required refer to Figure 16 to ensure correct location of storm collars Incorrect installation Main burner goes out pilot goes out REFER TO MAIN BURNER GOES OUT PILOT STAYS ON Thermocouple sh...

Page 18: ...18 WS 415 63 11 24 98 NOTES...

Reviews: