background image

10

WS-415-131 / A / 09.11.00

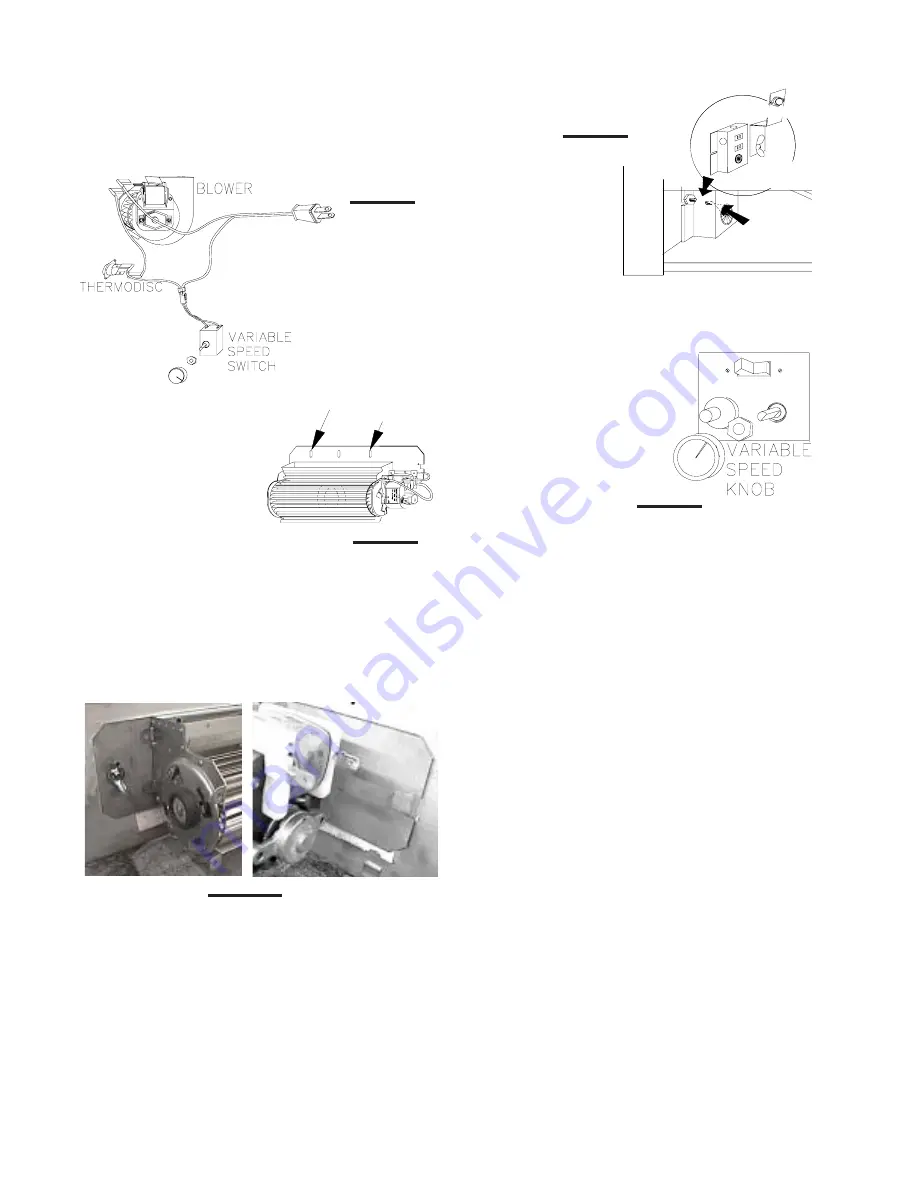
BLOWER INSTALLATION

INSTALLATION TO BE DONE BY A QUALIFIED INSTALLER

and must be electrically connected and grounded in accord-
ance with local codes. In the absence of local codes, use the
current ANSI/NFPA 70-1996 

NATIONAL


ELECTRICAL


CODE

.

If the fireplace was
not previously
equipped with a
blower:

 route a

grounded 2-wire, 60hz
power cable to the junc-
tion box. At this point, it
must be strain relieved
and insulated.

The three slots on the
blower mounting bracket
allow ease of adjustment
when attaching the
blower. For a quiet run-
ning blower, do not allow
the assembly to sit on the
firebox base.

Slide the vibration reducing pad 

(A)

 into the clip 

(C)

 and up

against the threaded stud 

(B)

 at the other end. The blower

must be able to be positioned entirely onto the pad.

Tilt the blower onto its side. Slide it past the controls and
into the clip 

(C)

. Secure to the threaded stud using the lock

washer and wing nut  provided. Ensure that the blower
does not touch the fireplace base or the firebox.

Attach the connectors from the black and white wires to the
thermodisc and secure the thermodisc bracket to the se-
curing stud at the bottom left of the unit using a lock washer
and wing nut. Ensure that the thermodisc touches the fire-
box wall.

Attach the connectors from the
black and red wires to the
blower.

Attach and secure the variable
speed switch using the nut pro-
vided. Plug the harness cord
into the receptacle.

The wire harness provided in this kit is a universal
harness. When installed, ensure that any excess
wire is contained, preventing it from making con-
tact with moving or hot objects.

Because the blower is thermally activated, when
turned on, it will automatically start approximately
10 minutes after lighting the fireplace and will run
for approximately 30-45 after the fireplace has
been turned off. Use of  the fan increases the out-
put of heat.

Drywall dust will penetrate into the blower bear-
ings causing irreparable damage. Care must be
taken to prevent drywall dust from coming into
contact with the blower or its compartment. Any
damage resulting from this condition is not cov-
ered by the warranty policy.

red

white

black

RECEPTACLE /

THERMODISC

GROUND
SCREW

JUNCTIONBOX

SLOTS

ELONGATED

FIGURE 16

FIGURE 17

C

A

B

FIGURES 18

FIGURE 19

FIGURE 20

Summary of Contents for GVF30

Page 1: ... followed exactly a fire or explosion may result causing property damage personal injury or death FOR YOUR SAFETY Do not store or use gasoline or other flammable vapours and liquids in the vicinity of this or any other appliance WHAT TO DO IF YOU SMELL GAS Do not try to light any appliance Do not touch any electrical switch Do not use any phone in your building Immediately call your gas supplier f...

Page 2: ... materials in this heater Adults and especially children should be alerted to the hazards of high surface temperatures and should stay away to avoid burns or clothing ignition Supervise young children when they are in the same room as the heater Due to high temperatures the heater should be located out of traffic and away from furniture and draperies Clothing or other flammable material should not...

Page 3: ...ompany official Labour costs to the account of the prior approval of an authorized company official Labour costs to the account of the prior approval of an authorized company official Labour costs to the account of NAPOLEON NAPOLEON NAPOLEON NAPOLEON NAPOLEON are based on a are based on a are based on a are based on a are based on a predetermined rate schedule and any repair work must be done thro...

Page 4: ...rmarket per manently located manufactured mobile home where not prohibited by local codes This fireplace is only for use with the type of gas indi cated on the rating plate This fireplace is not convert ible for use with other gases unless a certified kit is used Minimum inlet gas supply pressure is 4 5 inches water column for natural gas and 11 inches water column for propane Maximum inlet gas pr...

Page 5: ...as gas furnace gas water heater etc Do not include direct vent gas appliances which draw their input and output air from and to the outdoors WARNING If the area in which the heater may be oper ated is smaller than that defined as an unconfined space or if the building is of unusually tight construction provide adequate combustion and ventilation air by one of the methods described in the National ...

Page 6: ...er openings An unvented room heater is recommended for use as a secondary heat source rather than as a primary source Gas combustion produces water vapour which could oc cur at the rate of approximately one ounce of water for every 1 000 BTU hr of gas input During the cold weather season indoor humidity levels tend to be low Conse quently this water vapour can enhance the living space However if a...

Page 7: ...the fireplace Non combustible material brick stone or ceramic tile may protrude in these areas It is not necessary to install a hearth extension with this fireplace system Objects placed in front of the fireplace should be kept a minimum of 4 feet away from the front face Combustible mantle clearance can vary according to the mantle depth Use the graph to help evaluate the clear ance needed FRAMIN...

Page 8: ...placed over the locating screws on the burner 4 Set the two smaller logs into the pockets and grooves of the front and back logs respectively HOOD The curtain mesh must be kept fully closed during opera tion to help prevent accidental burns from occurring The heater must not be used when the hood is re moved Hook the hood over the lip of the curtain support plate OPTIONAL LOUVRE INSTALLATION REMOV...

Page 9: ...t the catalytic tiles ability to scrub the air 1 The mesh must be removed if the catalytic door is used Remove the centre bracket and bend the curtain rod slightly to disengage the rod from either side 2 Remove the curtain support plate Remove the two latch securing screws already installed position latch as shown in and re secure with the screws A socket ratchet is recommended for this Repeat at ...

Page 10: ... the black and white wires to the thermodisc and secure the thermodisc bracket to the se curing stud at the bottom left of the unit using a lock washer and wing nut Ensure that the thermodisc touches the fire box wall Attach the connectors from the black and red wires to the blower Attach and secure the variable speed switch using the nut pro vided Plug the harness cord into the receptacle The wir...

Page 11: ...tud at the bottom left of the unit using a lock washer and wing nut Ensure that the thermodisc touches the firebox wall OPTIONAL THERMOSTATIC SENSOR JUNCTION BOX RECEPTACLE OPEN ENDED SLOTS BRACKET VARIABLE SPEED PIEZO IGNITOR JUNCTION BOX THERMODISC SENSOR ASSEMBLY BRACKET RECEPTACLE THERMOSTATIC SENSOR CONTROL This optional kit is meant to be used only in conjunction with the GD65 Fan Kit which ...

Page 12: ...ding Immediately call your gas supplier from a neighbour s phone Follow the gas supplier s instructions If you cannot reach your gas supplier call the fire de partment FOR YOUR SAFETY READ BEFORE OPERATING WARNING IF YOU DO NOT FOLLOW THESE INSTRUCTIONS EXACTLY A FIRE OR EXPLO SION MAY RESULT CAUSING PROPERTY DAMAGE PERSONAL INJURY OR LOSS OF LIFE GAS KNOB OXYGEN DEPLETION SENSOR OPERATION MAINTEN...

Page 13: ...rvice person The fireplace area must be kept clear and free of combus tible materials gasoline or other flammable vapours and liquids The flow of combustion and ventilation air must not be obstructed 1 In order to properly clean the burner and oxygen deple tion sensor system remove the logs to expose both as semblies 2 Keep the control compartment logs burner air shutter opening and the area surro...

Page 14: ... PHOTOCOPY OF THE ORIGINAL IN VOICE WILL BE REQUIRED TO HONOUR THE CLAIM REPLACEMENT PARTS PART NO DESCRIPTION WS 357 01 PIEZO IGNITER WS 662 001 NATURAL GAS OXYGEN DEPLETION SENSOR SYSTEM WS 662 002 PROPANE GAS OXYGEN DEPLETION SENSOR SYSTEM WS 680 04 THERMOPILE WS 660 5 ON OFF TOGGLE SWITCH WS 725 030 NATURAL GAS VALVE WS 725 031 PROPANE GAS VALVE WS 750 060 IGNITER WIRE WS 385 33 NAPOLEON LOGO ...

Page 15: ...ILLIVOLT THERMOSTAT WS 660 010 REMOTE CONTROL ADVANTAGE WS 660 011 REMOTE CONTROL ADVANTAGE PLUS WS660 2 HAND HELD WIRELESS REMOTE SWITCH WS500 33 VARIABLE SPEED SWITCH WALL MOUNTING PLATE GVF103 KT CATALYTIC DOOR GV 783KT DECORATIVE BRICK PANELS MBP METAL BRICK PANEL SET GZ550 KT BLOWER KIT GD65 FAN KIT GD36 THERMOSTATIC SENSOR CONTROL KIT FOR USE WITH GD65 ONLY GVFLK LOUVRE KIT BLACK GVFLAB LOUV...

Page 16: ...le has cooled Allow ap proximately 60 seconds for the thermocouple to cool System is not correctly purged purge the gas line If a glass door has been installed ensure that the door is open or removed prior to purging Thermocouple shorting faulty loosen and tighten thermocouple clean thermocouple and valve connection replace Oxygen Depletion Sensor System test and replace valve Faulty valve replace...

Page 17: ...er solution Unit is over fired or under fired P I A B P I L O T N O L O T HI L O F F O Remote wall switch is in OFF position main burner comes on when gas knob is turned to ON po sition Wall switch is mounted up side down reverse Faulty valve replace replace Remote wall switch is grounding check for ground short repair ground or replace wire Remote wall switch wire is grounding Carbon is being dep...

Page 18: ...18 WS 415 131 A 09 11 00 Wolf Steel Fireplace Service History This fireplace must be serviced annually depending on usage Date Service Technician Name Service Performed Special Concerns Dealer Name ...

Page 19: ...19 WS 415 131 A 09 11 00 NOTES ...

Reviews: