W415-1472 / 04.21.15
50
EN
12.0 TROUBLESHOOTING
SYMPTOM
TEST SOLUTION
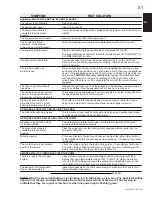
APPLIANCE SHUTS OFF AND THE #2 LIGHT FLASHES
Vacuum hose or fi ttings
are blocked
-
Unhook the air hose from the vacuum switch and blow through it. If air fl ows freely,
the hose and tube are fi ne. If air will not fl ow through the hose, use a wire coat
hanger to clear the blockage.
The air inlet, burnpot,
interior combustion air
chambers, combustion
blower or exhaust pipe
are blocked with ash or
foreign material.
-
Follow all cleaning procedures in the maintenance section of the manual.
The fi rebox is not
properly sealed.
-
Make sure the door is closed and that the gasket is in good shape. If the
ash door has a latch, make sure the ash door is properly latched and the
gasket is sealing well.
Vent pipe is incorrectly
installed.
-
Check to make sure the vent pipe installation meets the criteria in the
manual.
The vacuum switch wire
connections are bad.
-
Check the connectors that attach the blue wires to the vacuum switch.
The gray wires are
pulled loose at the
connector on the wiring
harness.
-
Check to see if the blue wires are loose at the connector.
Combustion blower
failure.
-
With the appliance on, check to see if the combustion blower is running. If
it is not, you will need to check for power going to the combustion blower. It
should be at 115 volts. If there is power, the blower is defective. If there is
not, see the next step.
Control board not
sending power to
combustion blower.
-
If there is no current going to the combustion blower, check all wire
connections. If all wire connections are properly connected, you have a
defective control board.
Control board not
sending power to
vacuum switch
-
There should be a 5-volt current (approximately) going to the vacuum
switch after the appliance has been on for 30 seconds.
Vacuum switch has
failed (very rare).
-
To test the vacuum switch, you will need to disconnect the air hose from
the body of the appliance. With the other end still attached to the vacuum
switch, very gently suck on the loose end of the hose (Hint: remove the
hose from the vacuum switch and the appliance fi rst to see if it is clear).
If you hear a click, the vacuum switch is working.
CAUTION: TOO MUCH
VACUUM CAN DAMAGE THE VACUUM SWITCH.
NOTE: Many of the following tests will require that the side panels are removed from the appliance
or the insert be removed from its cavity to access the components. Before troubleshooting always
confi rm that all components are clean and free of ash build up.
42.24
!
WARNING
TURN OFF THE ELECTRICAL POWER BEFORE SERVICING THE APPLIANCE.
APPLIANCE MAY BE HOT, DO NOT SERVICE UNTIL APPLIANCE HAS COOLED.
DO NOT USE ABRASIVE CLEANERS.
WHEN CHECKING CONNECTIONS, INSTALLING JUMPER WIRES (FOR TEST PURPOSES ONLY) OR
REPLACING COMPONENTS, UNPLUG APPLIANCE FROM THE RECEPTACLE TO PREVENT ELECTRI-
CAL SHOCK OR DAMAGE TO THE COMPONENT.
Summary of Contents for NPI45
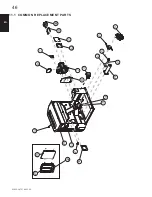
Page 48: ...W415 1472 04 21 15 48 EN 67 20 29 58 41 38 43 44 63 57 60 6 11 3 NPI45 REPLACEMENT PARTS...
Page 54: ...W415 1472 04 21 15 54 EN 14 0 SERVICE HISTORY 43 1...
Page 55: ...W415 1472 04 21 15 55 EN 15 0 NOTES 44 1...
Page 106: ...106 W415 1472 04 22 15 FR 67 20 29 58 41 38 43 44 63 57 60 6 11 3 PI CES DE RECHANGE DU NPI45...
Page 114: ...114 W415 1472 04 22 15 FR 15 0 NOTES 44 1...
Page 115: ...115 W415 1472 04 22 15 FR 44 1...


