background image


61

www.napoleon.com

N415-0537 JUN 24.19

215

204

241

226

154

209

210

212

211

213

214

236

216

217

218

240

239

237

238

220

221

222

223

224

225

227

228

229

230

231

215

155

236

216

232

233

227

228

234

219

205

207

208

206

235

82

83

202

201

203

204

242

201

202

203

204

PRO825-3 

N415-0537 JUN 24.19.indd   61

6/24/2019   12:47:57 PM

Summary of Contents for PRO825RSBIPSS-3

Page 1: ...t reading the LIGHTING instructions section of this manual Do not store or use gasoline or other flammable liquids or vapors in the vicinity of this or any other appliance An L P cylinder not connected for use must not be stored in the vicinity of this or any other appliance If the information in these instructions is not followed exactly a fire or explosion may result causing property damage pers...

Page 2: ...irect damages or for any transportation charges labor costs or export duties This Limited Warranty is provided in addition to any rights afforded to you by local laws Accordingly this Limited Warranty imposes no obligation upon NAPOLEON to keep parts in stock Based on the availability of parts NAPOLEON may at its discretion discharge all obligations by providing a customer a prorated credit toward...

Page 3: ...placed prior to using the gas grill with a replacement pressure regulator and hose assembly specified by the grill manufacturer Do not route hose underneath drip pan proper hose clearance to bottom of unit must be maintained Hose must not run behind the front leg It must run around the front side of leg if applicable Leak test the unit before initial use annually and whenever any gas components ar...

Page 4: ...36 1 2 93cm OVERALL WIDTH 94 1 4 239cm OVERALL DEPTH 25 1 4 64cm GRILL HEIGHT 36 91cm PRO825 GRILL GRILL SIZE 500 in 2 3265 cm 2 325 in 2 2160 cm 2 WARMING RACK SIZE 255 in 2 1635 cm 2 165 in 2 1080 cm 2 ALL DIMENSIONS ARE APPROXIMATE DIMENSIONS N415 0537 JUN 24 19 indd 4 6 24 2019 12 46 05 PM ...

Page 5: ...used The regulator must supply a pressure of 11 inches water column 0 39 PSI to the gas grill and have a QCC1 type fitting Cylinders to be used with this unit must be supplied with a QCC1 cylinder valve A QCC1 cylinder has a positive seating connection which will not allow gas flow until a positive seal has been achieved It is also equipped with an excess flow device In order to attain full flow t...

Page 6: ...ion and a readily accessible manual shut off valve must be installed upstream of and as close to the quick disconnect as is feasible The flared end of the hose must be connected to the fitting on the end of the manifold tube or flex tube if applicable as illustrated in the Natural Gas Hose Attachment diagram Tighten using two wrenches Do not use thread sealer pipe dope Leak test all joints prior t...

Page 7: ...t be stopped immediately shut off the gas supply disconnect it and have the grill inspected by a certified gas installer or dealer Do not use the grill until the leak has been corrected Electrical Precautions WARNING Failure to follow these instructions could result in property damage personal injury or death To protect against electric shock do not immerse cord or plugs in water or other liquid U...

Page 8: ... off position and wait 5 minutes for any excess gas to dissipate Either repeat steps 2 and 3 or light with a match 4 If the burner will not ignite within 5 seconds turn the control knob to the off position and wait 5 minutes for any excess gas to dissipate Repeat step 2 4 Push and hold the electronic igniter button until burner lights or light by match 4 If the burner will not ignite within 5 seco...

Page 9: ...inds adversely affect the cooking performance of the gas grill In extreme circumstances when consistent high winds come from directly behind the unit heat can vent underneath the control panel This may cause the control panel to become extremely hot to touch and the knobs to deform Napoleon offers a wind deflector illustrated below Install this wind deflector to help prevent the possibil ity of im...

Page 10: ...moke flavour Wood for smoking comes in various forms chunks chips dust and pellets it also comes in many varieties flavours from apple to walnut each transmitting a different taste Use only wood that you know has not been treated or better still buy from your authorized Napoleon dealer Infrared Main Burner Use If Equipped Follow the Infrared Burner Ignition procedures and operate on high for 5 min...

Page 11: ...smoke giving the food its delicious grilled taste The Napoleon infrared burner cooks in the same way In each burner 10 000 ports each with its own tiny flame cause the surface of the ceramic tile to glow red This glow emits the same type of infrared heat to the food as charcoal without its hassle or mess Infrared burners also provide a more consistently heated area that is far easier to regulate t...

Page 12: ...oker Chicken pieces High setting 2 min each side then medium low to low setting 20 25 min The joint connecting the thigh and the leg from the skinless side should be sliced 3 4 of the way though for the meat to lay flatter on the grill This helps it to cook faster and more evenly To add a trademark taste to your cooking try adding mesquite flavoured woodchips to your Napoleon woodchip smoker optio...

Page 13: ...still warm to the touch To clean stainless surfaces use a stainless steel or a non abrasive cleaner Always wipe in the direction of the grain Over time stainless steel parts discolor when heated usually to a golden or brown hue This discoloration is normal and does not affect the performance of the grill Porcelain enamel components must be handled with additional care The baked on enamel finish is...

Page 14: ...ed When the air shutter is adjusted correctly the flames will be dark blue tipped with light blue and occasionally yellow With too little air flow to the burner the flames are lazy yellow and can produce soot With too much air flow the flames lift erratically and can cause difficulties when lighting Adjusting the air shutter 1 Remove cooking grids and sear plates and leave lid open You may have to...

Page 15: ... light the burner and operate on high for 5 minutes with the lid open allowing debris to burn off Burner The burner is made from heavy wall 304 stainless steel but extreme heat and a corrosive environment can cause surface corrosion to occur This can be removed with a brass wire brush CAUTION Beware of Spiders Spiders and insects are attracted to the smell of propane and natural gas The burner is ...

Page 16: ...o replace the halogen bulb in your grill you must first remove the lens from the light housing To remove the lens from the housing remove the Philips screw securing the housing in place Snap the lens out of the housing including the metal bracket Do not touch the halogen bulb with your bare hands The oil from your fingertips will reduce the life of the bulb With gloved hands gently pull the old bu...

Page 17: ...nd the logo will slowly cycle through the color spectrum starting at green Quickly Press Twice to stop the spectrum at any color you choose Press twice again to let it continue changing colors Motion Sensor The knob and logo lights will remain ON as long as motion is detected within 1 meter of your grill They will turn off after 15 minutes of inactivity While the motion sensor is ON as indicated by...

Page 18: ...accompanied by the smell of gas and possibly difficulties in lighting Improper air shutter adjustment Close air shutter slightly according to combustion air adjustment instructions This must be done by a qualified gas installer Rear and Side burners will not light with the igniter but will light with a match Dead battery or installed incorrectly Loose electrode wire or switch terminal wires Liftin...

Page 19: ...burner assembly Contact your authorized Napoleon dealer for instructions on ordering a replacement burner assembly Illumination and Side Rear burner ignition do not work Electric Power is out The grill is nor receiving electric power Check the power outage in your area Ensure the grill is connected between the wall and the power bar of the grill Ensure the red indicator is ON in the control box Ch...

Page 20: ...uired 1 Model and serial number of the unit 2 Part number and description 3 A concise description of the problem broken is not sufficient 4 Proof of purchase photocopy of the invoice In some cases Napoleon could request to have the parts returned to the factory for inspection before providing replacement parts Before contacting Napoleon dealer please note that the following items are not covered b...

Page 21: ...entez pas d allumer cet appareil avant d avoir lu la section INSTRUCTIONS D ALLUMAGE de ce manuel Pour votre sécurité n entreposez pas et n utilisez pas d essence ou autres liquides et vapeurs inflammables à proximité de cet ou tout autre appareil Une bonbonne de propane non branchée ne devrait pas être entreposée à proximité de cet ou de tout autre appareil Si ces instructions ne sont pas suivies...

Page 22: ...cessoires consécutifs ou indirects ni de tous frais de transport de main d œuvre ou taxes d exportation La présente garantie limitée vient s ajouter à tous les droits qui vous sont accordés par la législation locale Par conséquent la présente garantie limitée n impose pas à NAPOLÉON l obligation de garder des pièces en stock En fonction de la disponibilité des pièces NAPOLÉON peut à sa discrétion ...

Page 23: ...cant avant d utiliser le gril Ne pas passer le tuyau d alimentation sous le tiroir d égouttement afin de garder une distance raisonnable entre le tuyau et le fond du gril Ne faites pas passer le tuyau d alimentation en gaz derrière la patte avant Le tuyau doit passer devant la patte avant afin de respecter le dégagement recommandéentre le tuyau et le fond de l appareil si c est approprié Faire un ...

Page 24: ...43cm 36 1 2 93cm 94 1 4 239cm 25 1 4 64cm 36 91cm PRO825 GRILL DIMENSIONS GRILLE 500 in 2 3265 cm 2 325 in 2 2160 cm 2 DIMENSIONS GRILLE DE RÉCHAUD 255 in 2 1635 cm 2 165 in 2 1080 cm 2 TOUS LES DIMENSIONS SONT APPROXIMATIVES DIMENSIONS N415 0537 JUN 24 19 indd 24 6 24 2019 12 46 48 PM ...

Page 25: ...o au gril et posséder un raccord de type QCC1 Les cylindres utilisés avec ce gril doivent être munis d une soupape QCC1 Un cylindre QCC1 possède un raccord qui empêche l écoulement du gaz jusqu à ce qu un joint étanche soit obtenu Il est aussi équipé d un dispositif de contrôle d écoulement du gaz Afin d obtenir un débit maximal de gaz les soupapes du gril doivent être fermées lorsque vous ouvrez ...

Page 26: ...é du tuyau au raccord qui est au bout du tube collecteur Resserrez avec une clé N utilisez pas de scellant enduit à tuyaux L installation doit être conforme à la norme CAN B149 1 du Code d installation du gaz naturel et du propane au Canada ou à la norme ANSI Z223 1 du National Fuel Gas Code aux États Unis Vous devez avoir une pipe de conducteur hors du quat d adé de gaz pour fournir ce gril le ga...

Page 27: ...s de calibre suffisant pour la puissance de cet appareil approuvées pour utilisation extérieure et identifiées W A Test de détection de fuites AVERTISSEMENT Il doit être fait avant la première utilisation annuellement et à chaque fois qu une pièce du système de gaz est remplacée ou réparée AVERTISSEMENT N utilisez pas une flamme nue pour vérifier pour des fuites de gaz Assurez vous qu il n y ait a...

Page 28: ...n de contrôle en position off et attendez 5 minutes pour que le gaz en excès puisse se dissiper Ensuite répétez les étapes 2 et 3 ou allumez avec une allumette 4 Si le brûleur ne s allume pas en moins de 5 secondes tournez le bouton de contrôle à off et attendez 5 minutes pour permettre au surplus de gaz de se dissiper Répétez l étape 2 4 Appuyez et gardez enfoncé l allumeur jusqu à ce que le brûl...

Page 29: ...essous Installez ce déflecteur pour aider à éviter les possibles accumulations de chaleur inappropriées Note Napoléon ne sera pas responsable d une surchauffe ou d une extinction causée par des conditions environnementales telles que des vents forts ou une ventilation inadéquate 1 2 3 Éclairage initial Lorsqu il est allumé pour la première fois le gril dégagera une légère odeur Ceci est un phénomè...

Page 30: ...hamburgers les steaks le poulet les légumes etc La nourriture est d abord saisie afin d emprisonner les jus et la saveur puis la température est réduite afin de terminer la cuisson selon vos préférences Cuisson indirect Avec un ou plusieurs brûleurs en fonction placez la nourriture à cuire sur la grille au dessus d un brûleur inactif La chaleur circule autour de l aliment ce qui le fait cuire lent...

Page 31: ...e du soleil à travers un prisme qui divisa la lumière en ses composants du spectre lumineux Il démontra que la plus forte concentration de chaleur qui émanait des rayons provenait de la région du spectre lumineux juste au dessus du rouge où aucune lumière n était visible C est cela l énergie infrarouge La plupart des matériaux absorbent facilement l énergie infrarouge sous un large spectre de long...

Page 32: ...lage de moyen bas à bas 20 25 min L articulation qui retient le pilon à la cuisse doit être coupée au 3 4 à partir du côté sans peau afin de permettre à la viande d être plus à plat sur la grille de cuisson Ceci permettra à la viande de cuire de façon plus uniforme et plus rapidement Pour ajouter une touche personnelle à votre poulet ajoutez des copeaux de bois à saveur de mesquite dans une pipe à...

Page 33: ...à nettoyer durant la période de préchauffage en utilisant une brosse en laiton Une laine d acier peut être utilisée pour les taches les plus rebelles Les grilles en acier inoxydable si équipé vont changer de couleur en permanence dû à la chaleur excessive de la surface de cuisson Nettoyage du panneau de commande Le texte sur le panneau de commande est imprimé directement sur l acier inoxydable Ave...

Page 34: ...s problèmes d allumage Pour ajuster le volet d air 1 Enlevez les grilles de cuisson les plaques de brûleur et laissez le couvercle ouvert Il sera peut être nécessaire d ouvrir la porte ou retirer le tiroir du haut pour accéder si équipé à la vis du volet d air Pour ajuster le volet d air du brûleur arrière vous devez enlevez le couvercle arrière 2 Desserrez la vis de verroullage du volet d air et ...

Page 35: ...allation Protection du brûleur infrarouge Le brûleur infrarouge de votre gril est conçu pour vous offrir une longue durée de vie Cependant certaines précautions doivent être prises afin d éviter que les surfaces en céramiques ne fissurent causant ainsi un mauvais fonctionnement du brûleur Vous trouverez ci dessous les causes de fissuration les plus courantes ainsi que les moyens à prendre pour les...

Page 36: ...partiment puis repliez les pattes sur le devant du compartiment à leur position initiale 1 2 3 AVERTISSEMENT Boyau Vérifiez l usure les coupures les craquelures ou s il est fondu Si vous découvrez une de ces défectuosités n utilisez pas votre gril Faites remplacer la pièce par votre détaillant Napoléon ou par un installateur qualifié Moulages en aluminium Nettoyez les moulages périodiquement à l a...

Page 37: ...ez rapidement deux fois pour vous arrêter sur la couleur choisie Pressez deux fois à nouveau pour continuer à changer les couleurs Détecteur de mouvement Les boutons et le logo resteront allumés tant qu un mouvement sera détecté dans un rayon d un mètre du barbecue Ils s éteindront automatiquement après 15 minutes d inactivité Lorsque le détecteur est sur le mode ON indiqué par la LED bleue vous p...

Page 38: ... d air Retirez le brûleur et nettoyez le complètement Consultez les instructions d entretien Ouvrez légèrement les volets d air tout en vous conformant aux instructions de réglage des volets d air ceci doit être effectué par un installateur de gaz qualifié Les flammes se détachent du brûleur accompagnées d une odeur de gaz et possiblement une difficulté d allumage Mauvais ajustement des volets d a...

Page 39: ... un bruit qui s apparente à un whoosh suivi d un bruit continuel semblable à une lampe à souder et qui diminue en intensité Les tuiles de céramique sont surchargées de graisse de cuisson et d accumulations les orifices sont obstrués Le brûleur a surchauffé dû à une ventilation inadéquate trop grande surface de cuisson recouverte par des plaques de cuisson ou des plateaux Des tuiles de céramique so...

Page 40: ...orrectement Le bloc d allumage ne fonctionne pas correctement Remplacez le commutateur d allumage si le voyant du commutateur s allume lorsque vous allumez le commutateur d éclairage Vérifiez la connexion du commutateur dans le panneau de commande s il n est pas allumé lorsque vous le mettez en marche Remplacez le bloc d allumage si le commutateur s allume lorsque vous allumez les lumières et que ...

Page 41: ... 1 Modèle et numéro de série de l appareil 2 Numéro de la pièce et description 3 Description concise du problème cassé n est pas suffisant 4 Preuve d achat copie de la facture Dans certains cas Napoléon peut vous demander de retourner la pièce à des fins d inspection avant de fournir une pièce de rechange Avant de contacter le détaillant Napoléon veuillez noter que la garantie ne couvre pas les él...

Page 42: ...ns in the order that they are laid out in this manual 6 Two people are required to lift the grill head onto the assembled cart If you have any questions about assembly or grill operation or if there are damaged or missing parts please call our Customer Solutions Department at 1 866 820 8686 between 9 AM and 5 PM Eastern Standard Time OUTILS REQUIS POUR L ASSEMBLAGE outils non inclus TOOLS REQUIRED...

Page 43: ...the lower position in order to close the lid Installation de la grille de caisson La grille de cuisson être installée à deux niveaux différents Le niveau supérieur est utilisé pour les chaudrons ou les poêles Le diamètre recommandé du chaudron ou de la poêle est de 10 254 mm à 16 406 mm Le niveau inférieur est utilisé pour les wok 14 355mm recommandé Assurez vous que le brûleur soit éteint et que ...

Page 44: ...nge adjustment follow the illustrations outlined below Les portes du cabinet ont été alignées en usine mais il est possible qu un ajustement des charnières soit nécessaire dans le cas d un gril qui aurait été déplacé ou qui aurait été déposé sur une surface inégale Pour un ajustement facile des charnières référez vous aux illustrations ci dessous x2 N415 0537 JUN 24 19 indd 44 6 24 2019 12 47 24 P...

Page 45: ...érieur de la hotte X Rotisserie Kit Assembly Instruction included with most rear burner units Assemble rotisserie kit components as shown Instructions d assemblage de l ensemble de rôtissoire inclus avec la plupart des appareils avec brûleur arrière Assemblez les composantes de la rôtissoire tel qu illustré N415 0537 JUN 24 19 indd 45 6 24 2019 12 47 26 PM ...

Page 46: ...ues branchez l appareil de cuisson extérieur au gaz sur un circuit muni d une prise avec interrupteur de défaut à la terre seulement Afin de fournir du courant à votre gril branchez un cordon électrique avec mise à la terre dans la barre d alimentation installée sur le panneau arrière de votre gril comme illustré Assurez vous que le cordon est approuvé et identifié pour UTILISATION EXTÉRIEURE Ne p...

Page 47: ...FF THE SWITCH CONTROLS THE KNOB AND LOGO LIGHTS AS WELL THE OVEN AND CABINET LIGHTS WILL TURN OFF AFTER TWO HOURS IF THE MOTION SENSOR IS OFF THE KNOB AND LOGO LIGHTS WILL ALSO SHUT OFF AFTER TWO HOURS MAXIMUM LABEL SIZE 7 x 9 Black text on brushed silver background grain to be horizontal across label All headings to be 11 pt bold faced type Remaining type to be 8 pt Font type to be Vogue class ii...

Page 48: ...WITCH IGNITION COMMUTATEUR ALLUMAGE 12VDC 0 3 0 8W 22 65mA SWITCH LIGHTS COMMUTATEUR LUMIÈRES 12VDC 0 3 0 8W 22 65mA PROX SENSOR CAPTEUR PROX 3 3VDC 0 01W 5mA LOGO LIGHT LUMIÈRE LOGO 9VDC 1 0W 310mA 12VAC 10W KNOB LIGHT LUMIÈRES DES BOUTONS x10 12VDC 0 4 1 1W 34 95mA COMMUTATEURS BOUTONS HALOGEN LAMP LUMIÈRE HALOGÈNE HALOGEN LAMP LUMIÈRE HALOGÈNE HALOGEN LAMP LUMIÈRE HALOGÈNE ELECTRODE ÉLECTRODE E...

Page 49: ...RNING The installation must be performed by a licensed gas fitter and all connections must be leak tested before operating the grill Natural Gas Only Proper Hose Connection AVERTISSEMENT L installation doit être effectuée par un installateur certifié pour le gaz et tous les raccordements doivent être testés pour des fuites avant de faire fonctionner le gril Serrer la connexion avec deux clés Gaz n...

Page 50: ...est and remove all sources of ignition See Leak Testing Diagram for areas to check Turn all burner controls to the off position Turn gas supply valve on Brush a half and half solution of liquid soap and water onto all joints and connections of the regulator hose manifolds and valves Bubbles will indicate a gas leak Either tighten the loose joint or have the part replaced with one recommended by th...

Page 51: ...ce du système de gaz est remplacée ou réparée Ne fumez pas et enlevez toutes sources d allumage lorsque vous faites ce test Consultez le schéma de test de fuites pour voir les endroits à tester 1 Fermez tous les boutons des brûleurs Ouvrez la soupape de la bonbonne 2 Appliquez une solution de deux parts égales de savon liquide et d eau sur tous les joints du régulateur le tuyau et ses raccords 3 D...

Page 52: ...er burner flex brûleur fumaison connecteur flexible x 18 N455 0016 smoker burner orifice brûleur fumaison des orifice p N455 0002 smoker burner orifice brûleur fumaison des orifice n 19 N240 0033 smoker burner igniter brûleur fumaison allumeur x 20 N655 0206 base stiffener cuve stiffener x 21 N570 0104 screw 10 24 x 3 8 vis 10 24 x 3 8 x 22 N570 0008 8 x 1 2 screw vis 8 x 1 2 x 23 N475 0492 contro...

Page 53: ... wire cover couvercle fil lumière x 65 N570 0112 screw 10 24 x 5 8 vis 10 24 x 5 8 x 66 N570 0013 8 x 5 8 screw vis 8 x 5 8 x 68 N735 0002 1 4 lock washer rondelle à ressort 1 4 x 69 N570 0015 lid pivot screw vis du pivot x 70 N570 0024 1 4 20 x 1 2 screw vis 1 4 20 x 1 2 x 71 N010 0968 drip pan large tiroir d egouttement grande x 72 N010 0967 drip pan small tiroir d egouttement petite x 73 N080 0...

Page 54: ... x 93 N380 0025 BK burner control knob small black bouton de contrôle petite noir x 94 N051 0010 smoker tube bezel brûleur fumaison monture de bouton x 95 N051 0012 control knob bezel small monture de bouton de commande petite x 97 N570 0087 1 4 20 x 7 8 screw vis 1 4 20 x 7 8 x 98 N750 0040 rear burner ignition wire brûleur arrière fil allumeur x 99 N660 0010 proximity sensor capteur de proximité...

Page 55: ...22 38 98 41 42 43 44 45 46 47 49 97 56 61 62 56 63 66 68 69 70 71 72 73 74 4 75 76 80 81 82 83 84 86 87 88 92 5 77 21 21 23 24 25 26 27 28 29 30 32 34 35 36 37 86 40 52 57 59 58 59 64 65 87 40 58 59 64 65 88 93 94 40 95 96 49 99 31 39 91 90 33 89 50 PRO825 3 N415 0537 JUN 24 19 indd 55 6 24 2019 12 47 54 PM ...

Page 56: ... 120 N475 0433 GY1SG panel cabinet rear panneau arriére x 121 N010 0816 panel inner cabinet panneau interne x 122 N010 0817 panel inner cabinet panneau interne x 123 N585 0112 GY1SG heat shield pare chaleur x 124 N080 0330 GY1SG bracket rear cover du couvercle arriére support x 125 N080 0331 GY1SG bracket base cuve support x 126 N080 0332 GY1SG bracket bumper pare chocs du support x 127 N750 0033 ...

Page 57: ...racket drip pan guide tiroir d égouttement support x 152 N160 0041 hose retainer clip clip tuyau de retenue x 153 N010 0938 assembly tank holder support de réservoir d assemblage p 154 N370 0906P kit side shelf left tablette latérale gauche trousse p N370 0906N kit side shelf left tablette latérale gauche trousse n 155 N370 0860 kit side shelf right tablette latérale droite trousse x 156 N750 0079...

Page 58: ...110 112 113 114 115 115 115 116 117 118 119 119 120 121 122 123 124 124 125 125 126 127 128 129 130 131 132 134 135 137 138 139 139 144 144 140 141 142 143 145 146 147 104 147 146 148 150 151 151 137 132 131 152 153 155 154 157 133 156 149 PRO825 3 N415 0537 JUN 24 19 indd 58 6 24 2019 12 47 56 PM ...

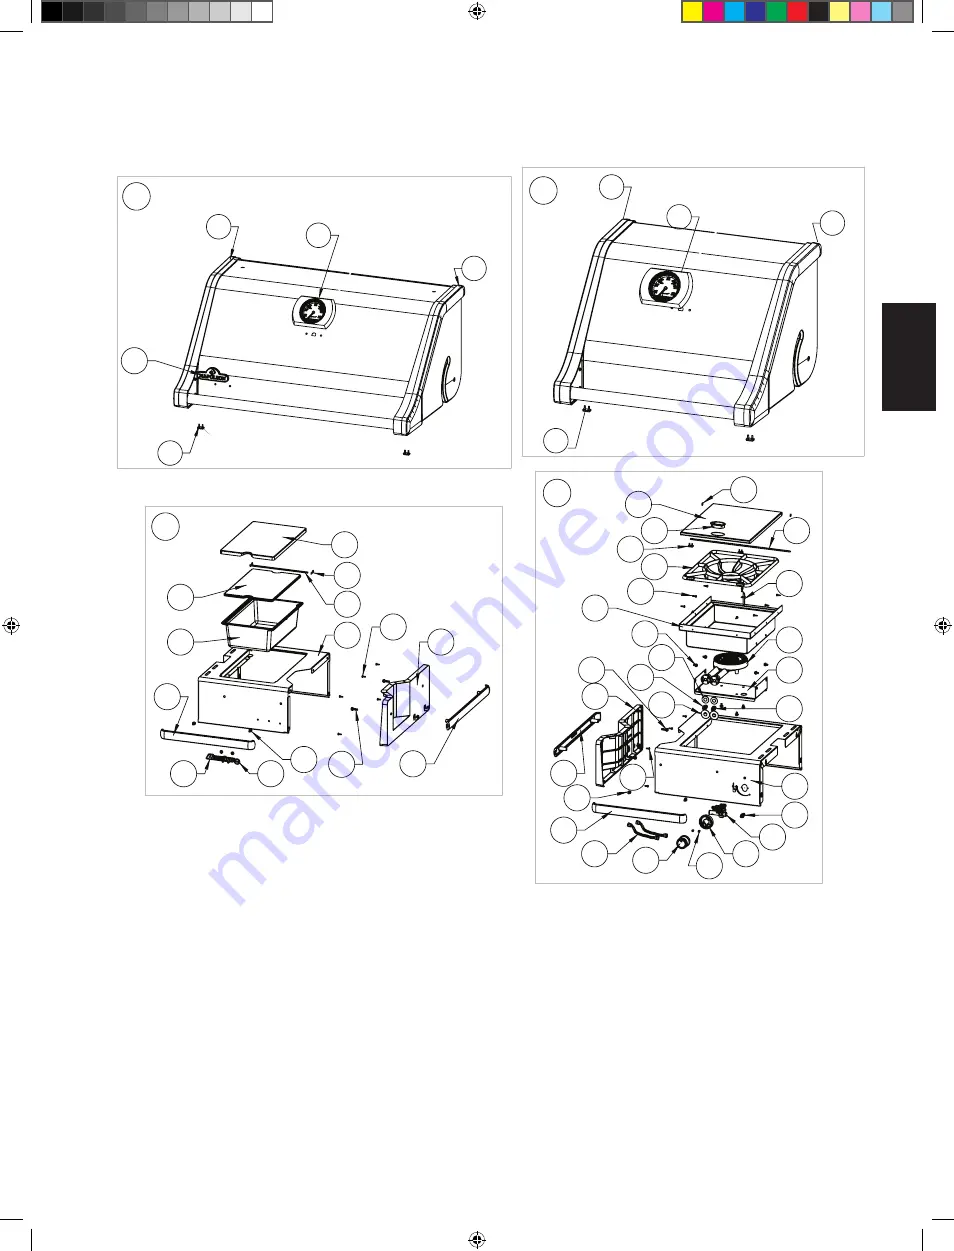
Page 59: ...he x 215 N570 0038 1 4 20 x 1 2 screw vis 1 4 20 x 1 2 x 216 N570 0076 8 x 1 2 screw vis 8 x 1 2 x 217 N100 0050 side buner brûleur latéral x 218 N080 0343 side burner mounting bracket brûleur latéral support de montage x 219 N120 0034 GY0TX side shelf end cap right embout de la tablette latéral droite x 220 N240 0032 side burner electrode brûleur latéral electrode x 221 N335 0074 side burner lid ...

Page 60: ...ûleur latéral x 239 N570 0078 screw M4 x 8mm vis M4 x 8mm x 240 N010 1098 control knob bezel small monture de bouton de commande petite x 241 N570 0073 1 4 20 x 3 8 screw vis 1 4 20 x 3 8 x 242 N385 0308 SER NAPOLEON logo logo NAPOLEON x x standard x compris p propane units only p appareils propane seulement n natural gas units only n appareils gaz naturel seulement ac accessory ac accessoires PRO...

Page 61: ... 209 210 212 211 213 214 236 216 217 218 240 239 237 238 220 221 222 223 224 225 227 228 229 230 231 215 155 236 216 232 233 227 228 234 219 205 207 208 206 235 82 83 202 201 203 204 242 201 202 203 204 PRO825 3 N415 0537 JUN 24 19 indd 61 6 24 2019 12 47 57 PM ...

Page 62: ...62 www napoleon com N415 0537 JUN 24 19 NOTES N415 0537 JUN 24 19 indd 62 6 24 2019 12 47 57 PM ...

Page 63: ...63 www napoleon com N415 0537 JUN 24 19 NOTES N415 0537 JUN 24 19 indd 63 6 24 2019 12 47 57 PM ...

Page 64: ...N415 0537 N415 0537 JUN 24 19 indd 64 6 24 2019 12 47 58 PM ...

Reviews: