EN
W415-2797 / A / 01.31.20
19
fi nishing
4.8 blower
installation
Drywall dust will penetrate into the blower bearings, causing irreparable damage. Care must be taken to prevent
drywall dust from coming into contact with the blower or its compartment. Any damage resulting from this
condition is not covered by the warranty policy. Use of the blower increases the output of heat.
This blower is thermally activated. Depending on the intensity of the fi re, the blower will start 15-30 minutes after
lighting. The thermal switch for the appliance is affi xed to an adjustable bracket, which should be positioned so it
is in contact with the blower housing as illustrated.
!
WARNING
•
Risk of fi re and electrical shock.
•
Turn off the electrical power before servicing this appliance.
•
Use only Wolf Steel approved optional accessories and replacement parts with this appliance. Using
non-listed accessories (blowers, doors, louvres, trims, etc.) could result in a safety hazard and will void the
warranty and certifi cation.
•
Ensure that the blower’s power cord is not in contact with any surface of the appliance to prevent
electrical shock or fi re damage. Do not run the power cord beneath the appliance.
For shipping purposes the blower housing has been stored within the fi rebox. We recommend removing the
door prior to installing the blower.
note:
A.
Remove the door (see “door removal” section).
B.
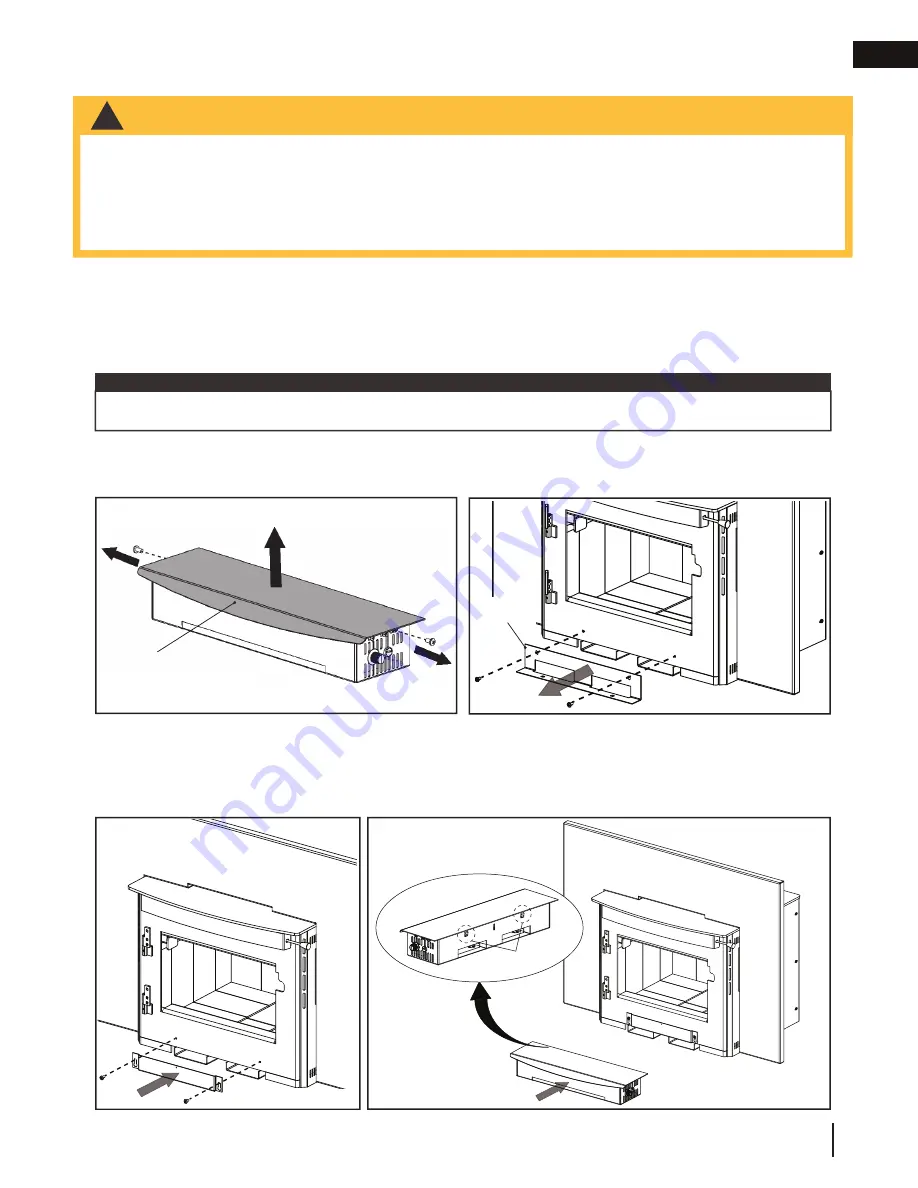
Remove the two screws securing the cover to the blower assembly
(Fig. 4-11)
. Set the screws and cover aside.
C.
Remove the shipping bracket by removing the two screws
(Fig. 4-12)
. Discard the bracket and set the screws aside.
Fig. 4-11
Cover
Fig. 4-12
D.
Install the blower mounting bracket using the two screws from step C
(Fig. 4-13)
.
E.
Secure the hooks in the blower assembly over the blower mounting bracket
(Fig. 4-14)
, and then slide the blower
assembly down until it is secure. Ensure the blower assembly is centred to the fi rebox.
F.
Re-attach the cover using the two screws previously removed in step B.
G.
Reinstall the door previously removed in step A.
Fig. 4-14
Opposite
View
Hooks
Shipping
Bracket
Fig. 4-13


