background image


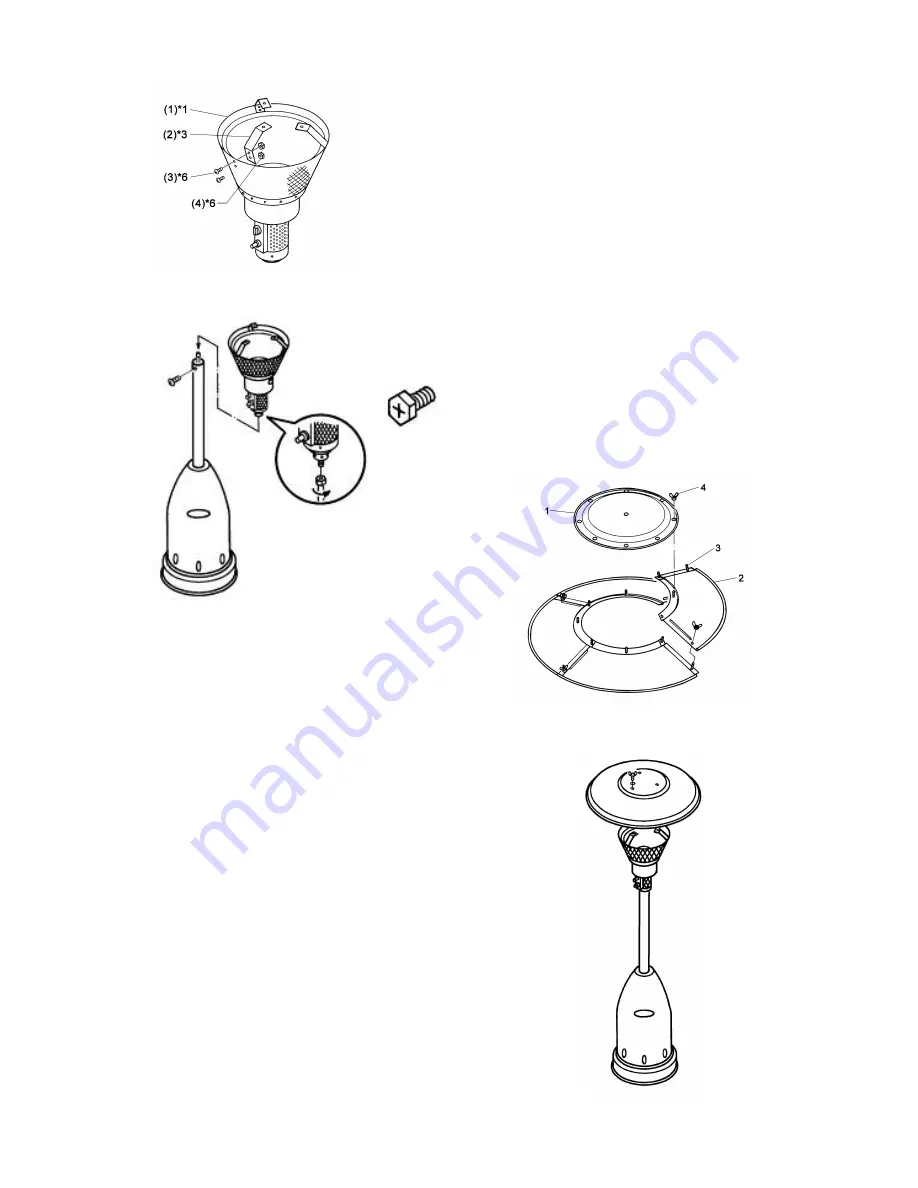
Before assembling the burner head on


post, please fix the 3 supported brackets


onto burner head for assembling reflector


D                                   


Slide hose through bottom of post and


connect to burner head.


Then fasten burner on post with the 4


Philips mechanical screws M6x10mm.


E

Sectional reflector option ONLY          

Assemble the reflector pieces to the
middle piece using the small washers and
the acorn nuts.


F


Place a steel washer over each bolt on      
the burner top (figure 8)
Lay reflector over the burner top bolts
add another steel washer to each bolt.

Summary of Contents for TERRACE AND PATIO HEATER

Page 1: ...nd accessories required 13 Assembly instructions 14 15 16 Verifying the connections 17 Warranty info Carefully read this guide and all safety information before assembling and setting up the heater TH...

Page 2: ...from debris Cleaning this outdoor gas appliance including special surfaces with recommended cleaning agents if necessary Check and clean burner tube to remove any insects and insect nests Blocked bur...

Page 3: ...area out of the reach of children Disconnected cylinders must have threaded valve plugs tightly installed and must not be stored in a building garage or any other enclosed area 5 The pressure regulat...

Page 4: ...appliance away from areas where are gas or other flammable liquids are stored Before use verify that no parts are damaged inspect gas hose Never modify this appliance in anyway Never use the heater w...

Page 5: ...T REQUIRED 10 and 13mm wrench Philips screwdriver medium blade Leak test solution MIX 50 50 water and soap 1 Propane cylinder not supplied with QCC 1 valve ASSEMBLY INSTRUCTIONS A Fix the 3 vertical s...

Page 6: ...nnect to burner head Then fasten burner on post with the 4 Philips mechanical screws M6x10mm E Sectional reflector option ONLY Assemble the reflector pieces to the middle piece using the small washers...

Page 7: ...he leak cannot repaired permanently close cylinder valve completely and contact the customer care department at 1 866 820 8686 or a qualified gas technician A SAFE LOCATION FOR THE HEATER CAUTION When...

Page 8: ...od of time remove gas cylinder Verify that the gas valve is closed tightly Do not store the gas cylinder indoors Store gas cylinder in a well ventilated area PREVENTIVE CARE AND MAINTENANCE Once a yea...

Page 9: ...es dents corrosion or discoloring due to heat or damage from abrasive or chemical cleaners NAC is not liable for any transportation costs labor costs or duties relating to the delivery or installation...

Reviews: