background image

English

15

Charger safety warnings

–  This appliance is not designed for use by other people (chil-

dren included), physical, sensory or mental incapability or 

lack of experience and knowledge of whose prevent from safe 

use of the appliance without being supervised, or without be-

ing instructed on use of the appliance by a person responsible 

for their safety.

–  Children should be supervised to avoid their playing with the 

appliance.

Accumulator Charging Instructions

1�  Please make sure the mains voltage is the same as the volt-

age listed on the charger’s machine plate� Connect the charg-

er (N1) to a power source� A red LED indicator (N2) will light up� 

This means the charger is ready to charge� If the red LED indi-

cator does not light up, check the connection to power supply� 

If the power supply functioning correctly, bring the charger in 

for repair to an authorised service centre!

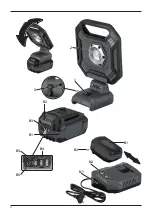
2�  Slide the accumulator (B1) all the way into the charger�
3�  The red LED will light up and the green LED (N2) will start flash-

ing to indicate that the accumulator is charging�

4�  After approximately 60 minutes, the accumulator should be 

fully charged, indicated by the green and red LED staying lit 

without flashing�

5�  Remove the accumulator from the charger� If you do not wish 

to charge another accumulator, disconnect the charger from 

the power source�

Overview of LED charging indicator signals (N2):

Green LED

Red LED

Meaning

off

on

connected to a power source

flashing

on

accumulator is charging

on

on

accumulator is charged

off

flashing

charger or battery temperature 

too high

alternately flashing

accumulator is damaged

New batteries:

Battery capacity may be slightly smaller than the listed value dur-

ing the first few initial charge cycles� The reason is that the chem-

ical composition of the batteries has not been activated yet� This 

is a temporary issue and will resolve on its own after a few charge 

cycles�

Note:

•  A  blinking green indicator means that the battery is fully 

charged or that it is in slow charge mode, which maintains 

a low charge level of the battery�

•  The initial battery charge may take longer then  60 minutes 

(according to battery capacity) depending on the environment 

temperature, the power supply and the current charge level�

•  If you are not using the charger, please unplug it from the pow-

er source�

Important information about the charging 

process:

1�  To get the best out of the batteries in terms of longevity and 

performance is to charge them at an ambient temperature of 

18 °C to 24 °C� 

DO NOT CHARGE

 the batteries at temperatures 

below 0 °C and above 45 °C� This is very important� You will 

prevent serious battery damage�

•  Do not charge the batteries in direct sunlight, especially in the 

summer! You will prevent extreme overheating, which could 

damage them!

2�  If a  battery that is too cold (below 0  °C) is inserted into the 

charger, the charger will not begin charging it right away; 

instead, the green and the red indicator light will begin blink-

ing� Once the battery reaches the right temperature naturally 

(within the standard range), the fast charge process will begin 

automatically�

•  If a battery that is too hot (more than 45 °C), is inserted into the 

charger, the charger will not begin charging it right away; in-

stead, the green and the red indicator light will begin blinking� 

Once the battery reaches the right temperature (within the 

standard range), the fast charge process will begin automat-

ically�

3�  If it is not possible to charge the batteries properly (the red 

indicator is blinking):

•  Check that the battery contact surfaces are not dirty� Clean 

them with a cotton wad and alcohol as needed�

•  If the battery is still not charging properly, send or bring the 

charger (including the batteries) to your nearest authorised 

service centre�

4�  Under certain conditions and if the charger is connected to 

power, foreign material may short circuit the charge contacts 

inside the charger� Foreign conducting substances, such as 

steel fibres, aluminium foils or metal deposits must be re-

moved from the charger continuously� Always unplug the 

charger from power prior to cleaning�

5�  If you are carrying out several different charge operations one 

after the other, the charger may become hot� This is normal 

and is not a sign of a technical problem�

6�  Prevent liquid from getting inside the charger as it could cause 

an electrical injury� Do not place the battery in a hot environ-

ment if you wish to facilitate the battery cool down process�

7�  Accumulator batteries can remain plugged into the charger 

without a risk of damage to them or the charger itself� The bat-

teries will remain fully charged in the charger� 

DO NOT LEAVE


charged batteries in the charger if the charger is not plugged 

into the power outlet�

8� 

DO NOT USE ACCUMULATOR BATTERIES

 if they are damaged 

or if liquid leaks out of the cells� If the battery liquid comes 

into contact with your skin, immediately flush the area with 

water and monitor the skin’s reaction� Seek medical attention 

if needed� If it comes into contact with your eyes, flush them 

with lots of water and immediately seek medical attention�

9�  If you are charging a  fully discharged battery or if you stop 

charging the battery before it is fully charged, you must count 

each of these cycles as an entire charging cycle�

Note on Lithium-ion (Li-Ion) batteries

•  These types of batteries do not have a memory effect, in other 

words, the batteries can be charged at any state of discharge� If 

you take the batteries out of the charger prior to fully charging 

them, it will not damage them�

•  Each Li-Ion battery is equipped with deep discharge protec-

tion� If the voltage falls (due to overloading or discharge) be-

low the monitored range, the electronic circuit will disconnect 

the cells� The machine will then either work intermittently or 

not at all� You must reduce machine load or recharge the bat-

tery�

Storing lithium-ion batteries

•  Store fully charge batteries in a dry and dust-free environment 

at an ambient temperature between 5 °C and 40 °C� If you are 

not using the batteries for a longer period of time, we recom-

mend you charge them fully once every three months�

•  Keep the battery contacts clean� Do not store the replacement 

battery together with metal items as it may cause a short cir-

cuit�

•  It is always necessary to charge batteries that were not used for 

a long time prior to use�

Transporting lithium-ion batteries

As per legal regulation, lithium-ion batteries fall into the hazard-

ous load category� These batteries must be transported while com-

plying with local, national, as well as international guidelines and 

regulations�

•  Consumers may transport these batteries on public roads 

without a problem�

•  Commercial transportation of lithium-ion batteries by trans-

portation companies must comply with the regulation on 

hazardous load transportation� Only trained personnel may 

carry out the preparation and the actual transport� The entire 

process must have expert supervision�

Summary of Contents for CR LED 20

Page 1: ...tie SK 10 Original operating manual EN 14 Original Bedienungsanleitung DE 18 Instrucciones de uso originales ES 22 Mode d emploi original FR 26 Manuale d uso originale IT 30 Оригинал pуководства по эксплуатации RU 34 Instrukcja oryginalna PL 38 CR LED 20 ...

Page 2: ... 5 Używać wyłącznie w pomieszczeniach 6 Prąd stały 7 Przyrząd posiada bezpiecznik podanych parametrów Vyobrazenie a popis piktogramov 1 Upozornenie 2 Pre zníženie rizika úrazu si prečítajte návod 3 Dvojitá izolácia 4 Nepatrí do komunálneho odpadu 5 Používajte len vo vnútri 6 Stejnosmerný prúd 7 Prístroj je vybavený poistkou udaných parametrov Figure and description of pictograms 1 Notice 2 To mini...

Page 3: ...Numero d ordine Тип Товарный Typ Numer katalogowy 65 405 728 Akumulátorová LED svítilna Akumulátorové LED svietidlo Cordless LED Flashlight Akku LED Leuchte Linterna LED a batería Lampe à diodes LED sur batterie Lampada LED a batteria Аккумуляторный светодиодный фонарь Latarka akumulatorowa LED CR LED 20 1 Akumulátor Akumulátor Battery Akku Batería Batterie Batteria Аккумулятор Akumulator CB 4 Nab...

Page 4: ...4 1 2 3 B4 B2 B2 B1 B3 B1 B5 B3 N2 N1 ...

Page 5: ...5 ...

Page 6: ... Skladování 8 Recyklace 8 Záruka 8 Prohlášení o shodě 9 Technická data Typ CR LED 20 Napětí V 20 0 Příkon LED W 20 0 Svítivost LED na vzdálenost 1m lux max 2 000 Délka svícení hod 100 1 5 50 3 0 Úhel naklopení svítilny 90 60 30 0 30 60 90 USP port výstup 5 V 2 A Hmotnost bez akumulátorů kg 0 40 Třída ochrany IP20 Doporučená nabíječka CN 20 Doporučené akumulátory CB 4 Nabíječka Typ CN 20 Napětí vst...

Page 7: ...s rychlého dobíjení 3 Není li možné akumulátory řádně nabít červená kontrolka svítí přerušovaně Zkontrolujte zda nejsou znečištěny kontaktní plochy akumu látorů V případě potřeby je vyčistěte bavlněným tampónkem a lihem Pokud se i nadále nedaří akumulátory správně nabít zašlete nebo předejte nabíječku včetně akumulátorů do nejbližšího autorizovaného servisu 4 Za určitých podmínek je li nabíječka p...

Page 8: ...kátor stavu akumulátoru B5 podle stavu nabití kapacity akumulátoru Přehled indikace stavu nabití akumulátoru Počet plně svítících LED Úroveň nabití akumulátoru 3 100 2 méně než 60 1 méně než 30 Údržba a servis Pokyny k čištění svítilny Vnější plastové části lze čistit pomocí vlhkého hadříku a slabého čisticího prostředku Přestože jsou tyto části vyrobené z materiálů odolných rozpouštědlům rozpoušt...

Page 9: ...0598 2 5 2015 EN 62493 2015 Směrnice 2014 35 EU Elektromagnetická kompatibilita EN 55015 2013 A1 2015 EN 61547 2009 EN 55032 2017 Směrnice 2014 30 EU RoHS Směrnice 2011 65 EU Místo uložení technické dokumentace Narex s r o Chelčického 1932 470 01 Česká Lípa Česká republika 2021 Narex s r o Chelčického 1932 Jaroslav Hybner 470 01 Česká Lípa Jednatel společnosti 01 03 2021 ...

Page 10: ...Skladovanie 12 Recyklácia 12 Záruka 12 Vyhlásenie o zhode 13 Technické údaje Typ CR LED 20 Napätie V 20 0 Príkon LED W 20 0 Svietivosť LED do vzdialenosti 1m lux max 2 000 Dĺžka svietenia hod 50 1 5 100 3 0 Uhol naklonenia svietidla 90 60 30 0 30 60 90 USB port výstup 5 V 2 A Hmotnosť bez akumulátorov kg 0 40 Trieda ochrany IP20 Odporúčaná nabíjačka CN 20 Odporúčané akumulátory CB 4 Nabíjačka Typ ...

Page 11: ...cky spustí proces rýchleho dobíjania 3 Ak nie je možné akumulátory riadne nabiť červený indikátor svieti prerušovane Skontrolujte či nie sú znečistené kontaktné plochy akumulá torov V prípade potreby ich vyčistite bavlneným tampónom a liehom Ak sa aj naďalej nedarí akumulátory správne nabiť zašlite ale bo odovzdajte nabíjačku vrátane akumulátorov do najbližšie ho autorizovaného servisu 4 Pri určit...

Page 12: ...edne sa rozsvieti indikátor stavu batérie B5 podľa stavu na bitia kapacity akumulátora Prehľad indikácie stavu nabitia akumulátora Počet naplno svietiacich LED Úroveň nabitia akumulátora 3 100 2 menej než 60 1 menej než 30 Údržba a servis Pokyny pre čistenie svietidla Vonkajšie plastové časti je možné čistiť pomocou vlhkej handričky a slabého čistiaceho prostriedku Napriek tomu že sú tieto časti v...

Page 13: ... 60598 2 5 2015 EN 62493 2015 Smernica 2014 35 EU Elektromagnetická kompatibilita EN 55015 2013 A1 2015 EN 61547 2009 EN 55032 2017 Smernica 2014 30 EU RoHS Smernica 2011 65 EU Miesto uloženia technickej dokumentácie Narex s r o Chelčického 1932 470 01 Česká Lípa Česká republika 2021 Narex s r o Chelčického 1932 Jaroslav Hybner 470 01 Česká Lípa Konateľ spoločnosti 01 03 2021 ...

Page 14: ...ironmental protection 16 Warranty 16 Certificate of Conformity 17 Technical Information Type CR LED 20 Voltage V 20 0 LED power input W 20 0 LED light intensity at the distance of 1m lux max 2 000 Time of lighting hr 100 1 5 50 3 0 Flashlight tilt angle 90 60 30 0 30 60 90 USP port Output 5 V 2 A Weight without batteries kg 0 40 Protection rating IP20 Recommended charger CN 20 Recommended batterie...

Page 15: ...nge the fast charge process will begin automat ically 3 If it is not possible to charge the batteries properly the red indicator is blinking Check that the battery contact surfaces are not dirty Clean them with a cotton wad and alcohol as needed If the battery is still not charging properly send or bring the charger including the batteries to your nearest authorised service centre 4 Under certain ...

Page 16: ...3 An accumulator status indicator B5 will light up based on the state of charge capacity of the accumulator Overview of accumulator s state of charge capacity indication Number of fully lit LEDs Accumulator s state of charge 3 100 2 less than 60 1 less than 30 Maintenance and service Instructions for flashlight cleaning Clean the external plastic parts by a wet rag and mild detergent Though these ...

Page 17: ... 60598 2 5 2015 EN 62493 2015 Directive 2014 35 EU Electromagnetic compatibility EN 55015 2013 A1 2015 EN 61547 2009 EN 55032 2017 Directive 2014 30 EU RoHS Directive 2011 65 EU Place of storage of the technical documentation Narex s r o Chelčického 1932 470 01 Česká Lípa Czech Republic 2021 Narex s r o Chelčického 1932 Jaroslav Hybner 470 01 Česká Lípa CEO of the company Marec 1 2021 ...

Page 18: ...orgung 20 Garantie 21 Konformitätserklärung 21 Technische Daten Typ CR LED 20 Spannung V 20 0 LED Leistungsaufnahme W 20 0 LED Lichtstärke auf 1m Entfernung lux max 2 000 Laufzeit mit AP 122 AP 123 Stunden 100 1 5 50 3 0 Winkel der Leuchte einstellbar 90 60 30 0 30 60 90 USB Port Ausgang 5 V 2 A Gewicht ohne Akkumulatoren kg 0 40 Schutzklasse IP20 Empfohlenes Ladegerät CN 20 Empfohlene Akkumulator...

Page 19: ...n beginnen nur grün und rot zu blinken Nachdem der Akku auf natürlichem Wege die Tempe ratur erreicht hat die dem standardmäßigen Temperaturbe reich entspricht startet der Schnellladeprozess automatisch Wird in das Ladegerät ein Akku gesteckt der zu warm ist über 45 C beginnt das Ladegerät nicht sofort mit der Aufladung sondern die Kontrollanzeigen beginnen nur grün und rot zu blinken Nachdem die ...

Page 20: ...sLeuchtquellewirdeinestarkleuchtendeLEDverwendet Schau en Sie nicht direkt in die Lichtquelle und leuchten Sie auch anderen Personen oderTieren nicht direkt in die Augen Sie könnten diese Personen bzw Tiere blenden sodass Verletzungsgefahr besteht USB port Der USB Ausgang 3 dient ausschließlich der Stromversor gung beziehungsweise der Aufladung externer Geräte Zum Anschließen eines externen Geräte...

Page 21: ...Einkauf bekannt waren sind aus der Garantie ausgeschlossen Anmerkung Aufgrund der ständigen Forschungs und Entwicklungsarbeiten sind Änderungen der hierin gemachten technischen Angaben vor behalten Konformitätserklärung CR LED 20 Wir erklären dass diese Anlage die Anforderungen folgender Nor men und Richtlinien erfüllt Sicherheit EN 60598 1 2015 A1 2018 EN 60598 2 4 2018 EN 60598 2 5 2015 EN 62493...

Page 22: ...cenamiento 24 Reciclaje 24 Garantía 24 Declaración de conformidad 25 Datos técnicos Tipo CR LED 20 Tensión V 20 0 Consumo energético del LED W 20 0 Luminosidad del LED a una distancia de 1 m lux máx 2 000 Duración de la iluminación horas 100 1 5 50 3 0 Ángulo de inclinación de la linterna 90 60 30 0 30 60 90 Puerto USB salida 5 V 2 A Peso sin batería kg 0 40 Clase de protección IP20 Cargador recom...

Page 23: ...ntroducimos en el cargador una batería demasiado caliente más de 45 C el cargador no iniciará la carga de inmediato únicamente se irán iluminando los testigos verde y rojo de manera intermitente Cuando la temperatura de la batería descienda a una temperatura estándar se iniciará de forma automática el procedimiento de carga rápida 3 Si la batería no se puede cargar debidamente se enciende el testi...

Page 24: ...erre con cuidado el puerto USB con la tapa de goma para impedir que entre suciedad La alimentación mediante el puerto USB solo es posible si la bate ría está colocada en la linterna Los dispositivos externos también pueden cargarse con la linterna apagada Control del estado de la batería El equipo dispone de un panel de control del estado de la bate ría B3 Presione el botón de control B4 en el pan...

Page 25: ... resultado de los continuos trabajos de investigación y desarrollo Declaración de conformidad CR LED 20 Declaramos que este equipo cumple con los requerimientos de las siguientes normas y directivas Seguridad EN 60598 1 2015 A1 2018 EN 60598 2 4 2018 EN 60598 2 5 2015 EN 62493 2015 Directiva 2014 35 EU Compatibilidad electromagnética EN 55015 2013 A1 2015 EN 61547 2009 EN 55032 2017 Directiva 2014...

Page 26: ...lage 28 Garantie 29 Déclaration de conformité 29 Caractéristiques techniques Type CR LED 20 Tension V 20 0 Puissance des diodes LED W 20 0 Intensité lumineuse des diodes LED à une distance de 1m lux max 2 000 Autonomie associé avec un AP 122 AP 123 heures 100 1 5 50 3 0 Angle d inclinaison de la lampe 90 60 30 0 30 60 90 Port USB sortie 5 V 2 A Poids sans batteries kg 0 40 Classe de protection IP2...

Page 27: ...t à clignoter Lorsque la température de la batterie tombe dans une plage standard le chargement rapide commence automatiquement 3 S il n est pas possible de charger les batteries correctement le indicateur LED rouge clignote par intermittence Vérifiez que les contacts de la batterie ne sont pas sales Net toyez les avec du coton et de l alcool si nécessaire Si les batteries ne parviennent toujours ...

Page 28: ...e l animal qui a été ébloui Port USB Le port USB de sortie 3 ne sert que comme source d alimenta tion ou si besoin de chargement pour des appareils externes Pour brancher des appareils externes au port USB retirez le cache en caoutchouc du port USB et branchez le câble USB Après avoir retiré le câble USB refermez soigneusement le port USB avec le cache en caoutchouc afin d éviter que de la saleté ...

Page 29: ...un centre de service NAREX sans être démonté Veillez à conserver la notice d utilisation les instructions de sécurité la liste des pièces de rechange et la preuve d achat Le cas échéant les dernières conditions de garantie en date sont toujours valables Remarque Des travaux de recherche et développement étant en cours les indications techniques contenues dans cette notice peuvent chan ger Déclarat...

Page 30: ...iciclaggio 32 Garanzia 32 Dichiarazione di conformità 33 Dati tecnici Tipo CR LED 20 Tensione V 20 0 Potenza assorbita LED W 20 0 Luminosità del LED alla distanza di 1m lux max 2 000 Durata di illuminazione ore 100 1 5 50 3 0 Angolo di inclinazione della lampada 90 60 30 0 30 60 90 Porta USB uscita 5 V 2 A Peso senza batterie kg 0 40 Classe di protezione IP20 Caricabatterie consigliato CN 20 Batte...

Page 31: ...vierà automaticamente il processo di ricarica veloce Se nel caricabatterie è inserita una batteria troppo calda sopra i 45 C il caricabatterie non inizia subito la ricarica ma iniziano solo a lampeggiare a intermittenza la spia verde e quella rossa Nel momento in cui la temperatura della batteria sarà scesa fino a un valore adeguato nell intervallo termico standard si avvierà automaticamente il pr...

Page 32: ...strarre il tappo della porta USB e quindi inserire il cavo USB Una volta estratto il cavo USB coprire accuratamente la porta USB con il tappo di gomma per evitare l infiltrazione di sporcizia nella porta USB L alimentazione dalla porta USB è possibile soltanto se la batteria è inserita nella lampada I dispositivi esterni possono essere alimen tati anche con la lampada spenta Controllo dello stato ...

Page 33: ...uppo il produttore si riserva il diritto di modificare i dati tecnici ivi indicati Dichiarazione di conformità CR LED 20 Elenco delle norme armonizzate utilizzate per la valutazione della conformità Sicurezza EN 60598 1 2015 A1 2018 EN 60598 2 4 2018 EN 60598 2 5 2015 EN 62493 2015 Direttiva 2014 35 EU Compatibilità elettromagnetica EEN 55015 2013 A1 2015 EN 61547 2009 EN 55032 2017 Direttiva 2014...

Page 34: ...од и техобслуживание 36 Складирование 36 Утилизация 37 Гарантия 37 Сертификат соответютвия 37 Технические данные Тип CR LED 20 Напряжение В 20 0 Пот щность LED Вт 20 0 ила света LED на расстоянии 1 м люкс макс 2 000 Время работы часов 100 1 5 50 3 0 Угол наклона светильника 90 60 30 0 30 60 90 USB порт выход 5 В 2 A Масса без аккумуляторов кг 0 40 Класс защиты IP20 Рекомендуемое зарядное устройств...

Page 35: ...сти к их повреждению 2 Если в зарядное устройство вложен слишком холодный аккумулятор ниже 0 C зарядное устройство не начнет сразу же заряжать его лишь начнут мигать зеленый и крас ный контрольные светодиоды Только когда аккумулятор естественным путем достигнет температуры соответству ющей стандартному диапазону температур автоматически начнется процесс быстрой зарядки Если в зарядное устройство в...

Page 36: ...и выключение При нажатии кнопки выключателя 1 фонарь начнет светить ся с интенсивностью 50 При повторном нажатии кнопки выключателя 1 фонарь начнет светиться с интенсивностью 100 При следующем нажатии кнопки выключателя 1 фо нарь выключится Наклон отражателя Отражатель фонаря 2 можно наклонять в диапазоне от 90 до 90 с интервалом 30 Для того чтобы наклонить отражатель в нужное положение одной руко...

Page 37: ...ля либо в результате нарушения правил эксплуатации а также повреждения известные при покупке гарантия не распространяется Рекламации могут быть признаны только том случае если аппарат в неразобранном состоянии прислан поставщику или авторизованному сервисному центру NAREX Тщательно хра ните руководство по эксплуатации и документов о покупке В остальных случаях всегда действуют актуальные гарантий ...

Page 38: ... 40 Składowanie 40 Recykling 40 Gwarancja 40 Deklaracja zgodności 41 Dane techniczne Typ CR LED 20 Napięcie V 20 0 Moc pobierana LED W 20 0 Światłość LED na odległość 1m lux maks 2 000 Czas świecenia godź 100 1 5 50 3 0 Kąt nachylenia latarki 90 60 30 0 30 60 90 Port USB wyjście 5 V 2 A Masa bez akumulatorów kg 0 40 Klasa ochrony IP20 Zalecana ładowarka CN 20 Zalecane akumulatory CB 4 Ładowarka Ty...

Page 39: ...tóra mieści się w standardowym zakresie proces szybkiego ładowania rozpocznie się automatycznie Jeśli do ładowarki zostanie włożony zbyt nagrzany akumula tor powyżej 45 C ładowarka nie rozpocznie ładowania na tychmiast zaczną jedynie migać zielone i czerwone kontrolki Po spadku temperatury akumulatora do poziomu który mieści się w standardowym zakresie proces szybkiego ładowania rozpocznie się aut...

Page 40: ...zyć urządzenie zewnętrzne do portu USB wyjąć gumo wą zatyczkę portu USB a następnie podłączyć kabel USB Po odłączeniu kabla USB dokładnie zakryć port USB gumową za tyczką aby zapobiec przedostaniu się brudu do portu USB Zasilanie z portu USB jest możliwe tylko po włożeniu akumulato ra do latarki Urządzenia zewnętrzne można zasilać również przy wyłączonej latarce Kontrola stanu akumulatora Urządzen...

Page 41: ...zastrzega się możliwość zmian zamieszczonych tu danych technicznych Deklaracja zgodności CR LED 20 Oświadczamy że urządzenie to spełnia wymagania następujących norm i dyrektyw Bezpieczeństwo EN 60598 1 2015 A1 2018 EN 60598 2 4 2018 EN 60598 2 5 2015 EN 62493 2015 Dyrektywa 2014 35 EU Kompatybilność elektromagnetyczna EN 55015 2013 A1 2015 EN 61547 2009 EN 55032 2017 Dyrektywa 2014 30 EU RoHS Dyre...

Page 42: ...42 ...

Page 43: ...43 ...

Page 44: ... cz section Service Centres Die aktuelle Liste der autorisierten Servicestützpunkte finden Sie unter www narex cz im Abschnitt Servicestellen La lista actual de los centros de servicio autorizados se puede encontrar en nuestro sitio web www narex cz en la sección Puntos de servicio Vous trouverez une liste actualisée de nos centres de service agréés sur notre site internet www narex cz dans la rub...

Reviews: