background image

English

14

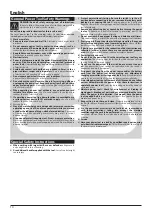
General Power Tool Safety Warnings

WARNING! Read all safety warnings and all instructions.


Failure to follow the warnings and instructions may result in 

electric shock, fire and/or serious injury.

Save all warnings and instructions for future reference!

The term “power tool” in the warnings refers to your mains-operated 

(corded) power tool or battery-operated (cordless) power tool.

1)  Work area safety

a) 

Keep work area clean and well lit.

 Cluttered or dark areas invite 

accidents.

b) 

Do  not operate power tools in explosive atmospheres, such as 

in the presence of flammable liquids, gases or dust.

 Power tools 

create sparks which may ignite the dust or fumes.

c) 

Keep children and bystanders away while operating a power tool.


Distractions can cause you to lose control.

2)  Electrical safety

a) 

Power tool plugs must match the outlet. Never modify the plug in 

any way. Do not use any adapter plugs with earthed (grounded) 

power tools.

 Unmodified plugs and matching outlets will reduce risk 

of electric shock.

b) 

Avoid body contact with earthed or grounded surfaces, such as 

pipes, radiators, ranges and refrigerators.

 There is an increased risk 

of electric shock if your body is earthed or grounded.

c) 

Do not expose power tools to rain or wet conditions.

 Water entering 

a power tool will increase the risk of electric shock.

d) 

Do not abuse the cord. Never use the cord for carrying, pulling or 

unplugging the power tool. Keep cord away from heat, oil, sharp 

edges or moving parts.

 Damaged or entangled cords increase the 

risk of electric shock.

e) 

When operating a power tool outdoors, use an extension cord 

suitable for outdoor use.

 Use of a cord suitable for outdoor use 

reduces the risk of electric shock.

f) 

If operating a power tool in a damp location is unavoidable, use 

a residual current device (RCD) protected supply.

 Use of an RCD 

reduces the risk of electric shock.

3)  Personal safety

a) 

Stay alert, watch what you are doing and use common sense when 

operating a power tool. Do not use a power tool while you are tired 

or under the influence of drugs, alcohol or medication.

 A moment 

of inattention while operating power tools may result in serious 

personal injury.

b) 

Use personal protective equipment. Always wear eye protection.


Protective equipment such as dust mask, non-skid safety shoes, hard 

hat, or hearing protection used for appropriate conditions will reduce 

personal injuries.

c) 

Prevent unintentional starting. Ensure the switch is in the off-

position before connecting to power source and/or battery pack, 

picking up or carrying the tool.

 Carrying power tools with your 

finger on the switch or energising power tools that have the switch on 

invites accidents.

d) 

Remove any adjusting key or wrench before turning the power 

tool on.

 A wrench or a key left attached to a rotating part of the 

power tool may result in personal injury.

e) 

Do not overreach. Keep proper footing and balance at all times.


This enables better control of the power tool in unexpected situations.

f) 

Dress properly. Do not wear loose clothing or jewellery. Keep your 

hair, clothing and gloves away from moving parts.

 Loose clothes, 

jewellery or long hair can be caught in moving parts.

g) 

If devices are provided for the connection of dust extraction and 

collection facilities, ensure these are connected and properly 

used.

 Use of dust collection can reduce dust-related hazards.

4)  Power tool use and care

a) 

Do not force the power tool. Use the correct power tool for your 

application.

 The correct power tool will do the job better and safer at 

the rate for which it was designed.

b) 

Do  not use the power tool if the switch does not turn it on and 

off.

 Any power tool that cannot be controlled with the switch is 

dangerous and must be repaired.

c) 

Disconnect the plug from the power source and/or the battery 

pack from the power tool before making any adjustments, 

changing accessories, or storing power tools.

 Such preventive safety 

measures reduce the risk of starting the power tool accidentally.

d) 

Store idle power tools out of the reach of children and do not allow 

persons unfamiliar with the power tool or these instructions to 

operate the power tool.

 Power tools are dangerous in the hands of 

untrained users.

e) 

Maintain power tools. Check for misalignment or binding of 

moving parts, breakage of parts and any other condition that may 

affect the power tool’s operation. If damaged, have the power 

tool repaired before use.

 Many accidents are caused by poorly 

maintained power tools.

f) 

Keep cutting tools sharp and clean.

 Properly maintained cutting 

tools with sharp cutting edges are less likely to bind and are easier to 

control.

g) 

Use the power tool, accessories and tool bits etc. in accordance 

with these instructions, taking into account the working 

conditions and the work to be performed.

 Use of the power tool for 

operations different from those intended could result in a hazardous 

situation.

5) Service

a) 

Have your power tool serviced by a qualified repair person using 

only identical replacement parts.

 This will ensure that the safety of 

the power tool is maintained.

Special Safety Instructions

a) 

When working with impact drill, use ear defenders.

 Exposure to 

noise might cause loss of hearing.

b) 

Use additional handle supplied with the tool.

 Loss of control might 

cause injury.

Summary of Contents for EVP 13 G-2A

Page 1: ...P vodn n vod k pou v n P vodn n vod na pou itie Original operating manual Instrucciones de uso originales p Pierwotna instrukcja obs ugi Eredeti haszn lati tmutat EVP 13 G 2H3 EVP 13 G 2A...

Page 2: ...rizika razu si pre tajte n vod Caution Read this manual to reduce the injury hazard Cuidado Lea las instrucciones para reducir los riesgos de que se produzcan da os Uwaga Dla zmniejszenia ryzyka urazu...

Page 3: ...3...

Page 4: ...4 1 2 3 4 5 5 6 7 8 9 10 11 12...

Page 5: ...5 1 13 14 15 16 14...

Page 6: ...z suvky a nebo p i zasouv n bateri i p i p en en n ad vypnut P en en n ad s prstem na sp na i nebo zapojov n vidlice n ad se zapnut m sp na em m e b t p inou nehod d P ed zapnut m n ad odstra te v ec...

Page 7: ...adit n stroj N stroj nasa te Obj mku rychloup nac ho skl idla ut hn te siln rukou a je sly et jasn p esko en klik Skl idlo se t mto automaticky zajist Zaji t n se op t uvoln budete li k odejmut n stro...

Page 8: ...jeho proklouznut dr ba V trac otvory 5 krytu motoru se nesm ucpat Po cca 200 hodin ch provozu se mus prov st n sleduj c pr ce Kontrola d lky kart Kart e krat ne 5 mm vym nit za nov V m na mazac ho tu...

Page 9: ...Bezpe nost SN EN 60745 1 SN EN 60745 2 1 Sm rnice 2006 42 EC Elektromagnetick kompatibilita SN EN 50366 SN EN 55014 1 SN EN 55014 2 SN EN 61000 3 2 SN EN 61000 3 3 Sm rnice 2004 108 EC 2012 Narex s r...

Page 10: ...zas van bat ri i pri pren an n radia vypnut Pren anie n radia s prstom na sp na i alebo zapojovanie vidlice n radia so zapnut m sp na om m e by pr inou neh d d Pred zapnut m n radia odstr te v etky n...

Page 11: ...r chlost 11 Pr davn dr adlo 12 Dorazov ty 13 K u ka sk idla 14 Stranov k 15 K es hrann z str n 16 Rychloup nacie sk idlo Zobrazen anebo pop san pr slu enstvo nemus by s as ou dod vky Dvojit izol cia...

Page 12: ...te p ku pr klepu na symbol kladivo Rezanie z vitov D kladne upnite z vitn k vsk idle zna nou silou inak d jde k jeho pre k znutiu dr ba Vetracie otvory 5 krytu motora sa nesm upchat Asi po 200 hodin...

Page 13: ...noriem asmern c Bezpe nos EN 60745 1 EN 60745 2 1 Smernica 2006 42 EC Elektromagnetick kompatibilita EN 50366 EN 55014 1 EN 55014 2 EN 61000 3 2 EN 61000 3 3 Smernica 2004 108 EC 2012 Narex s r o Chel...

Page 14: ...the tool Carrying power tools with your finger on the switch or energising power tools that have the switch on invites accidents d Remove any adjusting key or wrench before turning the power tool on A...

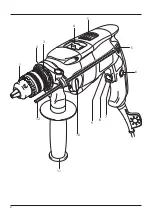
Page 15: ...ation switch lever 10 Gear shifting lever 11 Additional handle 12 Stop bar 13 Chuck hook 14 Spanner 15 Socket screw wrench 16 Quick tightening chuck The displayed or described accessories need not be...

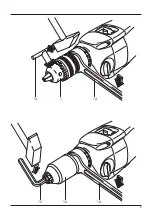
Page 16: ...rew the chuck together Release the firmly clamped chuck by impacts of the hammer on the hexagonal wrench Proceed in reverse sequence to screw the chuck on Work instructions Drill bits For steel use pe...

Page 17: ...used for making preliminary estimates regarding vibration and noise loads during operation The emission values specified refer to the main applications for which the power tool is used If the electric...

Page 18: ...ater as o porte las herramientas Asimismo la causa de accidentes puede ser tambi n el portar una herramienta con el dedo puesto en el pulsador o el conectar la clavija con el pulsador en posici n de e...

Page 19: ...ptor regulador 8 Ruedecilla de preselecci n de revoluciones 9 Manecilla del conmutador 10 Manecilla de cambio de velocidad 11 Mango adicional 12 Barra de tope 13 Llave del mandril 14 Llave lateral 15...

Page 20: ...ib relo con un martillazo en la llave del mandril 13 Retirada del mandril de sujeci n r pida fig Enganche la llave hexagonal 15 al mandril Sujete el husillo en la plataforma 2 con la llave lateral 13...

Page 21: ...evaluaci n provisional de los valores de vibraci n y ruido en la aplicaci n Losvaloresdeemisi nindicadosrepresentanlasaplicacionesprincipalesde la herramienta el ctrica No obstante si se emplea la her...

Page 22: ...o 22 1 2 a RCD RCD 3 a 4 a 5 a a...

Page 23: ...1 2 0 1 750 1 0 1 750 1 1 0 1 100 1 0 1 100 1 2 0 3 050 1 0 3 050 1 1 0 22 000 1 0 22 000 1 2 0 61 000 1 0 61 000 1 1 5 13 1 5 13 1 2 20 UNF 1 2 20 UNF Auto Lock 13 13 25 25 45 45 20 20 43 43 2 1 2 2...

Page 24: ...o 24 7 7 6 7 7 8 8 3 10 2 1 2 9 4 4 4 9 2 13 13 13 15 2 13 4 5 200 5 5 C a 5 C 2002 96 ES 12 24 NAREX...

Page 25: ...97 A LwA 108 A K 3 A ah K EN 60745 ah D 1 2 2 c ah ID 13 3 2 K 1 5 2 EN 60745 60745 1 60745 2 1 2006 42 EC 50366 55014 1 55014 2 61000 3 2 61000 3 3 2004 108 EC 2012 Narex s r o Chel ick ho 1932 Anto...

Page 26: ...ony Prze noszenie narz dzia z palcem na wy czniku lub wtykanie wtyczki na rz dzia z w czonym wy cznikiem mo e by przyczyn wypadk w d Przed za czeniem narz dzia zdj wszystkie narz dzia regulacyj ne lub...

Page 27: ...ika 10 D wigienka prze czania bieg w 11 Dodatkowa r koje 12 Trzpie ogranicznika g boko ci 13 Klucz do uchwytu 14 Klucz p aski 15 Klucz sze ciok tny imbus 16 Szybkomocuj cy uchwyt Wyobra one lub opisan...

Page 28: ...a uderzaj c m otkiem w klucz sze ciok tny Przykr caj c uchwyt post powa w odwrotnej kolejno ci Zalecenia dotycz ce pracy Wiert a Do stali u ywa naostrzonych wierte w dobrym stanie z wysokiej jako ci s...

Page 29: ...ia wibracjami i ha asem podczas u ytkowania Podane parametry emisji dotycz g wnych zastosowa elektronarz dzia Je li jednak narz dzie elektryczne zostanie u yte do innych zastosowa z innymi narz dziami...

Page 30: ...z dj n meg arr l hogy a csatlakoz dug ki van h zva a dugaszaljb l vagy az ak kumul tor ki van kapcsolva a szersz m thelyez s n l A szersz m thelyez se jjal a kapcsol n vagy a h l zatba kapcsolt szers...

Page 31: ...9 Forg sir ny kapcsol 10 Sebess gv lt kar 11 Kieg sz t markolat 12 tk z 13 Tokm nykulcs 14 Vill skulcs 15 Imbuszkulcs 16 Gyorskiold tokm ny A felt ntetett vagy le rt tartoz kok nem felt tlen l k pezi...

Page 32: ...se az ors t a lapos fe l leteken 2 vill skulcs 13 mm seg ts g vel Az imbuszkulcs seg ts g vel forgassa a tokm ny balra gy lecsavarja a tokm nyt A beszorult tokm nyt gy laz thatja meg hogy kalap ccsal...

Page 33: ...k ziszersz m okozta rezg s s zajterhel sek el zetes ki rt kel s hez A felt ntetett rezg s s zajszint rt kek az elektromos k ziszersz m f fel haszn l s ra vonatkoznak M s felhaszn l s vagy egy b szersz...

Page 34: ...34...

Page 35: ...35...

Page 36: ...x cz Narex s r o Chel ick ho 1932 CZ 470 01 esk L pa V robn slo Datum v roby Kontroloval Dne Raz tko a podpis Z RU N OPRAVY Datum P evzet P ed n Raz tko a podpis Prod no spot ebiteli Z RU N LIST 00 63...

Reviews: