background image

English

15

We recommend to connect the appliance via the current protector. The plug 

and the power and connecting cable connectors have to be waterproof.

For purpose of cable extension only the cable corresponding to manufactur-

er’s specification or a cable of higher quality may be used.

When using the extension cable, observe the minimum cross-section values:

cable length

cross section

< 16 A

< 25 A

up to 20 m

1,5 mm

2

2,5 mm

2

20 to 50 m

2,5 mm

2

4,0 mm

2

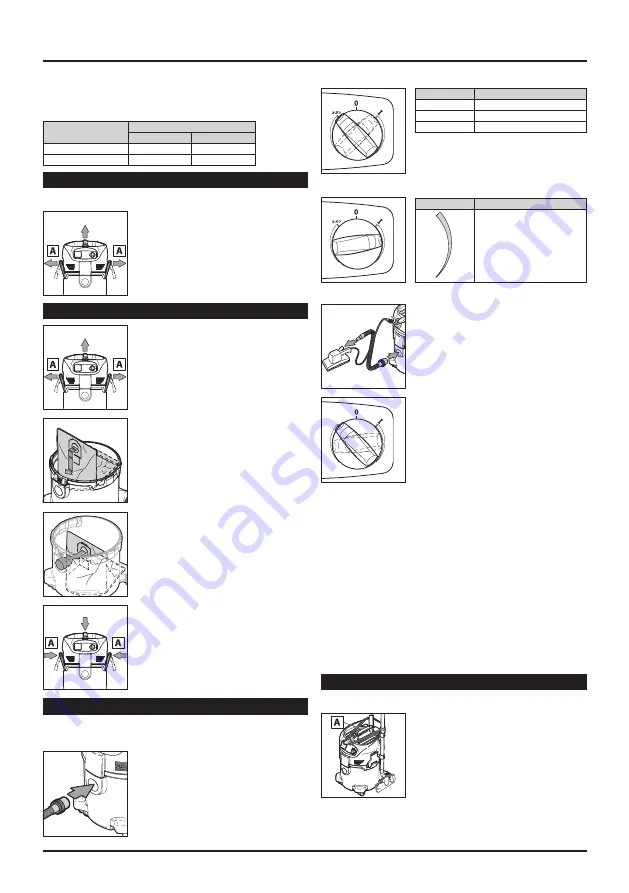
Prior to putting into operation

Vacuum cleaner completion

1.  Unpack the appliance and its accessories.

2.  The power cable may not be connected to the 

socket for now.

3.  Loosen  the  fasteners (A)  and  remove  the  top 

vacuum cleaner part.

4.  Unpack the accessories and take them out of 

the vacuum cleaner canister.

Insertion of the filter bag

1.  The power cable may not be connected to the 

socket for now.

2.  Loosen  the  fasteners (A)  and  remove  the  top 

vacuum cleaner part.

3.  Put the filter bag into the vacuum cleaner can-

ister.

4.  Press the filter bag neck firmly onto the hole 

for hose connection.

5.  Place the top part on the vacuum cleaner.

6.  Close the fasteners (A). Check whether the fas-

teners are fixed firmly.

Operation

Connection of suction hose and connection to 

the power supply source

1.  Connect the suction hose.

2.  Plug  the  power  cable  into  the  correctly  in-

stalled socket (with the safety pin); the vacu-

um cleaner must be OFF.

Starting the appliance

Switch position Function

0

OFF

auto

automatic mode

I

ON

Suction force control

Switch position Function

The suction force control 

mechanism enables to adapt 

the suction power to specific 

conditions

Automatic operation with connected attachments

1.  The  vacuum  cleaner  and  the  el.  tool  (attach-

ment)  must  be  OFF  prior  to  interconnecting 

them.

2.  Connect the el. tool to the suction hose already 

connected with the vacuum cleaner.

3.  Plug the el. tool power cable into the socked in 

the vacuum cleaner control panel.

4.  Start the vacuum cleaner, the switch is in the 

position “auto”.

5.  Start  the  el.  tool. Vacuum  cleaner  motor  will 

be  started  at  the  same  time.  After  switching 

the el. tool off, the vacuum cleaner will run for 

a while to move the dust from the suction hose 

into the canister.

Cleaning the filter cartridge „Press & Clean“ 

VYS 30-21

Applicable only if the appliance runs with the filter without the filter bag.

In case of suction power drop:

1. Turn the switch (6) to the position “I” (max. suction power).

2. Close the suction hose hole by your palm.

3. Depress the switch three times to start filter cleaning (8). This way gener-

ated airflow will clear the filtration cartridge plates for deposited dust.

Cleaning the filter cartridge „Auto Clean“ 

VYS 30-71 AC

To ensure that suction performance is always at its best, the filter element is 

automatically cleaned during operation. We recommend complete cleaning if 

the filter element becomes extremely dirty.

1. Switch off the vacuum cleaner.

2. Close the nozzles or suction hose opening with the palm of your hand.

3. Turn the switch (6) to position „I“ and let the cleaner operate for approx. 

10 seconds with the suction hose opening closed.

After work completion

Vacuum cleaner switching off and storing

1.  Switch  the  appliance  off  and  disconnect  the 

power cable from the socket.

2.  Wind the cable on the handle (A). Start wind-

ing from the vacuum cleaner and not from the 

cable end to prevent cable twisting.

3.  Empty  the  canister  and  clean  the  vacuum 

cleaner.

4.  After  suction  of  liquids:  put  the  top  vacuum 

cleaner  part  aside  to  let  the  filter  cartridge 

dry.

5.  Place  the  vacuum  cleaner  in  a dry  room  and 

protect from misuse by unauthorized persons.

auto

Summary of Contents for VYS 30-21

Page 1: ...P vodn n vod k pou v n P vodn n vod na pou itie Original operating manual Instrucciones de uso originales p Pierwotna instrukcja obs ugi Eredeti haszn lati tmutat VYS 30 21 VYS 30 71 AC...

Page 2: ...p ed v eobecn m nebezpe m Varovanie pred v eobecn m nebezpe enstvom Warning of general danger Aviso ante un peligro general Ostrze enie przed og lnym zagro eniem ltal nos vesz lyre val figyelmeztet s...

Page 3: ...3 1 2 3 4 5 6 7 8 VYS 30 21...

Page 4: ...apot eb elektrick kabel typu H05 RR F V m nu kabelu sm prov d t pouze autorizovan servis P vodn kabel nesm b t nam h n tahem a nesm le et na ostr ch hra n ch nebo p es tyto p ech zet a nesm b t p ej d...

Page 5: ...d musej b t p ed vz jemn m propojen m vypnut 2 Elektrick n ad p ipojte k sac hadici p ipoje n do vysava e 3 Kabel elektrick ho n ad zapojte do z suvky v ovl dac m panelu vysava e 4 Zapn te vysava sp n...

Page 6: ...pro p ipojen hadice 9 Na vysava nasa te vrchn d l 10 Sev ete uzav rac spony A P esv d te se zda uzav rac spony dob e dr V m na odpadkov ho s ku 1 P stroj vypn te a vyt hn te kabel ze z suvky 2 Rozev...

Page 7: ...ezi n dobou a vrchn m d lem vysava e je po kozen nebo chyb Vym te resp vsa te t sn n Samo istic mechanismus je defektn Informujte servis firmy Narex dn sac v kon p i mokr m vys v n N doba vysava e je...

Page 8: ...A Prohl en o shod Prohla ujeme e toto za zen spl uje po adavky n sleduj c ch norem a sm r nic Bezpe nost SN EN 60335 1 SN EN 60335 2 69 Sm rnice 2006 95 EC Elektromagnetick kompatibilita SN EN 55014...

Page 9: ...potreba elektrick k bel typu H05 RR F V menu k bla smie vykon va iba autorizovan servis Pr vodn k bel nesmie by nam han ahom a nesmie le a na ostr ch hran ch alebo cez tieto prech dza a nesmie sa po...

Page 10: ...r stroja Poloha sp na a Funkcie 0 Vypnut auto Zapnut do automatickej prev dzky I Zapnut Regul cia nas vacej sily Poloha sp na a Funkcia Mechanizmus regul cie nas vacej sily umo uje prisp so bi nas vac...

Page 11: ...rdlo filtra n ho vrecka B 4 Hrdlo filtra n ho vrecka uzatvorte zo ucho vadlom D 5 Filtra n vrecko zlikvidujte pod a z konn ch predpisov 6 Vy istite n dobu vys va a 7 Do vy istenej n doby vys va a vlo...

Page 12: ...n Vi odsek O istenie filtra nej patr ny resp V mena fil tra nej patr ny Tesnenie medzi n dobou a vrchn m dielom vys va a je po koden alebo ch ba Vyme te resp vsa te tesnenie Samo istiaci mechanizmus j...

Page 13: ...Vyhl senie o zhode Vyhlasujeme e toto zariadenie sp a po iadavky nasleduj cich noriem a smern c Bezpe nos EN 60335 1 EN 60335 2 69 Smernica 2006 95 EC Elektromagnetick kompatibilita EN 55014 1 EN 550...

Page 14: ...authorized service station only The supply cable may not be tensioned excessively may not lie on sharp edges and may not be passed over or damaged mechanically otherwise Check the supply cable regula...

Page 15: ...ment must be OFF prior to interconnecting them 2 Connect the el tool to the suction hose already connected with the vacuum cleaner 3 Plug the el tool power cable into the socked in the vacuum cleaner...

Page 16: ...neck firmly onto the hole for hose connection 9 Place the top part on the vacuum cleaner 10 Close the fasteners A Check whether the fas teners are fixed firmly Dust bag replacement 1 Switch the appli...

Page 17: ...age Packed appliance may be stored in dry unheated storage place with tempera ture not lower than 5 C Unpacked appliance should be stored only in dry storage place with tempera ture not lower than 5 C...

Page 18: ...tificate of Conformity We declare hereby that this device meets requirements of the following stand ards and directives Safety EN 60335 1 EN 60335 2 69 Directive 2006 95 EC Electromagnetic compatibili...

Page 19: ...usada solamente en habitaciones Para uso eterior se necesitauncableel ctricotipoH05RR F Elcablepuedesersustitu dosolamente poruntallerautorizado Esprohib doforzarelcabledealimentaci nportracci n poner...

Page 20: ...Puesta en marcha de la m quina Posici n del interruptor Funci n 0 Apagado auto Encendido en el funcionamien to autom tico I Encendido Regulaci n de la fuerza aspiradora Posici n del interruptor Funci...

Page 21: ...dora bajar Antes de colocar la manguera de aspiraci n de nuevo limpie la abertura de conexi n de la manguera y la tubuladora de la manguera Sustituci n de la bolsa filtrante 1 Apague la m quina y saqu...

Page 22: ...sobrecarga Apague la aspiradora y d jela enfriar unos 5 minutos Si tambi n luego sigue siendo imposible encender la aspiradora contacte el dpto de atenci n al cliente de la compa a Narex Defecto del...

Page 23: ...meses para los produc tos destinados al uso privado acreditado con la factura o el recibo No estar n cubiertos por la garant a los da os derivados del desgaste natural sobrecarga una manipulaci n inad...

Page 24: ...4 VYS 30 21 VYS 30 71 AC 230 50 60 16 A 1 200 2 400 3 600 3 700 25 250 x x 600 x 380 x 450 lP X4 7 5 H05 RR F 10 11 PET 00 763 290 00 765 492 5 00 763 288 5 00 763 289 1 2 3 4 5 6 7 8 VYS 30 21 H05 RR...

Page 25: ...25 230 220 240 16 A 25 A 20 1 5 2 2 5 2 20 50 2 5 2 4 0 2 1 2 3 A 4 1 2 A 3 4 5 6 A 1 2 0 auto I 1 2 3 4 auto 5 Press Clean VYS30 21 1 6 I 2 3 8 AutoClean VYS30 71AC 1 2 3 6 I 10 auto...

Page 26: ...26 1 2 A 3 4 5 1 2 A 3 4 5 6 A 1 2 A 3 C B 4 D 5 6 7 B 8 9 10 A 1 2 A 3 B 4 C 5 D 6 7 8 9 E 10 11 12 13 A...

Page 27: ...27 VYS 30 21 1 2 A 3 4 5 B 6 7 8 9 10 A VYS 30 71 AC 1 2 A 3 B 4 5 6 C D 7 8 B 9 10 A 5 Narex Narex P 40 Narex 0 15 7...

Page 28: ...S 12 24 NAREX EN 60 704 1 LpA 62 A LwA 59 A K 3 A EN 60335 1 EN 60335 2 69 2006 95 EC EN 55014 1 EN 55014 2 EN 61000 3 2 EN 61000 3 3 2004 108 EC 20 11 Narex s r o Chel ick ho 1932 Anton n Pomeisl 470...

Page 29: ...ia na dworze jest potrzebny kabel elektryczny typu H05 RR F Wymiany kabla mo e dokona tylko serwis autoryzowany Kabla nie mo na obci a naci ganiem inie mo e on le e na ostrych kantach lub prowadzi prz...

Page 30: ...wy czone przed wzajemnym po czeniem 2 Narz dzia elektryczne pod czy do w a ss cego pod czonego do odkurzacza 3 Kabel narz dzia elektrycznego pod czy do gniazdka w panelu steruj cym odkurzacza 4 W czy...

Page 31: ...ie w a 9 W o y na odkurzacz cz g rn 10 Zamkn spinki zamykaj ce A Skontrolowa czy trzymaj spinki zamykaj ce Wymianaworeczkaodpadkowego 1 Wy czy urz dzenie i wci gn kabel z gniazdka 2 Rozpi spinki zamyk...

Page 32: ...z dzenie elektryczne jest uszkodzone lub nie jest odpowied nio wsuni te Skontrolowa funkcj urz dzenia elektrycznego ewentualnie przycisn mocno kontakt do gniazdka Zbyt niski pob r mocy narz dzia elekt...

Page 33: ...w przypadkuwy cznie prywatnego u ywania potwierdzone faktur lub kwitem dostawy Szkody wynikaj ce z naturalnego zu ycia przeci ania nieprawid owego obchodze niasi ew szkodyz winyu ytkownikalubw wynikuu...

Page 34: ...haszn latraH07 RN F t pus k bel sz ks ges K bel cser j t kiz r lag erre kijel lt szerviz v gez heti Abevezet k belt nem szabad h z ssal terhelni s nem fek dhet les t rgya kon vagynemszabadr l pni tmen...

Page 35: ...t ki van kapcsolva 2 Az elektromos szersz mot csatlakoztassa a por sz v ba l v t ml h z 3 A elektromos szersz m k bel t kapcsolja a por sz v kezel panel n l v dug aljba 4 Kapcsolja be a porsz v t kapc...

Page 36: ...A fels r szt helyezze a porsz v ra 10 Nyomja ssze a z r kapcsokat A Gy z dj n meg arr l hogy a z r kapcsok j l tartanak A hullad kzacsk cser je 1 K sz l ket kapcsolja ki s h zza ki a dugaljb l 2 H zz...

Page 37: ...motor kicser l s t A motor nem m k dik automatikus zemben Az elektromos szersz m elromlott vagy nincs helyesen bedugva Ellen rizze az elektromos szersz m m k d s t esetleg j l nyomja a dug t a dug alj...

Page 38: ...ml val vagy sz ll t lev llel igazolt mag nhaszn lat eset n 24 h nap A term szetes elhaszn l d sb l t lterhel sb l nem megfelel haszn latb l ered k rokra ill a felhaszn l ltal okozott vagy a haszn lat...

Page 39: ...39...

Page 40: ...s r o Chel ick ho 1932 CZ 470 01 esk L pa V robn slo Datum v roby Kontroloval Dne Raz tko a podpis Z RU N OPRAVY Datum P evzet P ed n Raz tko a podpis Prod no spot ebiteli Z RU N LIST 00 778 120 C 20...

Reviews: