19
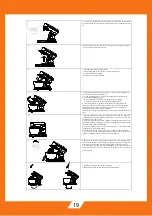
1.
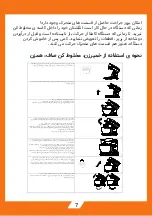
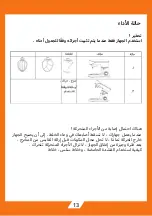
Turn the arm release button (2) clockwise. at the same time lift the swivel
arm(1) with hand so that it locks into place with a click
,
The swivel arm tilts
up.
2.
Fit the bowl cover (8) onto the swivel arm(1) and turn it slightly clockwise,
so that it locks into position securely.
3.
1. Place the food in the mixing bowl(12).
2.Fit the mixing bowl in the recess on the motor house(4).
3.Turn the mixing bowl slightly
clockwise, so it locks into position.
4.
1.Fit the required accessory (10 with 9, 8or 11) onto the motor spindle (6)
on the underside of the swivel arm(1).
2. A. The kneading hook (11) is used for heavy dough,minced meat or
other demanding kneading jobs.
B. The flat beater (10) is used to mix lighter types of dough.
C. The whisk (9) is used for whisking cream, egg whites, etc.
3. Turn the accessory, so the pins on the spindle are aligned with the
depressions on the accessory top edge. Press the accessory against the
swivel arm and turn it anti-clockwise at the same time until the pins
engage and the accessory locks into position
securely. The accessory must not be loose nor should you be able to pull it
free.
5.
1.Lower the swivel arm so that it locks into place with a click. The lid(8) must
fit tightly with the mixing bowl(12), otherwise it is fitted incorrectly. The
appliance is now ready for use.
2. Plug the power cord into main power outlet and switches it ON. Turn
Speed control knob to speed1(or any speed setting) indicator light on the
control panel will now be illuminated.
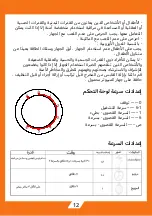
3. Select the speed you want using . Speed button 1 is the slowest and
speed button 6 is the fastest speed.
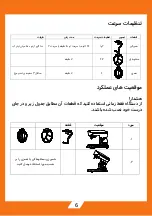
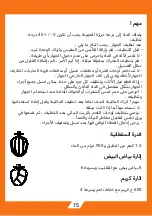
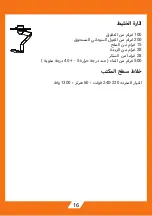
Recommended speeds, time and capacity are shown in the table above.
4. If you need to scrape inside the mixing bowl, wait until the accessory has
stopped completely. Use the spatula, never your fingers.
6.
1.Switch off the appliance by turn knob to 0 when you have finished mixing.
Switch off the appliance at the switch and unplug it before you change the
accessories, or before you take the appliance apart or when not in use.
2.Turn the swivel arm release button (2) clockwise. at the same time lift the
swivel arm with hand so that it locks into place with a click
,
The swivel
arm(1) tilts up.
7.
1.Detach the accessory by turning it clockwise.
2.Remove mixing bowl with prepared food anti-clockwise.
Summary of Contents for NS-973
Page 1: ...1 NS 973...
Page 2: ...2...
Page 3: ...3 1 2 3 4 5 6 7 8 9 11 11 12 13 1 2 3 4 5 6 7 8 9 10 11 12 13...
Page 4: ...4...
Page 5: ...5 0 6 1 1 6 p...
Page 6: ...6 2 1 03 1 5 2 133 533 2 4 7 6 7 0 1 2...
Page 7: ...7 1 2 1 2 1 3 1 12 2 4 3 4 1 11 9 8 11 6 1 2 11 11 9 3 5 1 8 12 2 1 3 1 6 4 6 1 0 2 2 1 7 1 2...
Page 8: ...8 40 5...
Page 9: ...9 900 5 1 6 8 4 600 100 200 15 28 28 40 5 500 1300 60 240 220...
Page 10: ...10 1 2 3 4 5 6 7 8 9 10 11 12 13 1 2 3 4 5 6 7 8 9 11 11 Khmyrzn 12 13...
Page 11: ...11...
Page 12: ...12 0 6 1 1 6...
Page 13: ...13...
Page 15: ...15 40 5 900 1 5 6 8 4 600...
Page 16: ...16 100 200 15 28 28 40 5 500 1300 60 240 220...
Page 25: ...25...
Page 26: ...26 NS 973 Professional bowl mixer Read instruction carefully before using...

