background image

22

Care and Maintenance

Several of the infant simulator components are completely washable 

and may be immersed in water. Perform the below care and 

maintenance procedures after each use.
1.  Ensure all medical devices and appliances are removed from the 

infant simulator after each use.

2.  Remove all components (hand and foot skins, umbilicus, birth 

defects, lung plate, and airway).

3.  Wipe the simulator and umbilicus with pulse system tubing with 

a damp cloth. Avoid the chest cavity with electronic components. 

Avoid the pulse tubing on the umbilicus and in the abdominal 

reservoir.

4.  Allow to air dry completely.
5.  Wipe the abdominal reservoir with a damp cloth.
6.  Allow to air dry completely.
7.  Wash the components (airways, hand and foot skins, birth defects, 

and genitals) gently in warm soapy water.

8.  Rinse and dry thoroughly.
9.  Allow all components to air dry completely after each use and before 

re-assembly or storage.

10.A dusting of baby powder to baby body and all components prior to 

storage is recommended.

11. Store the clean, dry simulator and the components in a clear plastic 

bag to discourage dust or other materials from settling on the clean 

simulator.

12.Certain surfaces can become damaged from prolonged exposure to 

the simulator and its components.

13.Stubborn dirt or grime may be removed by using Nasco Cleaner 

(sold separately, LF09919U) or Tub O’ Towels

®

 (sold separately, 

9731398). Simply apply the Nasco Cleaner to the soiled surface and 

wipe clean with a cloth or use Tub O’ Towels

®

 pre-moistened cloth. 

Avoid areas with electronic components with Nasco Cleaner and 

premoistened Tub O’ Towels

®

.

14.A dusting of baby powder will give a more quality to the skin.
15.Simulated blood will stain surfaces, clothing, and certain 

components of the simulator.

Actual product may vary slightly from photo. Nasco reserves the right to 

change product color, materials, supplies, or function as needed.

Summary of Contents for C.H.A.R.L.I.E

Page 1: ...or LF01420 with ECG Simulator LF01421 without ECG Simulator INSTRUCTION MANUAL HEALTHCARE C H A R L I E NeonatalResuscitationSimulator LF01420UwithECGSimulator LF01421UwithoutECGSimulator INSTRUCTION...

Page 2: ...irway Breathing Intubation and Ventilation Birth Anomalies Chest Tube Placement CPR Defibrillation ECG Simulation LF03670AU included with LF01420U GI Tube Placement Interchangeable Genitalia I O Infus...

Page 3: ...talled N Male Genitalia O Female Genitalia P Myelomeningocele Birth Defect Q Omphalocele Birth Defect R Umbilicus shown installed S 3 cc Syringe with Needle T 25 gauge Infusion Butterfly U 24 ml Syrin...

Page 4: ...e airway down into the head making sure to free the lips as the airway slides into place See figure 3 4 Gently pull up the defibrillation chest insert Using caution to not detach the electronics slide...

Page 5: ...ibrillation chest plate to the wire extending from the base of the chest cavity See figure 6 3 Fit the chest insert back into the chest cavity 4 Use the round defibrillation adapter posts for manual d...

Page 6: ...uced by the Interactive ECG Simulator connect the 4 colored limb leads coming from the left side of the infant simulator to the same colored snaps on the side of the Interactive ECG Simulator See figu...

Page 7: ...4 From the medial side of the vein channel feed the tubing through the remaining hole See figure 14 5 Adjust the tubing so that it lies securely in the vein channel 6 Attach the Luer fitting to the op...

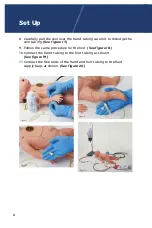
Page 8: ...foot See figure 18 10 Connect the hand tubing to the foot tubing as shown See figure 19 11 Connect the free ends of the hand and foot tubing to the fluid supply bags as shown See figure 20 D I O Leg T...

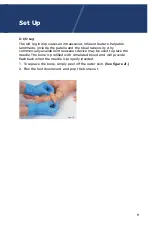
Page 9: ...PM D I O Leg The left leg incorporates an intraosseous infusion feature Palpable landmarks include the patella and the tibial tuberosity Any commercially available intraosseous device may be used to p...

Page 10: ...figure 25 3 Replace the umbilical stump being careful to not kink the tubing for the pulse system 4 If the pulse system tubing should become disconnected simply reconnect the stump at the outlet of th...

Page 11: ...simulator Note This is for tube placement only No fluids should be infiltrated into the simulated stomach cavity G Pulses C H A R L I E features seven functioning pulse sites right and left femoral r...

Page 12: ...hest cavity of the infant r Note This is for tube placement only No fluids e infiltrated into the simulated stomach cavity es L I E features seven functioning pulse sites right emoral right and left b...

Page 13: ...l practice guidelines to place the tube 3 Adhesive tape will not adhere to the material of the face Use an alternative method to secure the tube 4 Clean any excess lubricant following each use 5 Allow...

Page 14: ...he round defibrillation adapter posts for manual defibrillation 4 Screw the round defibrillation adapter posts into the defibrillation chest insert See figure 34 5 Screw the round defibrillation adapt...

Page 15: ...Shock the manikin using industry standards for infant defibrillation The blinking rhythm will then turn solid on the Interactive ECG Simulator and will be the rhythm displayed on your defibrillator m...

Page 16: ...ple or prolonged exposure to harsh antiseptics such as alcohol or iodine could damage or stain the simulator Using any fluids besides distilled water is not recommended 7 For injections or infusions c...

Page 17: ...solution or fluid supply Bag C Note Simulate cleansing IV injection and withdrawal sites using distilled water Multiple or prolonged exposure to harsh antiseptics such as alcohol or iodine could damag...

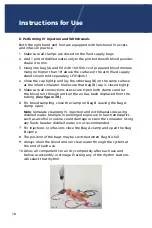
Page 18: ...Wipe out remaining fluid with a paper towel 7 Leave open to air dry Figure41 F Performing IV Infusions 1 Procure a 3rd IV bag sold separately LF01130U 2 Begin with a fully pressurized system 3 Insert...

Page 19: ...be inserted into the rectum with the supplied lubricant 2 Remove administered medications or appliances after each use 3 Ensure the rectum is clean and completely dry after each use and before re ass...

Page 20: ...ove administered medications or appliances after each use 3 Ensure the rectum is clean and completely dry after each use and before re assembly or storage K IO Leg The left leg incorporates an intraos...

Page 21: ...he stump 3 Be aware that most adhesives do not stick well to the infant simulator s skin use an alternative method to secure devices 4 With handling the skin of the simulator and skin components will...

Page 22: ...o air dry completely after each use and before re assembly or storage 10 A dusting of baby powder to baby body and all components prior to storage is recommended 11 Store the clean dry simulator and t...

Page 23: ...and Skin and Vein LF01405U IV Foot Skin and Vein LF01406U Cannulating Umbilicus no pulse system LF01407U Birth Defects LF01408U Advanced Airway LF01409U Defibrillation Chest Insert LF01410U Male and F...

Page 24: ...thcare com EMAIL lifeform enasco com PHONE 1 800 431 4310 ADDRESS 901 Janesville Ave Fort Atkinson WI 53538 HEALTHCARE LF00714U Clots and Hemorrhages Set LF01400U Newborn Nursing Skills and ALS Simula...

Reviews: