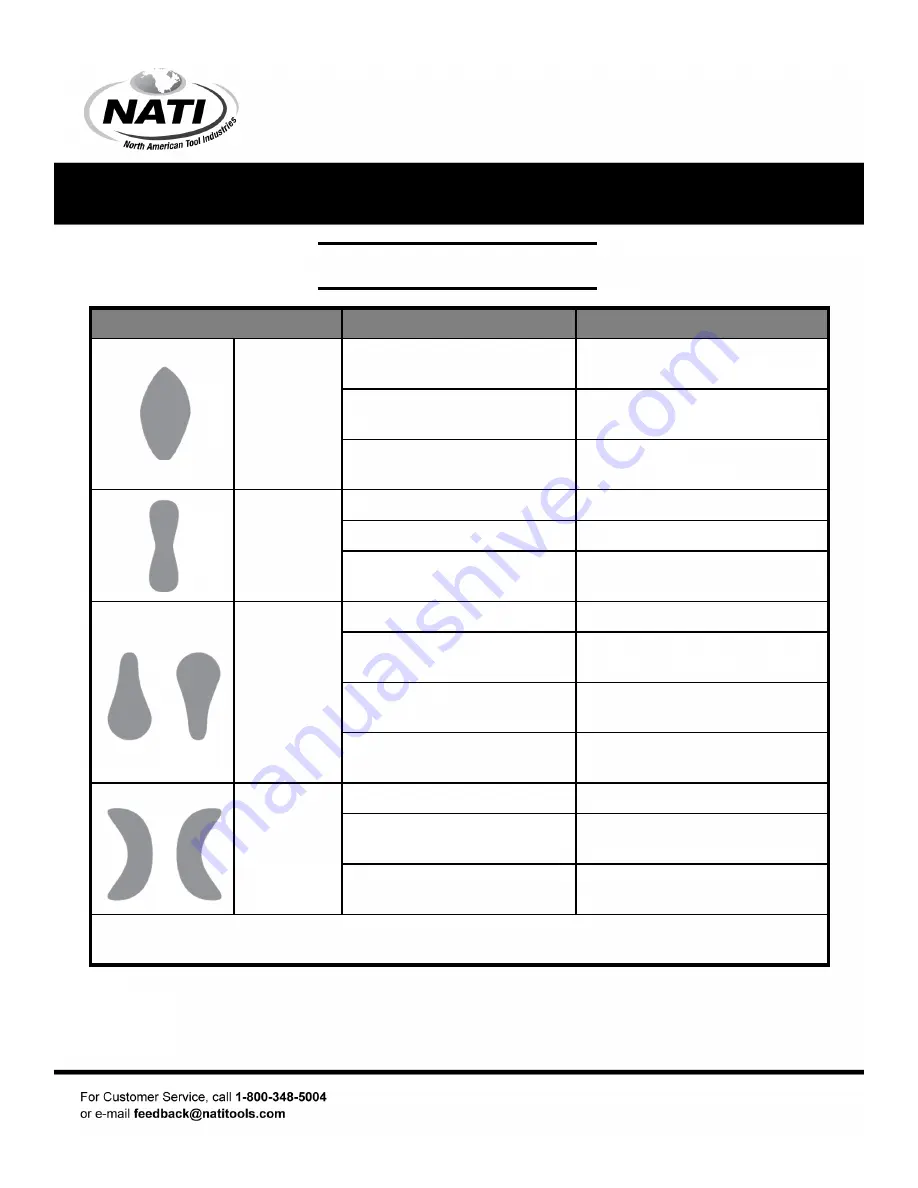
background image

16

Pattern on

right or left

only

Heavy

top/bottom

pattern

Light center

pattern

Heavy
center

pattern

Have qualified technician

replace needle

Damaged needle

Clean fluid tip

Dirt on one side of fluid tip

Clean nozzle with nonmetallic

point

Holes on one side of nozzle

are plugged

Corrective Action

Possible Cause(s)

Symptom

WARNING: Follow all safety precautions whenever diagnosing or servicing the tool.

Disconnect the air supply before servicing

Have qualified technician

replace needle

Damaged needle

Use a nonmetallic point to

clean nozzle

Dried paint on fluid tip

Clean and tighten nozzle and

seal

Nozzle loose or dirty seal

Clean nozzle

Nozzle plugged

Partially close pattern

adjustment knob

Pattern adjustment knob

open too far

Open fluid knob

Fluid knob not open enough

Reduce air pressure

High air pressure

Increase air pressure within the

operating air pressure

The air pressure is too low

Thin paint according to the

manufacturer’s instructions

The paint is too thick

Open pattern adjustment knob

more

Pattern adjustment knob

partially closed

Important Operating Instructions

TROUBLESHOOTING GUIDE

Summary of Contents for Speedway 50188

Page 1: ...50188 04 2017 LVLP Paint Spray gun Model 50188 Actual product may vary slightly...

Page 2: ...ns must be observed to avoid injuries and damage Please read the complete operating manual with due care Keep this manual in a safe place so that the information is available at all times If you give...

Page 3: ...hair increases the risk of injury to persons as a result of being caught in moving parts Avoid unintentional starting Be sure the switch is off before connecting to the air supply Do not carry the to...

Page 4: ...and must be repaired Disconnect the tool from the air source before making any adjustments changing accessories or storing the tool Such preventive safety measures reduce the risk of starting the tool...

Page 5: ...RAL SAFETY INSTRUCTIONS The warnings and precautions discussed in this manual cannot cover all possible conditions and situations that may occur It must be understood by the operator that common sense...

Page 6: ...hands and fingers increasing the risk of vibration related injury 3 Wear suitable gloves to reduce the vibration effects on the user 4 Use tools with lower vibration when there is a choice 5 Include v...

Page 7: ...ir hose must be long enough to reach the work area with enough extra length to allow free movement while working 3 Release the tool s trigger 4 Close the in line shut off valve between the compressor...

Page 8: ...luded to prevent movement while working 4 There must not be hazardous objects such as utility lines or foreign objects nearby that will present a hazard while working WORK AREA SET UP SPRAY GUN SET UP...

Page 9: ...dations Fan Direction 1 To change the direction of the fan from horizontal to vertical loosen the lock ring and turn the nozzle 90 2 After the adjustment tighten the lock ring by hand Pattern Adjustme...

Page 10: ...hecking the pattern after each adjustment IMPORTANT Proper spraying technique is ESSENTIAL to achieve good results 1 First prepare the spray gun according to the instructions under spray gun set up 2...

Page 11: ...avoid paint build up start moving the spray gun before squeezing the trigger When finished with the stroke release the trigger while still moving the spray gun Doing this will produce a smoother finis...

Page 12: ...noise vibration or leaking occurs have the problem corrected before use To prevent serious injury from explosion lubricate the tool only with specified lubricants Lubricate the air inlet using only p...

Page 13: ...es in a vapor free area Keep class ABC fire extinguisher nearby After each use 1 Empty the paint cup and clean it with the solvent 2 Fill the paint cup with solvent and spray it through the spray gun...

Page 14: ...on threaded connections before storing Solution disposal After cleaning dispose of cleaning solution according to the solution manufacturer s directions and local hazardous waste standards Air supply...

Page 15: ...ssure on tool Air tool lubrication Provides quick connection and release Increases coupler life Prevents water vapor from damaging work piece Fine tuning airflow at tool Description Air Hose Filter Re...

Page 16: ...lified technician replace needle Damaged needle Use a nonmetallic point to clean nozzle Dried paint on fluid tip Clean and tighten nozzle and seal Nozzle loose or dirty seal Clean nozzle Nozzle plugge...

Page 17: ...icing Lubricate air valve seat Sticking air valve Clean air valve seat Dirty air valve seat Air leaking from nozzle Reduce air pressure Too much air pressure Adjust distance Improper distance from wor...

Page 18: ...s or alterations or a lack of maintenance This product is intended for personal use The warranty will be voided if used in commercial rental or industrial applications NATI shall in no event be liable...

Page 19: ...19 PARTS LIST LVLP Paint Spray Gun Model 50188 88050188 02 2014...

Page 20: ...er Lock 9 Trigger Pin 8 Trigger Pin Snap Ring 7 Housing 6 Nozzle Washer 5 Spray Nozzle 4 Nozzle Inner Ring 3 Air Nozzle 2 Nozzle Lock Ring 1 Description Air Intake Nipple 36 Paint Cup 35 Siphon Tube 3...

Reviews: