background image

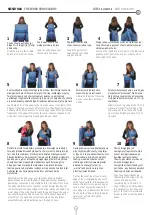
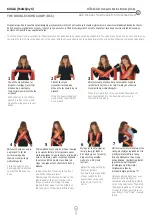
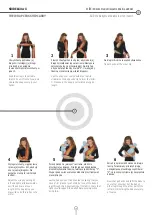
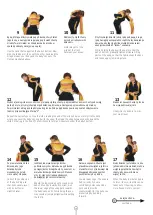
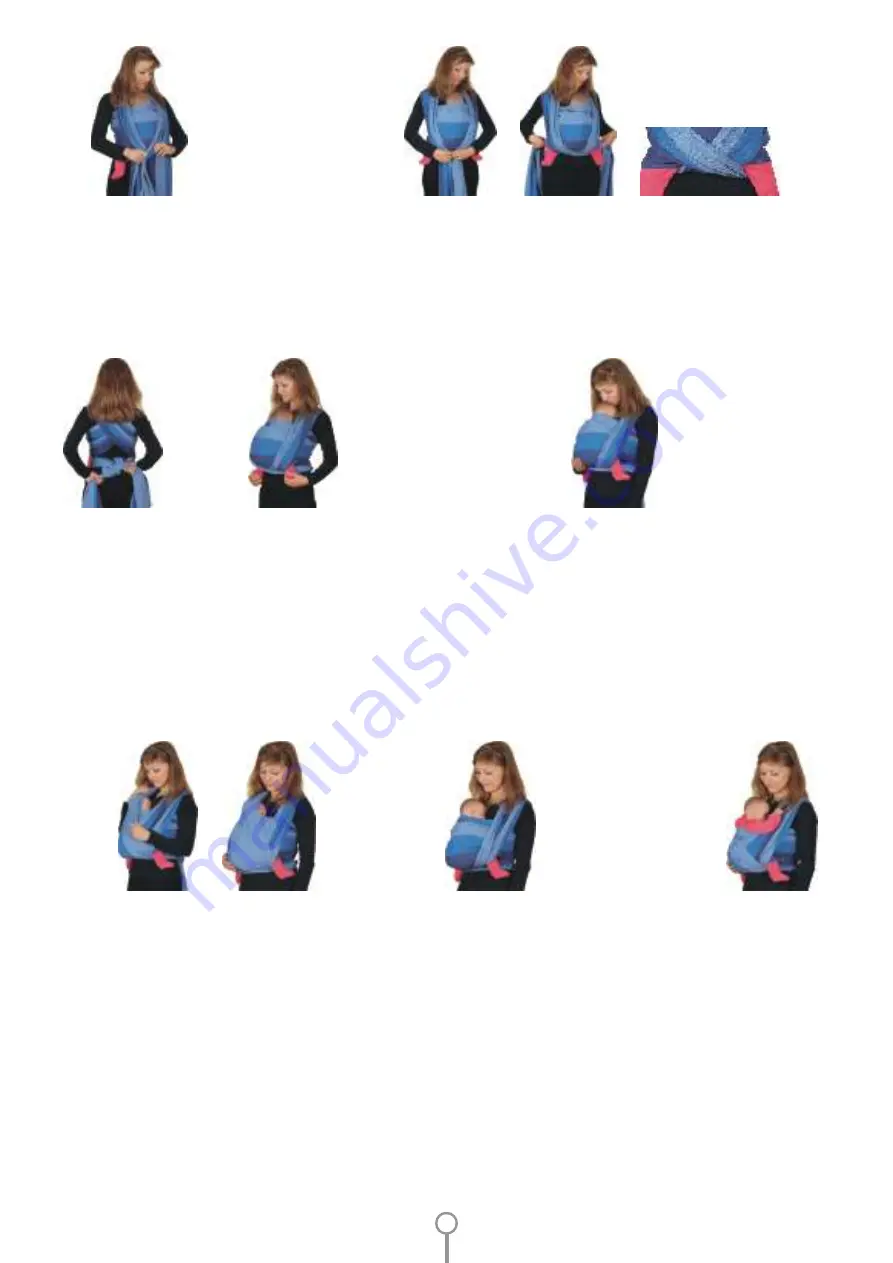
Popraw ułożenie chusty oraz 
nóżek dziecka, aby kolanka 
znajdowały się na wysokości jego 
pupy lub wyżej i były w 
niewielkim rozkroku.

Upewnij się, że dziecko jest na prawidłowej wysokości. Sprawdź, czy możesz bez 
trudu pocałować je w czółko. Jeśli chcesz sprawdzić, czy tkanina jest odpowiednio 
naprężona, pochyl się delikatnie do przodu. Dziecko podczas takiego ruchu 
powinno pozostać w Ciebie wtulone. Pionowe fragmenty chusty powinny sięgać 
aż do dołów podkolanowych dziecka.
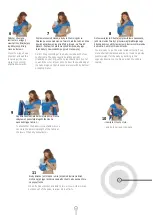
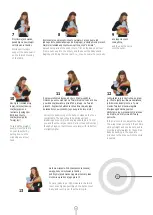
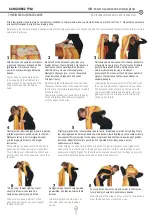
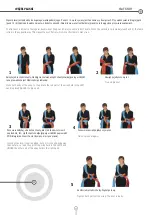
Zawiąż węzeł na 
plecach na 
wysokości talii.

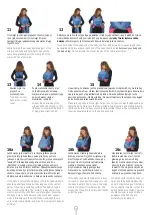
Skrzyżuj oba końce chusty pod pupą dziecka i między jego nóżkami i poprowadź do tyłu za 
siebie (każdy koniec chusty powinien być poprowadzony 

między Twoim ciałem a nóżką 

dziecka

). Staraj się przy tym zachować odpowiednie naprężenie tkaniny.

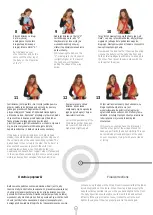
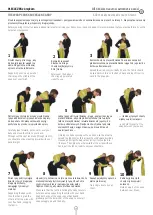
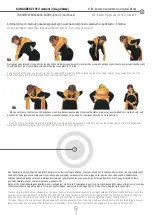
Gdy dziecko jest starsze i potrafi 
stabilnie siedzieć oraz trzymać 
główkę, górny poziomy brzeg 
tkaniny można opuścić nieco niżej, 
aby mogło ono trzymać rączki na 
zewnątrz. Chusta powinna jednak 
sięgać możliwie wysoko na plecach 
dziecka, do wysokości jego pach. 

Jeśli dziecko trzyma już samodzielnie 
główkę, nie musimy już obowiązkowo jej 
przytrzymywać. Jednakże do czasu, gdy 
dziecko nie umie jeszcze samodzielnie 
siedzieć, chusta powinna nadal 
przytrzymywać cały jego kręgosłup. 
Oznacza to, że rączki powinny być w 
dalszym ciągu chowane pod chustę. 

Trzymając już naciągniętą część chusty w jednej 
ręce i jednocześnie przytrzymując dziecko, 
naciągnij drugą ręką kawałek po kawałku drugą 
część chusty.

11

14

16a

16b

16c

15

12

13

Tie a knot on your 
back at your waist 
level.

Cross both ends of the wrap under the baby's bottom and between its legs and lead them 
backwards, behind your back (each end of the wrap should be led 

between your body and 

the baby's leg

. Try to maintain the proper tension of the fabric at all times.

While holding the already tightened part of the 
wrap in one hand and holding the baby at the 
same time, gradually pull the other part of the 
wrap with the other hand.

Correct the positioning of the 
wrap and the baby's legs, so that 
its knees are level with its bottom 
or higher and slightly apart.

Make sure the baby is at the right height - check if you can kiss the baby easily on 
the forhead. To make sure the fabric is tightened properly, bend slightly forward. 
While you do this, the baby should remain nestled into you. The vertical parts of 
the wrap should reach up to the baby's knee pits.

When the child is older and can sit 
up and hold its head steadily, the 
upper horizontal edge of the fabric 
can be slightly lowered, so that the 
baby's hands are outside. The wrap 
should however reach as high as 
possible on the baby's back, 
preferably to its armpits.

If the baby can hold its head erect, it does 
not need to be supported. However, until 
the baby is able to sit on its own, the wrap 
should still support its whole spine. This 
means, that the arms should still be tucked 
under the wrap.

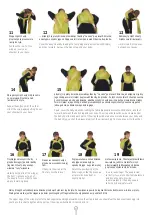
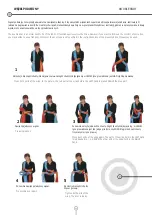
Jeśli dziecko jest malutkie i nie trzyma jeszcze pewnie 
główki, należy ją dodatkowo podeprzeć przy pomocy   
jednego z pionowych fragmentów chusty, przypominających 
“zasłonki”. Główka dziecka będzie obrócona na bok. 
„Zasłonka” przydaje się również, kiedy chcesz uchronić 
dziecko przed nadmiarem bodźców. Także główka starszego 
dziecka powinna być przytrzymywana, jeśli dziecko zaśnie w 
chuście. Upewnij się, że przez cały czas twarz dziecka jest 
odkryta, zupełnie widoczna i z dala od ciała osoby noszącej.

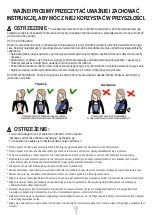
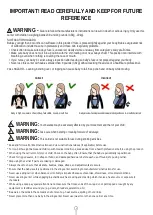
If the baby is very small and does not hold its head steady, it 
should be additionally supported using one of the vertical 
parts of the wrap resembling curtains. The baby's head is 
then turned to the side. The “curtain” is also useful if you 
want to protect the child from overstimulation. Even when 
the baby is older, its head/neck will benefit from support 
when it falls asleep in the wrap. Make sure baby’s face is 
uncovered, clearly visible, and away from caregiver’s body at 
all times.

9

Summary of Contents for Woven Wrap

Page 1: ...www natibaby com Chusta do noszenia dzieci Instrukcja Dla dzieci o wadze od 3 6kg do 20kg 8 44 funt w Woven Wrap Instruction Manual For children from 8 to 44 lb 3 6kg 20kg Made in Poland...

Page 2: ...przez osob u ywaj c chust Nigdy nie umieszczaj w chu cie wi cej ni jednego dziecka Nigdy nie u ywaj w danym momencie wi cej ni jednego nosid a w tym chusty 1 2 OSTRZEZENIE Zaniedbania w stosowaniu si...

Page 3: ...ych wi za przy czym na pocz tku wystarczy dobre opanowanie jednego z nich Wszyscy rodzice potwierdzaj e wi zanie chusty jest du o atwiejsze ni si to na pocz tku wydaje Opanowanie ka dego kolejnego wi...

Page 4: ...ends of the wrap do not get trapped or caught by any equipment or facilities around you e g doors shredders escalators etc Be aware of hazards in the domestic environment e g heat sources spilling of...

Page 5: ...ing a wrap is much easier that it seemed before Learning each next carry is much quicker Any carry should be wrapped rather tightly If the wrap is too loose it does not provide adequate and secure sup...

Page 6: ...inut Jedwab jest wra liwy na dzia anie s o ca dlatego chusty z dodatkiem tego w kna powinny by suszone i przechowywane w cieniu Najcz ciej zniszczenie chusty z we n we na merynos kaszmir i in nast puj...

Page 7: ...exceed 40 50 minutes Silk is sensitive to sunlight and this is why silk blend slings and wraps should be dried in shade and stored in dark place The most common damage of a sling wrap with wool merin...

Page 8: ...WIEK od urodzenia KIESZONKA 1 5 8 9 10 6 7 2 3 4 Grab the wrap in the middle and stretch it in front of you Lead the wrap above your chest and to the back Grab both parts of the wrap behind your back...

Page 9: ...holding the baby at the same time gradually pull the other part of the wrap with the other hand Correct the positioning of the wrap and the baby s legs so that its knees are level with its bottom or...

Page 10: ...chusty by a troch d u sza WIEK dziecko musi samodzielnie trzyma g wk KOALA Podw jny X 1 5 6 7 2 3 4 The Wrap Cross ties are excellent for situations when the baby has to be taken out and put back int...

Page 11: ...twarz dziecka jest odkryta zupe nie widoczna i z dala od cia a osoby nosz cej 11 12 13 Put the baby on your other shoulder and do the same with the other leg of the baby on the other side of the X Now...

Page 12: ...biodra lub ciut wy ej Uwa aj aby tkanina nie przekr ci a si wzd u d ugo ci 1 5 2 3 4 AGE the baby must be able to hold its head erect THE SIMPLE HIP CARRY Grab the wrap in the middle and stretch it o...

Page 13: ...erunku do biodra na kt rym siedzi dziecko 9 10 11 6 7 8 Cross the wrap on your shoulder and pull the inner edge the one closer to your neck slightly downwards Correct the positioning of the baby to ma...

Page 14: ...u mo na to robi przed lustrem WIEK dziecko musi umie samodzielnie siedzie SIODE KO w X 1 5 6 2 3 4 AGE the baby must be able to sit on its own THE WRAP CROSS HIP CARRY Grab the wrap in the middle stre...

Page 15: ...ga o przez ca y czas mo liwie wysoko na jego plecach 9 10 11 12 13 7 8 While continuing to support the baby seat it on the formed crossing of the fabric Spread both parts of the wrap in turn first on...

Page 16: ...hair drape the middle of the wrap over your thigh Cerefully lean forward put one arm over your baby and move the child to your back Throughout the next ten steps through item 15 you should continue le...

Page 17: ...hus a a 12 15 17 18 19 13 14 16 Drug cz chusty przerzu g r przez swoje rami do ty u 11 Put the other part of the wrap up over your shoulder to your back Hold this part of the wrap between your knees...

Page 18: ...facing the child between the wrap ends Make sure that the ends of the wrap that reach the floor are completely separated not twisted with each other Then while crossing your hands hold the baby firml...

Page 19: ...chu Na koniec zawi chust z przodu na wysoko ci swojej talii 12 14 15 16 13 17 Use the hand that supported the baby s bottom Now grab the child s arm then with the other hand lead the wrap between your...

Page 20: ...g chusty i zawi w ze ponownie 6a 6b As an alternative after the steps described in items 1 5 you may choose to Pull each part of the wrap one by one so that it wraps tightly around the child twist eac...

Page 21: ...Wsz dzie w instrukcji gdzie nie sprecyzowano rodzaju w z a mo na zastosowa dowolny z przedstawionych W ZE PODW JNY 1 3 4 5 2 Cross both parts of the wrap In the picture the red part of the wrap held i...

Page 22: ...czerwona cz chusty znajduj ca si w LEWEJ r ce prowadzona jest NAD cz ci niebiesk Zawi pojedynczy w ze 1 3 4 5 2 Tie a single knot again Cross both ends of the wrap again but do it in the opposite way...

Page 23: ...Come with us Come with us...

Page 24: ...baby natibaby com www natibaby com Wszelkie prawa zastrze one Przedruk lub kopiowanie mo liwe tylko na podstawie pisemnej zgody firmy NATIBABY Nosid a NATIGO NATIGO Carriers Chusty k kowe Ring slings...

Reviews: