Components and Assembly
11
Swivel Head
The swivel head keeps the blade in contact with the floor even when the floor is uneven.
When using a flat blade, turning the head over 180° provides another sharp edge on the
blade without having to replace the blade.
Inserting or Changing Blades
Sharp blades are imperative for good performance.
1. Using a 3/4’’ socket wrench, loosen bolts on cutting head. Quantity of bolts will vary
depending upon cutting head size.
2.
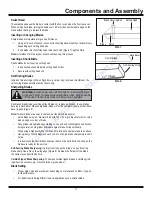
Insert blade into the cutting head to back of notch (Figure 7); tighten firmly.
Note:
A cordless 3/8’’ drive impact wrench will speed up this process.
Inserting a Shank Blade
Shank blades do not require a cutting head.
1. Insert desired shank blade into cutting head holder.
2. Secure with cutting head clip.
Self-Scoring Blades
Instead of pre-scoring a job for soft goods (e.g. carpet, vinyl, linoleum, membrane), the
self-scoring blades automatically do the scoring.
Sharpening Blades
Dull blades greatly reduce cutting ability. Sharpen or replace as needed. In use, blades
develop a back-bevel. When sharpening, blade will not be completely sharp until all back-
bevel is gone (Figure 8).
Note:
Thinner blades are easier to sharpen, but they also break easier.
•
Grind blade using a 4” diameter disk with 120 or finer grit. Be careful not to catch
disk on edge or corner of blade.
• Pass grinder along blade edge starting on one end and continuing in one direction,
being careful to hold grinder at proper angle of blade. Grind until sharp.
•
When using a high quality fine tooth hand file, follow the same procedure as above.
• Have plenty of sharp blades on each job so on-the-job blade sharpening is elimi-
nated.
• It is best to sharpen dull blades on proper bench or belt grinder in the shop, so the
blades are ready for the next job.
Self-Scoring Blade Sharpening:
It is important to keep the “wings” on a self-scoring
blade sharp. Use a file on the wing edge (Figure 8). Sharpen the flat part of the blade,
the same way as described above.
Carbide-Tipped Blade Sharpening:
To sharpen carbide tipped blades, a carbide grind-
ing wheel is necessary, e.g., silicon carbide or green wheel.
Blade Setting
•
Proper blade size and placement, depending on material and sub-floor type, af
-
fects performance.
•
For better results during difficult removal applications use a smaller blade.
WARNING:
BLADES ARE SHARP, USE EXTREME CAUTION. ALWAYS WEAR
GLOVES AND SAFETY GLASSES WHEN HANDLING BLADES. NEVER CHANGE
CUTTING HEAD OR SERVICE BLADES WHILE MACHINE IS RUNNING.
FIG. 7
Blade Securing Bolt
Cutting Head
Blade Notch
FIG. 8
Front of Blade
Back Bevel
Self-Scoring Wing
Front of Blade
To
order
go
to
Discount-Equipment.com


