background image

30 / 64

• Do not disassemble the device! In the event of a defect,

please contact your dealer. They will contact the Ser-
vice Center and can arrange the return of this device
for repair if necessary.

• Do not immerse the unit in water!

• Do not expose the device to impacts, vibrations, dust,

constant high temperatures or excessive humidity. This
can result in malfunctions, short-circuits or damage to
the batteries and components.

• Use only the recommended batteries. Always replace

weak or empty batteries with a new, complete set of
batteries at full capacity. Do not use batteries from dif-
ferent brands or types or with different capacities. Re-
move batteries from the device if it is not to be used for
a longer period of time!

NOTICE

Risk of voltage damage!

The manufacturer is not liable for damage related to improp-
erly installed batteries!

Summary of Contents for 9070300

Page 1: ...Wetterstation Weather Station Estaci n meteorol gica Weather station DE Bedienungsanleitung EN Instruction manual ES Manual de instrucciones...

Page 2: ...rtalingen van deze gebruiksaanwijzing IT Desidera ricevere informazioni esaustive su questo prodotto in una lingua specifica Venga a visitare il nostro sito Web al seguente link codice QR Code per con...

Page 3: ...Deutsch 4 English 24 Espa ol 43...

Page 4: ...rsicht und Lieferumfang 11 7 Display Anzeigen 13 8 Vor der Inbetriebnahme 14 9 Stromversorgung herstellen 15 10 Automatische Zeiteinstellung 16 11 Manuelle Zeiteinstellung 16 12 Weckrufeinstellung 17...

Page 5: ...5 18 Anschluss von Funksensoren 20 19 Technische Daten 20 20 EG Konformit tserkl rung 21 21 UKCA Konfirmit tserkl rung 22 22 Entsorgung 22...

Page 6: ...ntation auch auszugs weise in irgendeiner Form z B Fotokopie Druck etc so wie die Verwendung und Verbreitung mittels elektronischer Systeme z B Bilddatei Website etc ohne eine vorherige schriftliche G...

Page 7: ...formationen bei Serviceanfragen stets angeben 3 Eigenschaften Grafische 12 Stunden Wettertrendanzeige DCF Funkuhr Empfang und Anzeige Weckruf mit Schlummerfunktion Snooze Au entemperaturalarm Frostwar...

Page 8: ...s ist die Bedienungsanleitung an jeden nachfolgenden Besitzer Benutzer des Produkts weiterzugeben 5 Allgemeine Sicherheitshinweise GEFAHR Erstickungsgefahr Bei unsachgem er Verwendung dieses Produkts...

Page 9: ...m Ger t nie un beaufsichtigt Die Nutzung darf nur wie in der Anlei tung beschrieben erfolgen andernfalls besteht die Ge fahr eines Stromschlags GEFAHR Explosionsgefahr Bei unsachgem er Verwendung dies...

Page 10: ...nen St en Ersch tterungen Staub dauerhaft hohen Temperaturen oder extremer Feuch tigkeit aussetzen Dies kann zu Fehlfunktionen Kurz schl ssen sowie zu Besch digungen an Batterien und Bauteilen f hren...

Page 11: ...und Lieferumfang 1 6 3 4 5 7 8 2 9 10 9 11 12 13 14 15 16 17 17 A B Abb 1 Teile bersicht f r Basisstation oben und Funk sensor unten 1 Display Basisstation 2 Sockel 3 SNZ Taste Schlum merfunktion Snoo...

Page 12: ...tation 10 Batteriefach Basisstati on 11 Display Funksensor 12 Batteriefachabdeckung Funksensor 13 Batteriefach Funksen sor 14 CH Knopf Kanaleinstel lung 15 C F Knopf Wahl der Temperatureinheit 16 Aufh...

Page 13: ...Symbol f r aktiven Weckruf 4 Symbol f r akktive Zonenzeit 5 Symbol f r aktive Sommer zeit 6 Aktuelles Datum 7 Grafische Wettertrendanzei ge 8 Symbol f r das Funksignal 9 Batteriestandsanzeige Ba sisst...

Page 14: ...eneinander stellen legen 2 Stromversorgung f r das Basisger t herstellen und warten bis die Innentemperatur angezeigt wird 3 Stromversorgung f r den Sensor herstellen 4 Basisger t und Sensor innerhalb...

Page 15: ...nd orte zu suchen Manchmal reicht schon ein Verschieben um wenige Zentimeter Obwohl der Au ensensor wetterfest ist sollte er nicht an Orten mit Einfall von direkter Sonneneinstrahlung Regen oder Schne...

Page 16: ...und Uhrzeit automatisch eingestellt und das Empfangssym bol wird angezeigt Wird kein Funksignal empfangen folgenderma en vorge hen 1 DOWN Taste ca 2 Sekunden dr cken um den Emp fang des Funksignals e...

Page 17: ...u ver ndern 5 ALARM Taste dr cken um die Eingabe zu best tigen und zur n chsten Einstellung zu wechseln 6 Reihenfolge der Einstellungen Stunden Minuten 7 ALARM Taste abschlie end dr cken um Einstellun...

Page 18: ...ste dr cken um den Wert zu ver ndern 5 SET Taste dr cken um die Eingabe zu best tigen und zur n chsten Einstellung zu wechseln 6 Wenn nach 30 Sekunden keine Einstellung vorgenom men wurde wird der Tem...

Page 19: ...aste mehrmals dr cken um nacheinander die ge speicherten Werte anzuzeigen 2 Reihenfolge der Anzeige Aktuelle Werte MAX H chstwerte MIN Tiefstwerte 3 UP Taste w hrend der H chst oder Tiefstwertanzeige...

Page 20: ...einstellung folgenderma en vorgehen 1 Batteriefachabdeckung des Funksensors entfernen 2 CH Knopf ggf mehrmals dr cken bis im Display des Funksensors der gew nschte Kanal angezeigt wird CH1 CH2 oder CH...

Page 21: ...5 V bertragungsfrequenz 433 MHz Maximale Sendeleistung unter 10mW Temperatur Ma einheit C F Ma e 60 x 96 x 27 mm B x H x T Gewicht 52 g ohne Batterien 20 EG Konformit tserkl rung Hiermit erkl rt Bress...

Page 22: ...r UK Ltd Suite 3G Eden House Enterpri se Way Edenbridge Kent TN8 6Hf Great Britain 22 Entsorgung Entsorgen Sie die Verpackungsmaterialien sortenrein Informationen zur ordnungsgem en Entsorgung er halt...

Page 23: ...en die Batte rien nach Gebrauch entweder in unserer Verkaufsstelle oder in unmittelbarer N he z B im Handel oder in kommunalen Sammelstellen unentgeltlich zur ckge ben Batterien und Akkus sind mit ein...

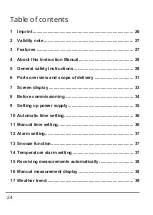
Page 24: ...arts overview and scope of delivery 31 7 Screen display 33 8 Before commissioning 34 9 Setting up power supply 35 10 Automatic time setting 36 11 Manual time setting 36 12 Alarm setting 37 13 Snooze f...

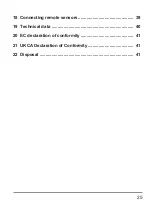
Page 25: ...25 18 Connecting remote sensors 39 19 Technical data 40 20 EC declaration of conformity 41 21 UKCA Declaration of Conformity 41 22 Disposal 41...

Page 26: ...this documentation even in extracts in any form e g photocopy print etc as well as the use and distribution by means of electronic systems e g image file website etc without the prior written permiss...

Page 27: ...ervice 3 Features Graphical 12 hours weather trend display Radio controlled clock with DCF signal reception and display Alarm with snooze function Outdoor temperature alarm frost warning Outdoor tempe...

Page 28: ...r given to someone else the instruction manual must be provided to the new owner user of the product 5 General safety instructions DANGER Danger of suffocation Improper use of this product may result...

Page 29: ...r sources recommended in this instruction manual otherwise there is a danger of an electric shock DANGER Explosion hazard Improper use of this product may result in fire It is essential that you obser...

Page 30: ...ive humidity This can result in malfunctions short circuits or damage to the batteries and components Use only the recommended batteries Always replace weak or empty batteries with a new complete set...

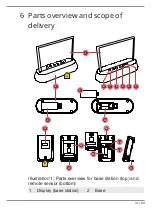
Page 31: ...1 64 6 Parts overview and scope of delivery 1 6 3 4 5 7 8 2 9 10 9 11 12 13 14 15 16 17 17 A B Illustration 1 Parts overview for base station top and remote sensor bottom 1 Display base station 2 Base...

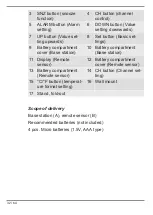
Page 32: ...ery compartment cover Base station 10 Battery compartment Base station 11 Display Remote sensor 12 Battery compartment cover Remote sensor 13 Battery compartment Remote sensor 14 CH button Channel set...

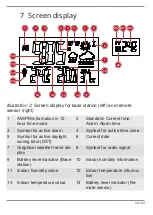
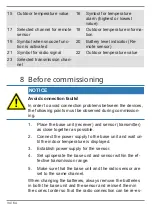
Page 33: ...rd Current time Alarm Alarm time 3 Symbol for active alarm 4 Symbol for active time zone 5 Symbol for active daylight saving time DST 6 Current date 7 Graphical weather trend dis play 8 Symbol for rad...

Page 34: ...etween the devices the following points must be observed during commission ing 1 Place the base unit receiver and sensor transmitter as close together as possible 2 Connect the power supply to the bas...

Page 35: ...ases we recommend finding other locations for both the base unit and the outdoor sensor Sometimes a shift of just a few centimetres is enough Though the remote unit is weather proof it should be place...

Page 36: ...f no radio signal is received proceed as follows 1 Press the DOWN button for approx 2 seconds to initi ate the reception of the radio signal again 2 If no radio signal is still received the time setti...

Page 37: ...he setting mode 8 Press SET button to activate the alarm The symbol will be displayed The alarm is activated 9 Press SET button again to disable the alarm The symbol will not be displayed The alarm is...

Page 38: ...it the temperature alarm symbol will flash and an alarm will sound for approx 3 seonds This will be re peated with an interval of 1 minute until the temperat ure has fallen below the limit again NOTIC...

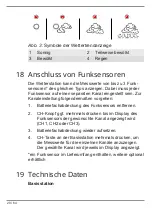
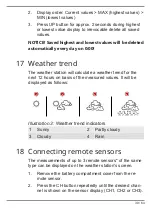
Page 39: ...n will calculate a weather trend for the next 12 hours on basis of the measured values It will be displayed as follows 1 2 3 4 Illustration 3 Weather trend indicators 1 Sunny 2 Partly cloudy 3 Cloudy...

Page 40: ...9 Technical data Base station Batteries 2x AAA 1 5V Radio controlled signal DCF Maximum number of sensors 3 Temperature unit C F Time display HH MM Time format 12 or 24 hours Dimensions 140 x 105 x 50...

Page 41: ...available at the following internet address www bresser de down load 9070300 UKCA 9070300_UKCA pdf Bresser UK Ltd Suite 3G Eden House Enter prise Way Edenbridge Kent TN8 6Hf Great Britain 22 Disposal...

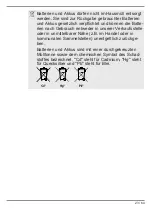
Page 42: ...umulators and can re turn the batteries after use either in our sales outlet or in the immediate vicinity e g in the trade or in muni cipal collection points free of charge Batteries and accumulators...

Page 43: ...dicaciones en la pantalla 52 8 Antes de la puesta en marcha 53 9 Establecer la alimentaci n el ctrica 54 10 Ajuste autom tico de la hora 55 11 Ajuste manual de la hora 56 12 Ajuste del despertador 56...

Page 44: ...44 18 Conexi n de sensores inal mbricos 60 19 Especificaciones t cnicas 60 20 Declaraci n de Conformidad CE 61 21 Reciclaje 62...

Page 45: ...oducci n de esta documentaci n incluso en extractos en cualquier forma como fotocopias impresiones etc as como el uso y la distribuci n por me dio de sistemas electr nicos como archivos de imagen si t...

Page 46: ...a de la tendencia de las condiciones meteorol gicas durante 12 horas Recepci n e indicaci n de la hora controlada por radio DCF Despertador con funci n de repetici n de la alarma Snooze Alarma de temp...

Page 47: ...Cuando el aparato se venda o se entregue a otra persona el manual de instrucciones debe entregarse al nuevo propietario usuario del producto 5 Instrucciones generales de seguridad PELIGRO Peligro de a...

Page 48: ...que no sea la recomendada en este manual de instrucciones de lo contrario existe riesgo de descarga el ctrica PELIGRO Peligro de explosi n El uso inadecuado de este producto puede provocar un in cendi...

Page 49: ...ema Esto puede causar un mal funcionamiento cor tocircuitos y o da os en las pilas y otras partes Use solo las pilas recomendadas Sustituya siempre las pilas desgastadas por un juego de pilas nuevas y...

Page 50: ...50 64 6 Esquema de piezas y contenido del suministro 1 6 3 4 5 7 8 2 9 10 9 11 12 13 14 15 16 17 17 A B Fig 1 Esquema de piezas de la estaci n b sica arriba y del sensor inal mbrico abajo...

Page 51: ...ento de las pilas estaci n b sica 10 Compartimento de las pilas estaci n b sica 11 Pantalla sensor ina l mbrico 12 Tapa del compartimen to de las pilas sensor inal mbrico 13 Compartimento de las pilas...

Page 52: ...t ndar hora actual alar ma hora de la alarma 3 S mbolo de alarma activada 4 S mbolo de la zona horaria activa 5 S mbolo de horario de verano activo 6 Fecha actual 7 Indicaci n gr fica de la ten dencia...

Page 53: ...ior 23 Canal de transmisi n selec cionado 8 Antes de la puesta en marcha AVISO Evite los fallos de conexi n A fin de evitar problemas de conexi n entre los dispositivos deben observarse los siguientes...

Page 54: ...exterior Las influencias externas diversos transmisores de radio y otras fuentes de interferencia pueden reducir en gran medida el alcance po sible En tales casos recomendamos encontrar otras ubica c...

Page 55: ...la pantalla 9 Volver a poner la tapa del compartimento de las pilas 10 Ajuste autom tico de la hora Despu s de encenderse el aparato busca autom ticamen te la se al de radio Tarda entre 3 y 8 minutos...

Page 56: ...ar el bot n SET para guardar los ajustes y salir del modo de ajuste 12 Ajuste del despertador 1 Mantener pulsado el bot n ALARM durante 2 segun dos aproximadamente para entrar en el modo de ajuste del...

Page 57: ...pagar la alarma que volver a sonar cuando se alcance de nuevo la hora de alarma ajustada 14 Ajuste de la alarma de temperatura 1 En el modo de indicaci n normal de la hora mantener pulsado el bot n DO...

Page 58: ...ite AVISO La alarma solo se puede desactivar a trav s del punto ON OFF en el modo de ajuste de la alar ma de temperatura OFF alarma de temperatura desactivada 15 Transmisi n autom tica de valores Una...

Page 59: ...mo se borran auto m ticamente todos los d as a las 0 00 h 17 Tendencia de las condiciones meteorol gicas A partir de los valores medidos se calcula una tendencia de las condiciones meteorol gicas para...

Page 60: ...sen sor inal mbrico 2 En caso necesario pulsar el bot n CH varias veces hasta que en la pantalla del sensor inal mbrico se muestre el canal deseado CH1 CH2 o CH3 3 Volver a poner la tapa del compartim...

Page 61: ...1 5 V Frecuencia de transmisi n 433 MHz Potencia de transmisi n m xima inferior a 10 mW Unidad de medici n de la temperatura C F Dimensiones 60 x 96 x 27 mm An x Al x P Peso 52 g sin pilas 20 Declara...

Page 62: ...s Directiva RAEE2 incorporada a la normativa nacional median te el Real Decreto 110 2015 de 20 de febrero el equi po el ctrico usado debe recogerse por separado y re ciclarse de forma respetuosa con e...

Page 63: ......
Page 64: ...es de pr f rence via e mail E Mail sav bresser fr T l phone 00 800 6343 7000 BRESSER France SARL P le d Activit s de Nicopolis 314 Avenue des Ch nes Verts 83170 Brignoles France Prix d un appel local...

Reviews: