background image

5

How to set up

Note: We recommend assembling your telescope for the first time in the daylight or in a lit room so 
that you can familiarize yourself with assembly steps and all components.

1.

 Open the tripod until the tripod spreaders are fully extended. 

2.

 To set the tripod height, unlatch the hinged locking mechanisms on each leg and extend or retract the 

leg to the desired setting. 

3.

 When the tripod is the proper height, relatch any open locking mechanisms on each leg before 

attaching the telescope tube.

4a-b.

 Set the telescope tube on the mount head so that the thread is aligned with the locking screw in 

the centre of the mounting plate. Secure the tube to the mount by tightening the locking screw until it is 
secure. Be careful not to 
over-tighten the locking screw. 

5a.

 Slide the red dot viewfinder into the finder bracket that is already mounted on the telescope tube and 

insert the diagonal into the focuser.

5b.

 Secure the diagonal by tightening the focuser thumbscrews. Place your chosen eyepiece into the 

diagonal. We recommend starting with the 20 mm because it will provide the widest field of view. 

6a-b.

 To move the telescope up or down and left or right, loosen the handle. Move the telescope up or 

down, left or right and tighten the handle to lock it to the desired position.

Using/aligning the red dot viewfinder:

The viewfinder is powered by a CR-2032 battery that is included. Before using the viewfinder for the first 
time, remember to remove the plastic insulator that is blocking the battery from connecting. When it is 
time to replace the battery, remove the battery cap by loosening the set screw. Take out the old battery 
and slide a new battery in place with the positive side showing. Replace the cap, and tighten the set 
screw.

Note: Please recycle used batteries 
responsibly. 

For the viewfinder to be 

effective, it must be aligned.

To do this:

Insert the 20 mm eyepiece into the diagonal 
and power on the viewfinder by sliding the 
switch on its right side to an “On” position.

7a.

 Point the eyepiece at an easy to identify 

target like a tree that is approximately 
200 yards away. Centre the object in the 
eyepiece. Lock the telescope into place by 
tightening the panhandle. 

Note: Terrestrial objects will appear 
reversed due to the optical setup. This 
rotation is perfectly normal for a refractor 
using a standard diagonal, and it will not 
affect astronomical viewing. 

7b-e. 

Without moving the telescope, position the red dot using the two adjustment screws so that it 

shares the same view as the one in your eyepiece.  The front screw will move the viewfinder up and down, 
and the other will move it side to side. Your viewfinder is now aligned. 

8.

 Telescope is ready for viewing.

 The Red Dot Viewfinder is 

powered by a battery type 

CR-2032 (3V);  if a replacement is 

necessary, remove cap (Fig. 1) by 

unscrewing set screw (Fig. 2) and 

sliding battery towards the front.  

Slide new battery in place with the 

positive (+) side showing.  Replace 

cap and tighten with 

set screw (Fig. 2).

Fig. 1

Fig. 2

Front

Red Dot Viewfinder

(bottom view)

El Visor Red Dot es

impulsado por un tipo de batería 

CR-2032 (3V); si un reemplazo es 

necesario, retire la tapa (fig. 1), 

desenroscando el tornillo de ajuste 

(fig. 2) y la batería de deslizamiento 

hacia la parte delantera. Deslice la 

pila en el lugar con la positiva 

proyección lateral (+). Reemplace 

la tapa y apriete con

el tornillo de 

fijación (fig. 2).

fig. 1

fig. 2

frente

Red Dot visor

(vista desde abajo)

English

赤点ファインダーは付属の

CR-2032

電池

 (3V) 

で駆動してい

ます。電池交換の際は、位置決め

ネジ

 (

2) 

を緩めて電池キャップ


(

1) 

を取り外します。古い電池を

前に向かってスライドさせ、新し

い電池を+面を表にして入れ、キ

ャップを戻してネジ

 (

2) 

をしめ

てください。

1

2

前部

赤点ファインダー


(

下面図

)

Japanese

Le viseur point rouge est

alimenté par une batterie de type 

CR-2032 (3V), si un remplacement 

est nécessaire, enlever le bouchon 

(Fig. 1) en dévissant la vis de 

réglage (Fig. 2) et la batterie de 

glissement vers l'avant. Glisser la 

nouvelle pile en place avec la 

borne positive (+) côté montrant. 

Remettre le bouchon et 

le serrer avec

la vis de 

pression 

(Fig. 2).

Fig. 1

Fig. 2

Devant

Viseur point rouge

(vue de dessous)

French

Spanish

Summary of Contents for DELUXE ADVENTURE SET

Page 1: ...e standard carbon zinc or rechargeable ni cad ni mh etc batteries Non rechargeable batteries are not to be recharged Please recycle batteries responsibly NOT INCLUDED X2 INCLUDED X1 CR2032 3V CHOKINGH...

Page 2: ...IN GENERAL MUNICIPAL WASTE COLLECT AND DISPOSE OF SUCH WASTE SEPARATELY MAKE USE OF THE RETURN AND COLLECTION SYSTEMS AVAILABLE TO YOU OR YOUR LOCAL RECYCLING PROGRAM CONTACT YOUR LOCAL AUTHORITY OR P...

Page 3: ...Azimuth Mount 3 Tripod 4 Optical Tube Assembly OTA with Dew Shield 5 Focus Wheel 6 Diagonal 7 12 5mm and 20 mm Eyepieces 8 2x Barlow Lens 9 Red Dot Viewfinder 10 Smartphone Adapter 7 6 8 3 1 2 5 6 4...

Page 4: ...x3 3 x3 4b 5b 6b 7b 7e 7a 7c 7d How To Set Up Note We recommend assembling your telescope for the first time in the daylight or in a lit room so that you can familiarize yourself with assembly steps a...

Page 5: ...for the first time remember to remove the plastic insulator that is blocking the battery from connecting When it is time to replace the battery remove the battery cap by loosening the set screw Take o...

Page 6: ...onal and it will not affect astronomical viewing Cleaning Your telescope is a precision optical device and keeping the optics free of dust and dirt is crucial for optimal performance To clean the lens...

Page 7: ...ng conditions are right The Moon Diameter 3 476 km Distance Approximately 384 401 km The Moon is the Earth s only natural satellite and it is the second brightest object in the sky after the Sun Altho...

Page 8: ...amazing in a telescope the shape of this bright double lobed nebula has been compared to a dumbbell an hourglass or an apple core As an added bonus the white dwarf that lies at the heart of the Dumbbe...

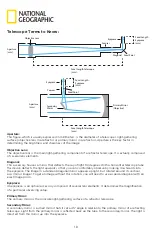
Page 9: ...sits at a 45 angle in relation to the eyepiece Light bounces off of this secondary mirror and out through the eyepiece A refractor telescope is designed for astronomical use Terrestrial objects may ap...

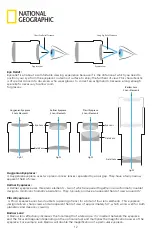
Page 10: ...tical axis mirror image To get an image without this rotation you will need to use a special diagonal with an erect image prism Eyepiece An eyepiece is an optical accessory comprised of several lens e...

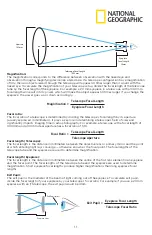
Page 11: ...r aperture has a focal ratio of f 10 Focal length Telescope The focal length is the distance in millimeters between the objective lens or primary mirror and the point at which entering light rays conv...

Page 12: ...s elements two of which are paired together in an achromatic doublet design to minimize chromatic aberrations They typically produce an apparent field of view around 45 Pl ssl Eyepieces A Plossl eyepi...

Page 13: ...13 Notes...

Page 14: ...PREVENT LEAKING DO NOT IMMERSE THE BATTERY COMPARTMENT IN WATER NON RECHARGEABLE BATTERIES ARE NOT TO BE RECHARGED RECHARGEABLE BATTERIES ARE TO BE REMOVED FROM THE TOY BEFORE BEING CHARGED RECHARGEA...

Page 15: ...ion On Off Switch and Mirror 7 Battery Cover not visible 8 Microscope Arm 9 3 Prepared Slides and 3 Blank Slides 10 3 Slide Covers Labels 11 3 Collection Vials 12 Spatula 13 Scalpel 14 Tweezers Stirri...

Page 16: ...tion indicated by the battery compartment label 3 Replace the cover and screws Do not mix old and new batteries Do not mix alkaline standard carbon zinc or rechargeable ni cad ni mh etc batteries Non...

Page 17: ...nto your eye This process of light transmission is known as microscopy Many micro organisms found in water plant components and the smallest animal parts are transparent in nature Opaque specimens on...

Page 18: ...DEALER WILL CONTACT THE CUSTOMER SERVICE DEPARTMENT AND CAN SEND THE DEVICE IN TO BE REPAIRED IF NECESSARY DO NOT SUBJECT THE DEVICE TO TEMPERATURES EXCEEDING 60 C 140 F DISPOSAL KEEP PACKAGING MATER...

Page 19: ...mpact binoculars are the perfect companion for countless outdoor adventures With these sturdy binoculars you can investigate amazing species and sights Take them on a nature walk to get a detailed loo...

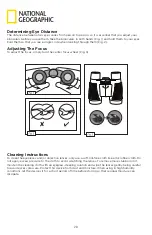
Page 20: ...ter focus wheel Fig 3 Cleaning Instructions To clean the eyepieces and or objective lenses only use a soft lint free cloth like a microfiber cloth Do not apply excess pressure to the cloth to avoid sc...

Page 21: ...ce unsupported or unattended on the adapter pad Though the surface of the adapter pad is designed with suction cups and is non skid the manufacturer cannot assure that the pad will support the weight...

Page 22: ...22 Notes...

Page 23: ...23 Notes...

Page 24: ...and Yellow Border Design are trademarks of the National Geographic Society used under license 2021 Explore Scientific LLC 1010 S 48th Street Springdale AR 72762 All rights reserved Made in China explo...

Reviews: