Appendix E
SCXI-1100 Cabling
© National Instruments Corporation
E-3
SCXI-1100 User Manual
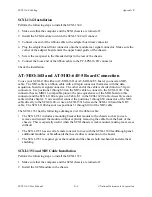
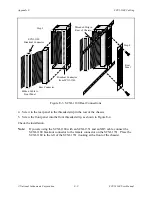
After step 1, the order of these steps is not critical; however, it is easier to locate the correct
position for the mounting bracket with a module installed in the chassis. If you are attaching a
cable to the breakout connector, installation is easiest if you attach the second cable before
installing the SCXI-1340.
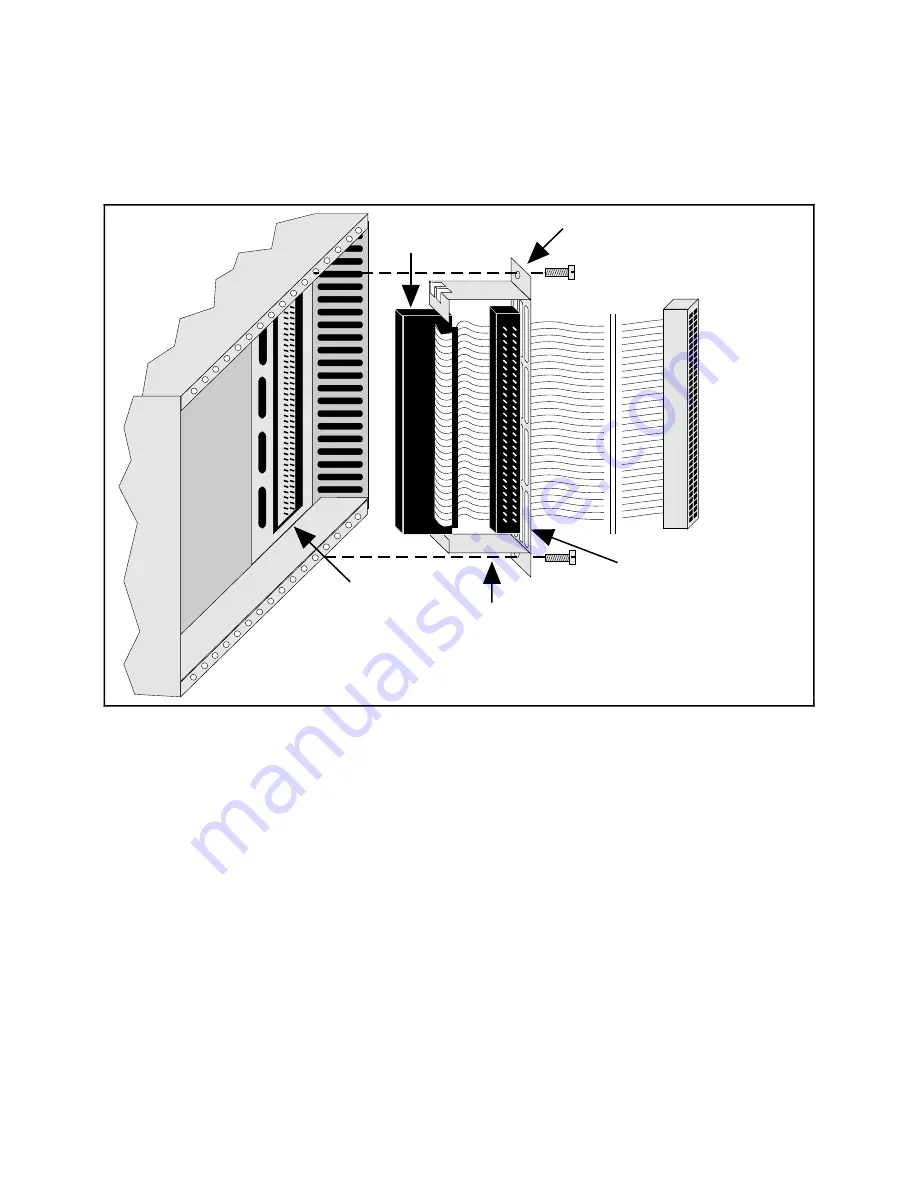
SCXI-1100 Rear
Signal Connector
Rear Panel
50-Pin Female
Connector to
MIO-16 Board
Mounting Bracket
Mounting Bracket
Connector
Male Breakout
Connector
Step 3
Step 4
Step 4
Step 5
Figure E-1. SCXI-1340 Installation
SCXI-1341 Lab-NB, Lab-PC, or Lab-PC+ and SCXI-1344
Lab-LC Cable Assemblies
The SCXI-1341 Lab-NB, Lab-PC, or Lab-PC+ cable assembly connects a Lab-NB, Lab-PC, or
Lab-PC+ board to an SCXI-1100 module. The SCXI-1344 Lab-LC cable assembly connects a
Lab-LC board to an SCXI-1100 module. The SCXI-1341 and SCXI-1344 cable assemblies
consist of two pieces–an adapter board and a 50-conductor ribbon cable that connects the Lab
board to the rear connector of the adapter board. The adapter board converts the signals from the
Lab board I/O connectors to a format compatible with the SCXI-1100 rear signal connector pinout
at the front connector of the SCXI-1341 or SCXI-1344. The adapter board also has an additional
male breakout connector that provides the unmodified Lab board signals for use with an
SCXI-1180 feedthrough panel or an SCXI-1181 breadboard module. The adapter board gives the
Lab boards full access to the digital control lines, but these boards take only single measurements
and cannot scan channels. Leave jumper W1 in position A on the SCXI-1341 and SCXI-1344.
The SCXI-1100 does not use jumper W1. Table E-2 lists the SCXI-1341 and SCXI-1344 pin
translations.
Note: If you are using the Lab-PC+, configure the board for single-ended inputs.


