


6
|
ni.com
|
NI 9211 Calibration Procedure
EEPROM Update
When an adjustment procedure is completed, the NI 9211 internal calibration memory
(EEPROM) is immediately updated.
If you do not want to perform an adjustment, you can update the calibration date and onboard
calibration temperature without making any adjustments by initializing an external calibration,
setting the C Series calibration temperature, and closing the external calibration.
Re-Verification
Repeat the
section to determine the As-Left status of the device.
Note
If any test fails Re-Verification after performing an adjustment, verify that
you have met the
before returning your device to NI. Refer to
for assistance in returning the device to NI.
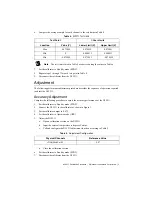
Accuracy Under Calibration Conditions
The values in the following table are based on calibrated scaling coefficients, which are stored
in the onboard EEPROM.
The following accuracy table is valid for calibration under the following conditions:
•
Ambient temperature 23 °C ±5 °C
•
NI 9211 installed in slot 8 of an NI cDAQ-9178 chassis
•
Slots 1 through 7 of the NI cDAQ-9178 chassis are empty
Note
For operational specifications, refer to the most recent
NI 9211 Operating
Instructions/User Guide and Specifications
online at
ni.com/manuals
.
Table 6.
NI 9211 Accuracy Under Calibration Conditions
Gain Error
Offset Error
370 ppm
13
μ
V


