
V
C
INPUT 9-
39 V
25
W MA
X
NI cDAQ-9179
NI Compac
tDAQ
POWER
READY
ACTIVE
PFI 0
PFI 1
SS
V
C
NI-DAQmx
NI LabVIEW
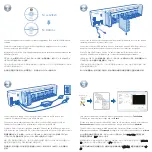
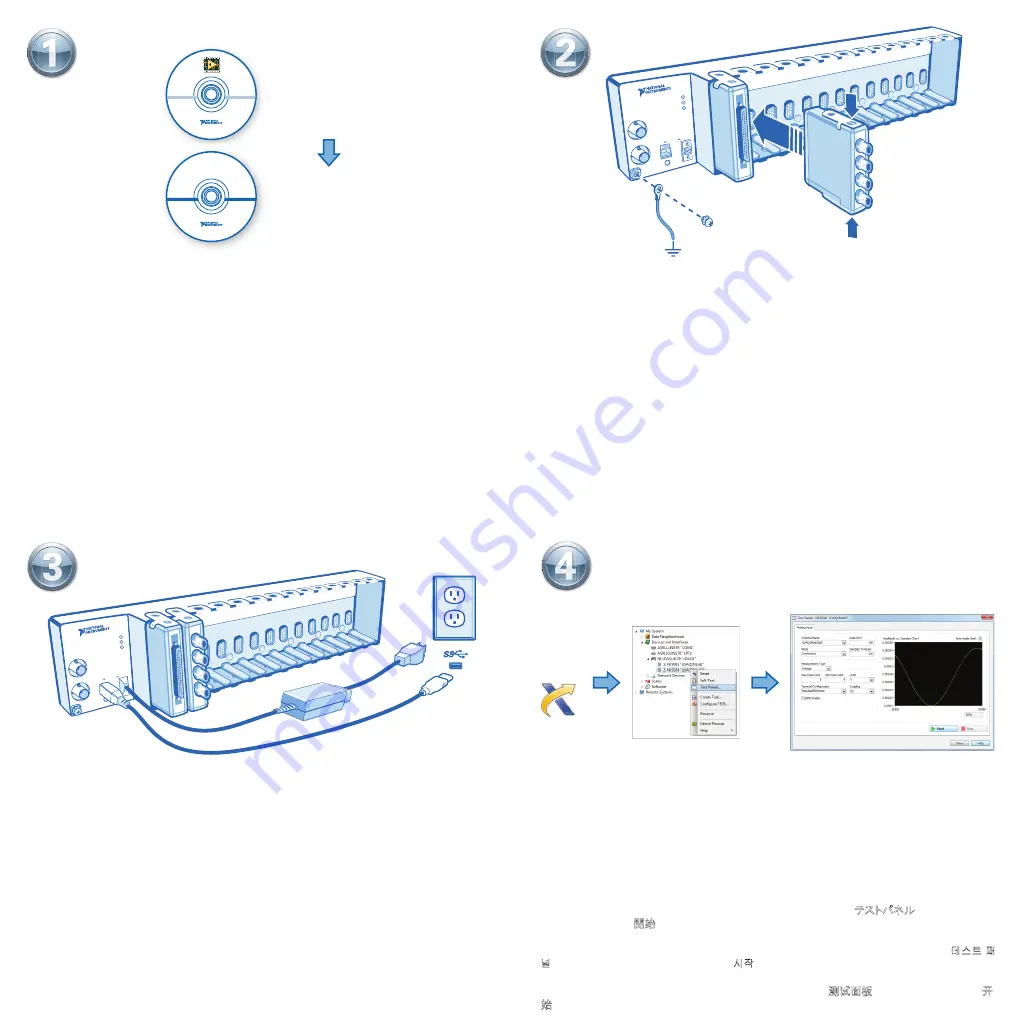
First, install application development software (if applicable). Then install NI-DAQmx driver
software.
Connect the cDAQ chassis to earth ground. Then install I/O modules. Refer to the module
operating instructions for signal connections.
Take your first measurement in MAX. Right-click any module and select
Test Panels
.
Configure the measurement settings and click
Start
.
Commencez par installer le logiciel de développement d’applications (le cas échéant).
Ensuite, installez le driver NI-DAQmx.
Installieren Sie zuerst die Entwicklungsumgebung (sofern zutreffend) und anschließend den
NI-DAQmx-Treiber.
アプリケーション開発ソフトウェアをインストールします(必要な場合)。 続いて、
NI-DAQmx
ドライ
バソフトウェアをインストールします。
우선 어플리케이션 개발 소프트웨어를 설치합니다 (해당하는 경우). 그 다음
NI-DAQmx
드라이버
소프트웨어를 설치합니다.
Connect the power supply. Then connect the cDAQ chassis to a USB port on your
computer. For best performance, use a USB 3.0 port.
NI cDAQ-9179
NI Compac
tDAQ
POWER
READY
ACTIVE
PFI 0
PFI 1
SS
V
C
INPUT 9-
39 V
25
W MA
X
Prenez votre première mesure dans MAX. Faites un clic droit sur un module et sélectionnez
Panneaux de test
. Configurez les paramètres de mesure puis cliquez sur
Démarrer
.
Führen Sie die erste Messung im MAX durch. Klicken Sie eines der Module mit der rechten
Maustaste an und wählen Sie
Testpanels
. Konfigurieren Sie die Messung und klicken Sie auf
Start
.
MAX
で最初の測定を実行します。モジュールの
1
つを右クリックしてテストパネルを選択します。
測定設定を構成し、開始をクリックします。
MAX
를 사용하여 첫번째 측정을 수행합니다. 모듈에서 마우스 오른쪽 버튼을 클릭하고 테스트 패
널을 선택합니다. 측정 셋팅을 설정한 후 시작을 클릭합니다.
现在可开始用
MAX
实现测量任务。右键单击任意模块并选择测试面板。配置测量设置并单击开
始。
Connectez le châssis cDAQ à la terre. Ensuite, installez les modules d’E/S. Reportez-vous
aux instructions d’utilisation du module pour effectuer les connexions de signaux.
Erden Sie das cDAQ-Chassis. Führen Sie anschließend die I/O-Module ein. Wie die
einzelnen Anschlüsse zu verbinden sind, ist in der Modulanleitung beschrieben.
cDAQ
シャーシをアースに接続します。 続いて、
I/O
モジュールを取り付けます。 信号接続につい
ては、モジュールの操作手順を参照してください。
cDAQ
섀시를 접지에 연결합니다. 그 후
I/O
모듈을 설치합니다. 신호 연결은 해당 모듈의 사용
설명서를 참조하십시오.
将
cDAQ
机箱接地。然后安装
I/O
模块。请参考模块的使用说明获取信号连接的相关信息。
Connectez le bloc d’alimentation puis raccordez le châssis cDAQ à un port USB de
l’ordinateur. Pour optimiser les performances, utilisez un port USB 3.0.
Schließen Sie die Stromversorgung an. Verbinden Sie dann das cDAQ-Chassis mit einem
USB-Anschluss des Computers. Die höchste Datenrate wird mit einem USB-3.0-Port erzielt.
電源を接続します。その後に、
cDAQ
シャーシをコンピュータの
USB
ポートに接続してください。
パフォーマンスを最大限にするには、
USB 3.0
ポートを使用してください。
전원 공급 장치를 연결합니다. 그런 다음
cDAQ
섀시를 컴퓨터의
USB
포트에 연결합니다.
성능을 최적화하려면,
USB 3.0
포트를 사용합니다.
Measurement &
Automation
Explorer
(NI MAX)
33
22
11
先安装应用程序开发软件(如有需要), 然后安装
NI-DAQmx
驱动软件。
连接电源,然后连接
cDAQ
机箱至计算机的
USB
端口。请使用
USB 3.0
端口,以实现最佳
性能。
44