background image

© National Instruments Corporation

23

 cFP-2200/2210/2220/2220A

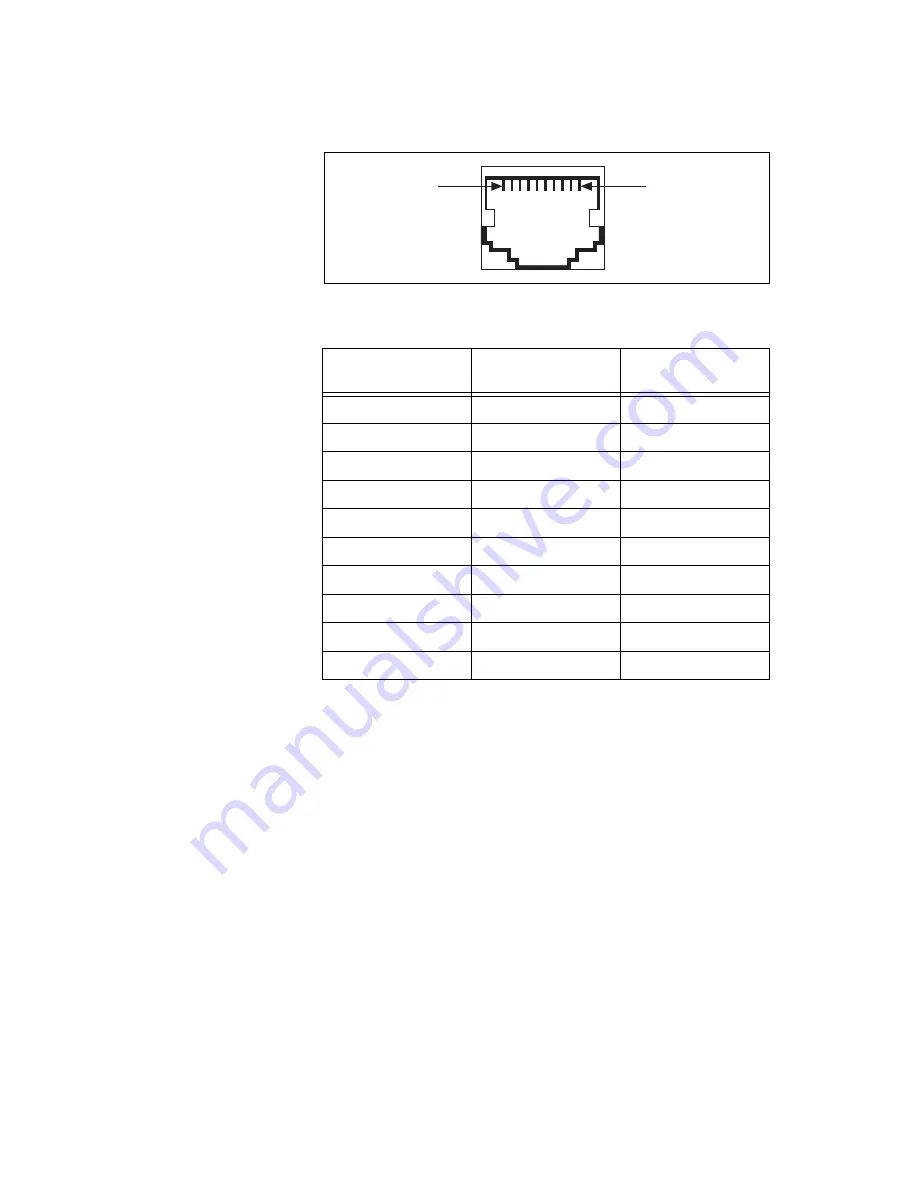
Figure 26.  10-Position Modular Jack Pin Locations

Figure 27 shows how to wire several FP-1001 banks in an RS-485 network 
controlled by the cFP-2220/2220A. Only two FP-1001 banks are shown, 
but the cFP-2220/2220A can control up to 24 FP-1001 banks. Install 120

Ω


termination resistors at each end of the network as shown in Figure 27.

Table 2.  10-Position Modular Jack Pin Descriptions 

10-Position 

Modular Jack Pin

RS-232 Signal

RS-485 Signal

10

DCD

GND

9

RXD

CTS+ (HSI+)

8

TXD

RTS+ (HSO+)

7

DTR

RXD+

6

GND

RXD–

5

DSR

CTS– (HSI–)

4

RTS

RTS– (HSO–)

3

CTS

TXD+

2

RI

TXD–

1

No Connect

No Connect

Pin 10

Pin 1

PRELIMINARY

Summary of Contents for cFP-22 Series

Page 1: ...4 Status LED 5 Power LED 6 User Configurable LEDs 7 DIP Switches 8 USB Port cFP 2220 Only 9 RJ 45 Ethernet Port 2 cFP 2220 and cFP 2220A Only 10 Reset Button 11 Power Connector 12 Digital Input Output...

Page 2: ...ched off Caution Substitution of components may impair suitability for Class I Division 2 Caution For Zone 2 applications install the Compact FieldPoint system in an enclosure rated to at least IP 54...

Page 3: ...screwdriver 14 AWG 1 6 mm wire with ring lug to fit 8 screw 11 30 VDC Power supply PC running Windows FieldPoint software 6 0 1 or later LabVIEW Real Time Module 8 5 1 or later Mounting the Compact F...

Page 4: ...ground terminal To ensure maximum cooling efficiency mount the Compact FieldPoint so that the I O module vents are at the top and bottom as shown in the following figure Figure 2 cFP 22xx Installed o...

Page 5: ...led on cFP BP 4 Front View with Dimensions Cabling Clearance 4 slots 246 mm 9 68 in 8 slots 441 mm 17 4 in Cooling Outline 51 mm 2 in Cooling Outline 51 mm 2 in Min 182 mm 7 18 in 106 mm 4 18 in Cabli...

Page 6: ...backplane before mounting it 104 78 mm 4 1 in 63 50 mm 2 5 in 22 23 mm 0 9 in 33 15 mm 1 3 in 129 54 mm 5 1 in 311 40 mm 12 3 in 387 60 mm 15 3 in 407 80 mm 16 1 in 127 00 mm 5 0 in 440 94 mm 17 4 in...

Page 7: ...r and the 8 32 5 16 in countersink screws shipped with the mounting kit Figure 7 Installing the DIN Rail Clip on the cFP BP 4 Caution Do not use screws longer than 5 16 in to fasten the DIN rail clip...

Page 8: ...01 The vertical panel mount kit has mounting holes on the top and bottom of the backplane and is NI part number 778688 01 Complete the following steps to mount the system on a flat surface 1 Fasten t...

Page 9: ...el Mount Kit Installed Front View with Dimensions Figure 11 cFP BP 8 with Horizontal Panel Mount Kit Installed Front View with Dimensions Figure 12 Installing the Vertical Panel Mount Kit on the cFP B...

Page 10: ...the plates to a panel 3 Connect the PE ground terminal on the cFP BP x to safety ground Caution Disconnect power and make sure that no I O modules are in the backplane before removing it from the pan...

Page 11: ...0 in 4 Radius 2 29 mm 0 090 in 444 5 mm 17 500 in 2 29 mm 0 090 in 8 Diameter 374 65 mm 14 750 in 278 89 mm 10 980 in 177 8 mm 7 000 in 25 4 mm 1 000 in 66 29 mm 2 610 in 37 69 mm 1 484 in 37 72 mm 1...

Page 12: ...2220 2220A 12 ni com Figure 16 Installing the Rack Mount Bracket on the cFP BP 4 Figure 17 Installing the Rack Mount Bracket on the cFP BP 8 NA TION AL INST RU MEN TS NA TION AL INST RU MEN TS P R E L...

Page 13: ...power supply such as the PS 5 The captive 10 32 nuts on the rack mount kit make it easy to attach a DIN rail Use two 10 32 screws of 3 8 in length as shown in Figure 18 If you want to install flat was...

Page 14: ...ve screws on the controller with the holes on the backplane 3 Seat the card edge at the back of the controller in the card edge connector on the backplane 4 Press the controller firmly to seat it on t...

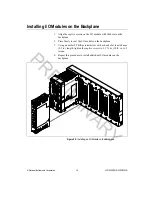
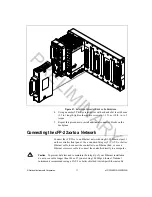
Page 15: ...on the backplane 2 Press firmly to seat the I O module on the backplane 3 Using a number 2 Phillips screwdriver with a shank of at least 64 mm 2 5 in length tighten the captive screws to 1 1 N m 10 lb...

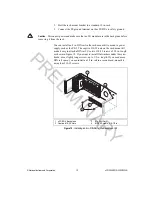
Page 16: ...e socket Caution Do not insert or remove connector blocks or other connectivity accessories while power is applied to them 1 Wire signals or loads as described in the I O module and connector block op...

Page 17: ...etwork Connect the cFP 22xx to an Ethernet network using RJ 45 Ethernet port 1 on the controller front panel Use a standard Category 5 CAT 5 or better Ethernet cable to connect the controller to an Et...

Page 18: ...tance configuring the host computer and controller on the same subnet Using Ethernet Port 2 to Connect the cFP 2220 2220A to Other FieldPoint Systems on the Network You can use Ethernet port 2 to conn...

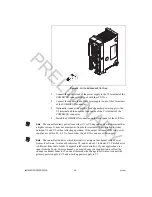
Page 19: ...of the power wires Wrap the wires around one side of the ferrite so that they pass through the ferrite twice as shown in Figure 22 Figure 22 Wrapping the Power Wires around the Ferrite Figure 23 Clos...

Page 20: ...on which terminal has a higher voltage It does not draw power from both terminals The controller switches between V1 and V2 without affecting operation If the output voltages of the two power supplies...

Page 21: ...The Status LED turns off indicating that the POST is complete If the LEDs do not behave in this way when the system powers on refer to the Understanding LED Indications section You can configure the c...

Page 22: ...jack The Serial VIs access COM 3 as port 2 Refer to Figure 26 and Table 2 for pin locations and signal descriptions COM 4 cFP 2220 and cFP 2220A Only COM 4 is an RS 485 serial port with a 10 position...

Page 23: ...1 banks are shown but the cFP 2220 2220A can control up to 24 FP 1001 banks Install 120 termination resistors at each end of the network as shown in Figure 27 Table 2 10 Position Modular Jack Pin Desc...

Page 24: ...he cFP 2220 2220A has two digital inputs and two digital outputs that you can use to connect a simple operator interface to the controller Refer to Figure 1 for the location of the input and output te...

Page 25: ...pes of USB devices Refer to the LabVIEW Real Time Module Help for more information Caution Do not hotswap USB devices while the Compact FieldPoint system is in a hazardous location or connected to hig...

Page 26: ...tch The position of the SAFE MODE switch determines whether the embedded LabVIEW Real Time engine launches at startup If the switch is in the OFF position the LabVIEW Real Time engine launches Keep th...

Page 27: ...elp CONS OUT Switch With a serial port terminal program you can use the CONS OUT switch to read the IP address and firmware version of the controller Use a null modem cable to connect the serial port...

Page 28: ...e controller in MAX 2 The controller has detected an error in its software This can occur when an attempt to upgrade the software is interrupted Refer to the Measurement Automation Explorer Help for i...

Page 29: ...the removable CompactFlash point the VI to the D drive on the controller Caution You must power down the controller before installing or removing a CompactFlash Removing the CompactFlash without power...

Page 30: ...e IP address subnet mask DNS address gateway and Time Server IP are set to 0 0 0 0 Power on defaults watchdog settings and VIs are unaffected Complete the following steps to reset the network configur...

Page 31: ...ntroller reboots unconfigured or with the old IP address Green status LED error code greater than 3 Green status LED error code 2 during normal operation Controller incorrectly reports that the disk i...

Page 32: ...nonvolatile 128 MB DRAM cFP 2210 128 MB nonvolatile 256 MB DRAM cFP 2220 2220A 256 MB nonvolatile 256 MB DRAM Memory lifetime nonvolatile 100 000 writes per block For information about the amount of m...

Page 33: ...imum data rate 12 Mb s Maximum current 500 mA Power Requirements Caution You must use a National Electric Code NEC UL Listed Class 2 power supply with the cFP 22xx Power supply input voltage range 11...

Page 34: ...not connect the system to signals or use for measurements within Measurement Categories II III or IV Safety Standards This product is designed to meet the requirements of the following standards of s...

Page 35: ...esponsible manner NI recognizes that eliminating certain hazardous substances from our products is beneficial not only to the environment but also to NI customers For additional environmental informat...

Page 36: ...this operating temperature range follow the guidelines in the installation instructions for your Compact FieldPoint system Storage temperature IEC 60068 2 1 IEC 60068 2 2 55 to 85 C Ingress protection...

Page 37: ...normal and crossover cables Figure 31 Ethernet Connector Pinout Table 4 Ethernet Cable Wiring Connections Pin Connector 1 Connector 2 Normal Connector 2 Crossover 1 white orange white orange white gre...

Page 38: ...the United States contact your local branch office Australia 1800 300 800 Austria 43 662 457990 0 Belgium 32 0 2 757 0020 Brazil 55 11 3262 3599 Canada 800 433 3488 China 86 21 5050 9800 Czech Republi...

Page 39: ...P R E L I M I N A R Y...

Page 40: ...trademarks Other product and company names mentioned herein are trademarks or trade names of their respective companies For patents covering National Instruments products refer to the appropriate loca...

Reviews: