2.
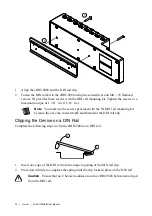
Fasten the panel mounting plate to the cRIO-9068 using the screwdriver and M5 or
number 10 screws. NI provides these screws with the panel mounting kit. Tighten the
screws to a maximum torque of 1.3 N · m (11.5 lb · in.).
Note
You must use the screws provided with the NI panel mounting kit
because they are the correct depth and thread for the panel mounting plate.
3.
Fasten the panel mounting plate to the surface using the screwdriver and screws that are
appropriate for the surface. The maximum screw size is M5 or number 10.
Panel Mounting Dimensions
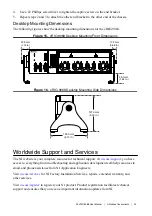
The following figure shows the panel mounting dimensions for the cRIO-9068.
Figure 13. cRIO-9068 Panel Mounting Dimensions
355.6 mm
(14.00 in.)
336.5 mm
(13.25 in.)
9.5 mm
(0.38 in.)
17.6 mm
(0.69 in.)
88.1 mm
(3.47 in.)
31.7 mm
(1.25 in.)
63.5 mm
(2.50 in.)
7.2 mm
(0.29 in.)
Mounting the Device on a DIN Rail
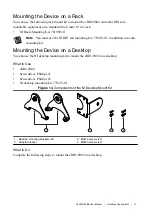
You can use the NI DIN rail mounting kit to mount the cRIO-9068 on a standard 35-mm DIN
rail.
What to Use
•
cRIO-9068
•
Screwdriver, Phillips #2
•
NI DIN rail mounting kit, 779018-01
–
DIN rail clip
–
M4 × 25 flathead screw (x2)
What to Do
Complete the following steps to mount the cRIO-9068 on a DIN rail.
NI cRIO-9068 User Manual
|
© National Instruments
|
19

