background image

FP-PWM-520 and cFP-PWM-520

2

ni.com

Installing the FP-PWM-520

The FP-PWM-520 mounts on a FieldPoint terminal base 
(FP-TB-

x

), which provides operating power to the module. 

Installing the FP-PWM-520 onto a powered terminal base does 
not disrupt the operation of the bank.

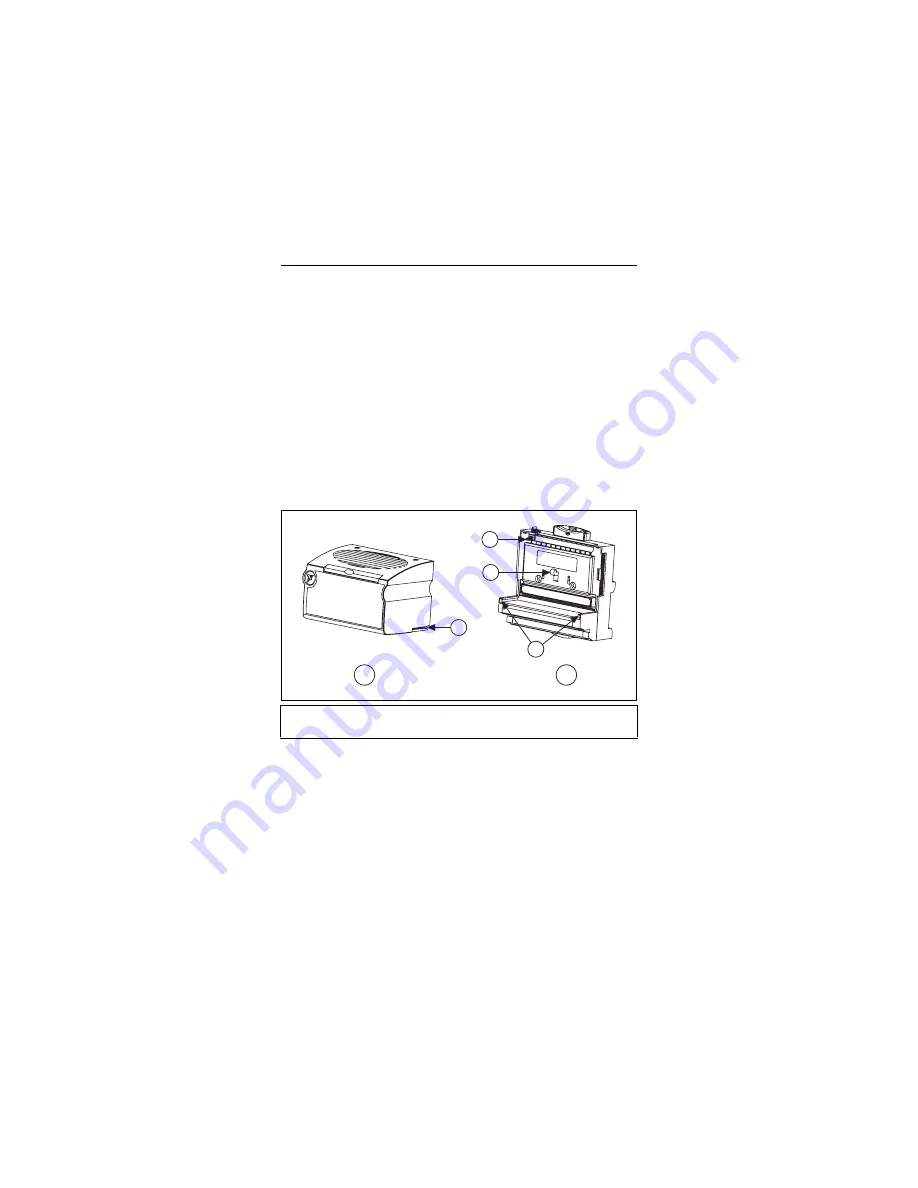
To install the FP-PWM-520, refer to Figure 1 and complete the 
following steps:

1. Slide the terminal base key to either position X, used for any 

module, or position 4, used for the FP-PWM-520 module.

2. Align the FP-PWM-520 alignment slots with the guide rails on 

the terminal base.

3. Press firmly to seat the FP-PWM-520 on the terminal base. 

When the module is firmly seated, the terminal base latch locks 
it into place.

Figure 1.  

Installing the FP-PWM-520

1

I/O Module

2

Terminal Base

3

Alignment Slot

4

Terminal Base Key

5

Latch

6

Guide Rails

1

3

2

4

5

6

Summary of Contents for FIELDPOINT FP-PWM-520

Page 1: ...r the FieldPoint network module you are using Features The c FP PWM 520 is a FieldPoint pulse width modulation PWM output module with the following features Eight PWM sourcing output channels 0 to 100 duty cycle capability with 12 bit resolution Short circuit protection for outputs Outputs source 5 VDC or 10 30 VDC with user provided power supply Independent configuration of the output period for ...

Page 2: ...re 1 and complete the following steps 1 Slide the terminal base key to either position X used for any module or position 4 used for the FP PWM 520 module 2 Align the FP PWM 520 alignment slots with the guide rails on the terminal base 3 Press firmly to seat the FP PWM 520 on the terminal base When the module is firmly seated the terminal base latch locks it into place Figure 1 Installing the FP PW...

Page 3: ...e following steps 1 Align the captive screws on the cFP PWM 520 with the screw holes on the backplane The alignment keys on the cFP PWM 520 prevent backward insertion 2 Press firmly to seat the cFP PWM 520 on the backplane 3 Using a number 2 Phillips screwdriver with a shank of at least 64 mm 2 5 in length tighten the captive screws to 1 1 N m 10 lb in of torque The nylon coating on the screws pre...

Page 4: ...he cFP PWM 520 and under the slide in card on the front of the FP PWM 520 Connect to the terminals using the terminal base connector block or other connectivity accessory Use a 5 VDC or 10 30 VDC external power supply for the output channels The power supply must provide enough current to power all of the loads on the output channels up to a maximum of 1 A per channel Connect the external power su...

Page 5: ...ore information and select fuses for the VOUT terminals accordingly Pulse Width Modulator Output Circuit The c FP PWM 520 output channels are optically isolated from the rest of the FieldPoint bank The channels are sourcing outputs with short circuit protection circuitry Sourcing current means that the VOUT terminal provides a path to a voltage supply In the ON state of the output period a transis...

Page 6: ...er a channel is in a short circuit condition complete the following steps 1 In FieldPoint software set the duty cycle to 100 for the channel in question Refer to the Configuring the Output Channels section for more information about configuring the duty cycle 2 Measure the voltage between the VOUT and VSUP terminals for that channel Under normal load conditions the VOUT to VSUP voltage is less tha...

Page 7: ...e channel trips and goes into an overcurrent state In an overcurrent state the channel turns off and the module is not damaged If the level of current through the output terminal is higher than the minimum possible trip current and lower than the guaranteed trip current the state of the channel is indeterminate and depends on factors such as the current level the temperature and the power supply I...

Page 8: ...u want to set the duty cycle The duty cycle is the proportion of time that the PWM signal is ON over the period Enter a value from 0 to 100 to set the duty cycle The duty cycle has 12 bit resolution 4 096 discrete duty cycle settings Figure 4 Period and Duty Cycle of a PWM Output Status Indicators The c FP PWM 520 has two green status LEDs POWER and READY After you insert the FP PWM 520 onto a ter...

Page 9: ...ction describes the isolation of the c FP PWM 520 and its compliance with international safety standards The field wiring connections are isolated from the backplane and the inter module communication bus The isolation barriers in the module provide 250 Vrms Measurement Category II continuous isolation verified by 2 300 Vrms 5 s dielectric withstand test The c FP PWM 520 provides double insulation...

Page 10: ... ground using 14 AWG 1 6 mm wire with a ring lug Use the 5 16 in panhead screw shipped with the backplane to secure the ring lug to the backplane PE ground terminal As with any hazardous voltage wiring make sure that all wiring and connections meet applicable electrical codes and commonsense practices Mount terminal bases and backplanes in an area position or cabinet that prevents accidental or un...

Page 11: ... disconnect I O side wires or connectors unless power has been switched off or the area is known to be nonhazardous Caution Do not remove modules unless power has been switched off or the area is known to be nonhazardous Caution Substitution of components may impair suitability for Class I Division 2 Caution For Zone 2 applications install the Compact FieldPoint system in an enclosure rated to at ...

Page 12: ...D and earlier modules 0 3 Ω Pulse width accuracy 1 3 μs any period and duty cycle Short Circuit Protection Minimum trip current Revision E and later modules 9 A Revision D and earlier modules 1 A Module Temperature Ranges 40 to 50 C 50 to 60 C 60 to 70 C cFP PWM 520 1 A 0 75 A 0 5 A FP PWM 520 1 A 1 A 1 A 1 The letter in the part number identifies the revision of the module For example part number...

Page 13: ...d READY indicators eight green output state indicators Weight FP PWM 520 140 g 4 9 oz cFP PWM 520 110 g 3 9 oz Current Level Channel Behavior Module Protection 0 1 A Channel does not trip Module is not damaged 1 9 A Channel does not trip Module may be damaged 9 12 5 A Channel may trip Module may be damaged 12 5 A Channel trips Module is not damaged Current Level Channel Behavior Module Protection ...

Page 14: ...nts Power from network module 1 W Isolation Voltage Isolation voltage is verified by a dielectric withstand test Channel to ground isolation Continuous 250 Vrms Measurement Category II Dielectric withstand 2 300 Vrms 5 s max Channel to channel isolation None Environmental FieldPoint modules are intended for indoor use only For outdoor use they must be mounted inside a sealed enclosure Operating te...

Page 15: ...e 18 shocks at 6 orientations Hazardous Locations U S UL Class I Division 2 Groups A B C D T4 Class I Zone 2 AEx nC IIC T4 Canada C UL Class I Division 2 Groups A B C D T4 Class I Zone 2 Ex nC IIC T4 Europe DEMKO Ex nC IIC T4 Safety This product is designed to meet the requirements of the following standards of safety for electrical equipment for measurement control and laboratory use IEC 61010 1 ...

Page 16: ...irective EMC Note Refer to the Declaration of Conformity DoC for this product for any additional regulatory compliance information To obtain the DoC for this product visit ni com certification search by model number or product line and click the appropriate link in the Certification column Environmental Management National Instruments is committed to designing and manufacturing products in an envi...

Page 17: ... a WEEE recycling center For more information about WEEE recycling centers and National Instruments WEEE initiatives visit ni com environment weee htm ᄤֵᙃѻક ᶧ ࠊㅵ ࡲ Ё RoHS Ё ᅶ National Instruments ヺড়Ё ᄤֵᙃ ѻકЁ䰤ࠊՓ ᶤѯ ᆇ 䋼ᣛҸ RoHS DŽ Ѣ National Instruments Ё RoHS ড়㾘ᗻֵᙃˈ䇋ⱏᔩ ni com environment rohs_chinaDŽ For information about China RoHS compliance go to ni com environment rohs_china ...

Page 18: ...fice Australia 1800 300 800 Austria 43 662 457990 0 Belgium 32 0 2 757 0020 Brazil 55 11 3262 3599 Canada 800 433 3488 China 86 21 5050 9800 Czech Republic 420 224 235 774 Denmark 45 45 76 26 00 Finland 358 0 9 725 72511 France 01 57 66 24 24 Germany 49 89 7413130 India 91 80 41190000 Israel 972 3 6393737 Italy 39 02 41309277 Japan 0120 527196 Korea 82 02 3451 3400 Lebanon 961 0 1 33 28 28 Malaysi...

Page 19: ...to the Terms of Use section on ni com legal for more information about National Instruments trademarks Other product and company names mentioned herein are trademarks or trade names of their respective companies For patents covering National Instruments products refer to the appropriate location Help Patents in your software the patents txt file on your CD or ni com patents ...

Reviews: