background image

windows, the ambient light can vary significantly with weather. Also, standard fluorescent

lighting flickers at a rate that is perceivable by the ISC-178x. In these situations, the ambient

light must be overridden with a dedicated light source to ensure reproducible results.
The Lighting Strobe starts after the Trigger Delay is satisfied. Use the Exposure Delay if your

lighting source requires time to reach a stable intensity so that your images are consistent and

your lighting does not fluctuate. The Exposure Delay can only be specified in units of time,

and defaults to a value of 0. The Exposure Delay can be adjusted by setting the Exposure

Delay control in Vision Builder AI, setting the Exposure Delay attribute in LabVIEW, or by

setting the Exposure Delay in the attribute tree in MAX. The exposure begins once the

Exposure Delay is satisfied. Both the Lighting Strobe and the Exposure signals end once the

Exposure Time is satisfied.

Related Information

Field of View

 on page 17

Determining the Maximum Frame Rate

 on page 22

Image Readout

The image readout phase begins immediately following the completion of the image exposure

time. During image readout, the sensor transfers the acquired image data to the CPU of the

ISC-178x.
The image readout duration is primarily dependent upon the image size and the image

decimation because these settings directly influence the amount of data that must be

transferred. The length of time required for the image readout directly affects the maximum

frame rate that can be achieved because only one image can be transferred at a time. There can

never be an exposure that ends during the image readout for the previous image. The

relationship between the triggering, exposure, and readout of the image is determined by the

Trigger Overlap feature.

Related Information

Field of View

 on page 17

Determining the Maximum Frame Rate

 on page 22

Trigger Overlap

The Trigger Overlap feature determines whether to allow the exposure phase of a triggered

image acquisition to occur while the previous image is still being transferred to the host. If

Trigger Overlap is disabled, the exposure phase and the image transfer phase will occur

sequentially. If the exposure phase ends before the previously acquired image is transferred to

the host, enabling Trigger Overlap can lead to dropped frames. If, however, the exposure phase

ends after the previously acquired image is transferred to the host, enabling Trigger Overlap

can increase the speed of your application.
When Trigger Overlap is disabled, the start of the exposure phase is highly deterministic

because the exposure and image readout occur sequentially. When Trigger Overlap is enabled

and the exposure begins during the readout of the previous image, the exposure signal must be

synchronized with the sensor. This introduces additional offset and jitter to the start of the

exposure.

ISC-178x User Manual

  | 

© National Instruments

  | 

25

Summary of Contents for ISC-1783

Page 1: ...ISC 1783...

Page 2: ...Mode NI Linux Real Time 16 Image Sensor 16 Acquiring Images 20 Triggering 20 Exposure and Lighting 24 Image Readout 25 Trigger Overlap 25 Reconfiguring During an Acquisition 26 ISC 178x Software Attr...

Page 3: ...mage sensor 3 C mount lens mount 4 Varioptic liquid lens connector Figure 2 ISC 178x Connectors Power Status User 100 1G 1 2 3 4 1 LED indicators 2 Digital I O and Power connector 3 VGA and USB connec...

Page 4: ...4 ISC 178x Power and I O Connector Pinout 1 2 3 4 5 6 7 8 9 10 11 12 Table 1 ISC 178x Power and I O Connector Signal Descriptions Pin Signal Description 1 C OUT Common reference negative for isolated...

Page 5: ...M12 to A Code M12 Power and I O Cable 3 m 145232 03 A Code M12 to Pigtail Power and I O Cable 3 m 145233 03 A Code M12 to Pigtail Power and I O Cable The A Code M12 to Pigtail Power and I O Cable NI...

Page 6: ...12 pin male M12 connector that provides connectivity between the ISC 178x a display device and USB 2 0 devices like a keyboard or a mouse ISC 178x VGA and USB Connector Pinout 11 10 12 4 3 2 1 9 8 7 6...

Page 7: ...cable is available for the ISC 178x Table 5 USB and VGA Cable Cables Length Part Number M12 to VGA USB Splitter Cable 1 m 782022 01 Network Connector The network connector is an 8 pin M12 X coded con...

Page 8: ...5 Network Cable 5 m 145230 05 X Code M12 to X Code M12 Network Cable 5 m 145231 05 Varioptic Liquid Lens Connector The ISC 178x supports the following models of Varioptic liquid lenses Caspian C 39N0...

Page 9: ...Red Orange Initialization error Orange Orange Red blink Temperature limit exceeded Orange Orange Red blink Orange System firmware initializing Orange Orange Red blink Green System firmware initializat...

Page 10: ...10x the cable diameter The following figures provide dimensional drawings for the ISC 178x Figure 4 Front View with Dimensions 42 00 mm 1 654 in 21 00 mm 827 in 16 50 mm 650 in 61 00 mm 2 402 in 61 00...

Page 11: ...7 00 mm 276 in 91 00 mm 3 583 in 61 00 mm 2 402 in 87 55 mm 3 447 in 46 50 mm 1 831 in 7 00 mm 276 in M4X0 7 6H 4 00 mm 0 157 in Figure 6 Side View with Dimensions 46 00 mm 1 811 in 72 00 mm 2 834 in...

Page 12: ...26 50 mm 1 043 in 41 00 mm 1 614 in 118 00 mm 4 646 in REF Figure 8 Bottom View with Dimensions Power Status User 100 1G 17 10 mm 673 in 54 00 mm 2 126 in 24 00 mm 945 in 2X 6 00 mm 236 in ISC 178x U...

Page 13: ...C 178x and an Advanced Illumination ICS 3 lighting controller without a trigger Use this configuration to run a light in continuous mode Figure 9 Wiring a Lighting Controller Without a Trigger 24 VDC...

Page 14: ...guration depends on whether the common input signal is tied to ground sinking input or V sourcing input The isolated inputs cannot be configured individually The isolated inputs must all be sinking or...

Page 15: ...on to a sourcing output Figure 12 Wiring an Isolated Input to a Sourcing Output External Power Supply Sourcing Output Device ISC 178x Iso In CIn Wiring the Isolated Outputs The isolated outputs can be...

Page 16: ...g a Pull up Resistor on page 16 Wiring an Isolated Output to a Sourcing Input The following figure shows how to wire an isolated output to a sourcing input Figure 14 Wiring an Isolated Output to a Sou...

Page 17: ...require a resistor with a higher power rating Related Information Wiring a Lighting Device for Strobe Mode on page 12 Wiring an Isolated Output to a Sinking Input on page 14 Wiring an Isolated Output...

Page 18: ...r the Pixel Pitch The Active Pixels can be obtained from the image sensor configuration table or the specifications for each model where FOV is the field of view in either the horizontal or vertical d...

Page 19: ...djust the various parameters until you achieve the right combination of components that match your inspection needs This might include increasing the working distance choosing a lens with a shorter fo...

Page 20: ...sible it is preferable to add additional lighting Auto White Level Color Models Only Color models of the ISC 178x allow you to adjust the gain for each color plane in the RGB color space The white lev...

Page 21: ...r at a workstation equipped with anti ESD facilities If dust sticks to the sensor first attempt to blow it off from the side of the sensor using ionized air If oils are present on the sensor clean the...

Page 22: ...the Acquire Image Smart Camera step Then select one of the Input lines from the Source drop down control In LabVIEW set the value of the Trigger Mode to ON and the value of the Trigger Source attribu...

Page 23: ...e counts allows the ISC 178x to expose the image when the part is in position regardless of changes in conveyor belt speed When using an Input line as the trigger source you must specify the desired a...

Page 24: ...Trigger Exposure Image Readout 1 1 Frame Period The frame period is affected by the following factors Exposure Time and Exposure Delay attributes Trigger Delay attribute Image size determined by the...

Page 25: ...r an appropriate amount of time relative to the light in the environment acquired images will exhibit appropriate contrast to easily distinguish both dark and light features Contrast is a key factor i...

Page 26: ...tly influence the amount of data that must be transferred The length of time required for the image readout directly affects the maximum frame rate that can be achieved because only one image can be t...

Page 27: ...e changed while the ISC 178x is waiting on a trigger the settings will not be applied to the currently queued image The first image acquired after changing the settings will still use the old configur...

Page 28: ...sets the activation for the selected counter CounterEventSource Enum Counter dependent Gets sets the source for the selected counter CounterReset Command Resets the selected counter CounterSelector E...

Page 29: ...osure ExposureTime DBL 50 to 4200000 s Determines the exposure time of the camera Gain U32 0 to 255 Determines the input gain of the camera Height U32 Model dependent Pixels Gets sets the height of th...

Page 30: ...n the selected line LineMode Enum Input Output Indicates the mode of the selected line LineSelector Enum Input 0 Input 1 Input 2 Input 3 Windows only Output 0 Output 1 Output 2 Selects the digital I O...

Page 31: ...t of the image OffsetY U32 Model dependent Pixels Gets sets the top offset of the image PayloadSize U32 0 to 4294967295 Bytes Gets the frame size in bytes PixelCoding Enum Raw Mono BGRAPacked color mo...

Page 32: ...put 0 Edges Input 1 Edges Input 2 Edges Input 3 Edges Windows only Specifies the counter source for the pulse generator delay PulseGeneratorDuration DBL 0 to 1374389534 4 s Specifies the duration in m...

Page 33: ...er source of the selected pulse generator ReverseX Bool Determines if the image is flipped horizontally ReverseY Bool Determines if the image is flipped vertically SensorHeight U32 Model dependent Pix...

Page 34: ...trigger Applies when TriggerDelaySource is InternalClock Applies when TriggerSource is Software or when TriggerSource is an input line and TriggerActivation is edge based TriggerDelayEdgeActivation En...

Page 35: ...iggerActivation is edge based TriggerDelaySource Enum Internal Clock Input 0 Edges Input 1 Edges Input 2 Edges Input 3 Edges Windows only Specifies the counter source for the trigger delay for the sel...

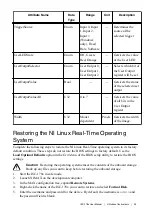
Page 36: ...me Operating System Complete the following steps to restore the NI Linux Real Time operating system to its factory default condition These steps do not restore the BIOS settings to factory default Use...

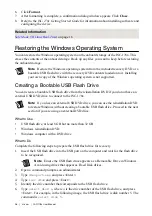
Page 37: ...ive to connect to the ISC 178x Note If you have an external USB DVD drive you can use the reinstallation DVD to restore Windows without creating a bootable USB flash drive Proceed to the next section...

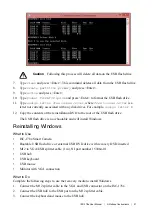
Page 38: ...the reinstallation DVD to the root of the USB flash drive The USB flash drive is now bootable and will install Windows Reinstalling Windows What to Use ISC 178x Smart Camera Bootable USB flash drive o...

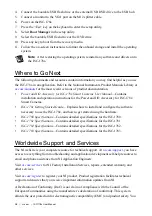
Page 39: ...plains how to install and configure the software necessary to use the ISC 178x and how to get started using the hardware ISC 1780 Specifications Contains detailed specifications for the ISC 1780 ISC 1...

Page 40: ...as 78759 3504 NI also has offices located around the world For telephone support in the United States create your service request at ni com support or dial 1 866 ASK MYNI 275 6964 For telephone suppor...

Page 41: ...EULAs and third party legal notices in the readme file for your NI product Refer to the Export Compliance Information at ni com legal export compliance for the NI global trade compliance policy and h...

Reviews: