background image

Chapter 1

Getting Started

©

 National Instruments Corporation

1-5

NI PXI-1044 User Manual

PXI-1044 Backplane Overview

Interoperability with CompactPCI

The PXI-1044 backplane is interoperable with 5 V and universal 
PXI-compatible products and standard CompactPCI products. This is an 
important feature, because some PXI systems may require components that 
do not implement PXI-specific features. For example, you may want to use 
a standard CompactPCI network interface card in a PXI chassis.

The signals on the backplane P1 connectors meet the requirements of the 
CompactPCI specification for both peripheral and system modules. Refer 
to Appendix B, 

Pinouts

, for pinout information.

The PXI-specific signals are on the backplane P2 connectors and are found 
only on those signal lines reserved or not used in the CompactPCI 64-bit 
specification. Therefore, all modules that meet the requirements of the 
CompactPCI 64-bit specification will function in the PXI-1044. Refer to 
Appendix B, 

Pinouts

, for pinout information.

The PXI-1044 has three PXI bus segments linked through 
two 64-bit/33 MHz PXI bridges. The PXI bus segment divisions are 
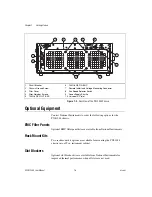
represented on the front of the chassis by vertical lines as shown in 
Figure 1-1.

The PXI-1044 backplane has +5 V V(I/O). Refer to the 

CompactPCI 

Specification PICMG 2.0 R3.0

 for details regarding V(I/O).

System Controller Slot

The system controller slot is slot 1 of the chassis as defined by the PXI 
Specification. It has three controller expansion slots for system controller 
modules that are wider than one slot. As defined in the PXI specification, 
these slots allow the controller to expand to the left to prevent the controller 
from using peripheral slots.

Summary of Contents for NI PXI-1044

Page 1: ...PXI NI PXI 1044 User Manual NI PXI 1044 User Manual November 2004 371360A 01...

Page 2: ...1190000 Israel 972 0 3 6393737 Italy 39 02 413091 Japan 81 3 5472 2970 Korea 82 02 3451 3400 Malaysia 603 9131 0918 Mexico 01 800 010 0793 Netherlands 31 0 348 433 466 New Zealand 0800 553 322 Norway...

Page 3: ...lood accident actions of third parties or other events outside reasonable control Copyright Under the copyright laws this publication may not be reproduced or transmitted in any form electronic or mec...

Page 4: ...ity with CompactPCI 1 5 System Controller Slot 1 5 Star Trigger Slot 1 6 Peripheral Slots 1 6 Local Bus 1 6 Trigger Bus 1 8 System Reference Clock 1 8 Chapter 2 Installation and Configuration Safety I...

Page 5: ...tialization Files 2 14 Chapter 3 Maintenance Preparation 3 1 Service Interval 3 1 Cleaning 3 1 Interior Cleaning 3 2 Exterior Cleaning 3 2 Cleaning and Replacing the Fan Filters 3 2 Resetting the AC M...

Page 6: ...oss or a system crash When this symbol is marked on the product refer to the Read Me First Safety and Radio Frequency Interference document shipped with the product for precautions to take bold Bold t...

Page 7: ...manual CompactPCI Specification PICMG 2 0 R 3 0 PXI Hardware Specification Revision 2 1 PXI Software Specification Revision 2 1 IEEE 1101 1 1991 IEEE Standard for Mechanical Core Specifications for M...

Page 8: ...les hardware and switches are undamaged Inspect the inner chassis for any possible damage debris or detached components If damage appears to have been caused during shipment file a claim with the carr...

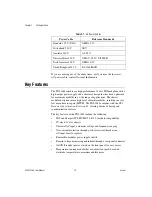
Page 9: ...n features The key features of the PXI 1044 include the following PXI and CompactPCI PICMG 2 0 R 3 0 module compatibility 3U sized 14 slot chassis Universal AC input automatic voltage and frequency ra...

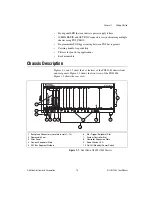
Page 10: ...ns Rack mountable Chassis Description Figures 1 1 and 1 2 show the key features of the PXI 1044 chassis front and rear panels Figure 1 1 shows the front view of the PXI 1044 Figure 1 2 shows the rear...

Page 11: ...wo rack mount kit options are available for mounting the PXI 1044 chassis into a 19 in instrument cabinet Slot Blockers Optional slot blocker kits are available from National Instruments for improved...

Page 12: ...e found only on those signal lines reserved or not used in the CompactPCI 64 bit specification Therefore all modules that meet the requirements of the CompactPCI 64 bit specification will function in...

Page 13: ...ection Peripheral Slots There are 13 peripheral slots including the star trigger slot Local Bus The PXI backplane local bus is a daisy chained bus that connects each peripheral slot with adjacent peri...

Page 14: ...al Bus Local Bus Local Bus Local Bus PXI Trigger Bus Segment 1 and PCI Bus Segment 1 PXI Trigger Bus Segment 2 and PCI Bus Segment 2 PXI Trigger Bus Segment 3 and PCI Bus Segment 3 Star Trigger Contro...

Page 15: ...rigger line may be routed in either direction it cannot be routed in more than one direction at a time System Reference Clock The PXI 1044 supplies the PXI 10 MHz system clock signal PXI_CLK10 indepen...

Page 16: ...st be connected during use of this equipment to minimize shock hazards Refer to the Connecting Safety Ground section for instructions on connecting safety ground Live Circuits Operating personnel and...

Page 17: ...ions Providing Adequate Clearance Apertures in the top and along both sides of the chassis facilitate power supply and module cooling Air enters through filters and fan inlets in the lower rear of the...

Page 18: ...itch Select HIGH for maximum cooling performance recommended or AUTO for quieter operation When set to AUTO the fan speed is determined by chassis intake air temperature Installing Filler Panels To im...

Page 19: ...rth safety ground If your power outlet does not have an appropriate ground connection you must connect the premise safety ground to the chassis grounding screw located on the rear panel Refer to Figur...

Page 20: ...s Complete the following steps to install a controller 1 Plug in the PXI chassis before installing the controller The power cord grounds the chassis and protects it from electrical damage while you in...

Page 21: ...he controller front panel to the chassis using the controller front panel mounting screws 4 Connect the keyboard mouse and monitor to the appropriate connectors Connect devices to ports as required by...

Page 22: ...sis slot by first placing the module card edges into the front module guides top and bottom as shown in Figure 2 4 Slide the module to the rear of the chassis making sure that the injector ejector han...

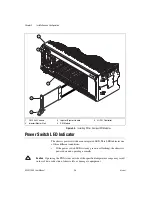
Page 23: ...ndicates one of three different conditions If the power switch LED is steady green not flashing the chassis is powered on and operating normally Caution Operating the PXI system outside of the specifi...

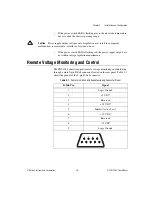
Page 24: ...f the power switch LED is flashing red the power supply outputs are not within voltage regulation requirements Remote Voltage Monitoring and Control The PXI 1044 chassis supports remote voltage monito...

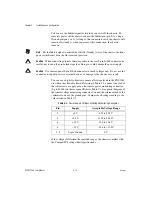
Page 25: ...r to check voltages only Do not use the connector to supply power to external devices or damage to the chassis may result You can use a digital voltmeter to ensure all voltage levels in the PXI 1044 a...

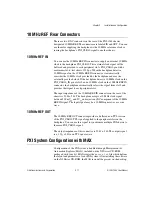
Page 26: ...on the 10 MHz REF IN connector the backplane automatically selects the signal from slot 2 and provides that signal to each peripheral slot The input impedance of the 10 MHz REF IN connector on the re...

Page 27: ...h to expand it 3 If the PXI system controller has not yet been configured it will be labeled PXI System Unidentified Right click on this entry to display the popup menu then select the appropriate con...

Page 28: ...Instruments APIs such as NI DAQmx Static reservation of trigger lines can be implemented by the user in MAX through the Triggers tab Reserved trigger lines will not be used by PXI modules dynamically...

Page 29: ...em integrators the manufacturers of PXI chassis and system modules must document the capabilities of their products The minimum documentation requirements are contained in ini files which consist of A...

Page 30: ...serve standard handling precautions for static sensitive devices while servicing the chassis Always wear a grounded wrist strap or equivalent while servicing the chassis Service Interval Clean the cha...

Page 31: ...soap residue by wiping with a cloth moistened with clear water Do not use abrasive compounds on any part of the chassis Cleaning and Replacing the Fan Filters Dirty fan filters can dramatically reduce...

Page 32: ...hassis 4 Complete the procedure described in the Connecting to Power Source section of Chapter 2 Installation and Configuration If the power switch LED is not a steady green contact National Instrumen...

Page 33: ...used as a visual reference The appropriate screws are located along the outer edges of the chassis rear panel There are six screws evenly spaced along the top and bottom edges and four screws evenly...

Page 34: ...NI PXI 1044 User Manual Connecting Safety Ground Refer to the Connecting Safety Ground section of Chapter 2 Installation and Configuration Connecting to Power Source Refer to the Connecting to Power...

Page 35: ...features of the chassis may be impaired This appendix contains specifications for the PXI 1044 chassis Electrical AC Input Input voltage range 100 240 VAC Operating voltage range1 90 264 VAC Input fre...

Page 36: ...rnal chassis power supply that provides DC power to the CompactPCI PXIbackplane You can also use the rear panel 9 pin D Sub connector to control the internal chassis power supply DC Output DC current...

Page 37: ...wer supply shuttle MTTR Replacement in under 5 minutes Chassis Cooling Per slot cooling capacity Slot cooling capacity is 25 W with fan speed set to HIGH Slot airflow direction P1 to P2 bottom of modu...

Page 38: ...y certifications refer to the product label or to ni com certification search by model number or product line and click the appropriate link in the Certification column Electromagnetic Compatibility E...

Page 39: ...ative humidity Operating 10 to 90 non condensing Nonoperational storage 5 to 95 non conducting Shock Operational1 2 30 g peak half sine 11 ms pulse Nonoperational1 2 30 g half sine 11 ms pulse Operati...

Page 40: ...V 0 Recognized Backplane connectors Conforms to IEC 917 and IEC 1076 4 101 and are UL 94 V 0 rated 10 MHz System Reference Clock 10 MHz REF Maximum clock skew between slots 250 ps Built in 10 MHz cloc...

Page 41: ...cuitry 1 ps RMS in 10 Hz to 1 MHz range External clock output Connector BNC on rear of chassis ground referenced Output amplitude 1 Vpp 20 squarewave into 50 2 Vpp into open circuit Output impedance 5...

Page 42: ...mate Zinc Plating on Cold Rolled Steel Polyurethane Enamel Figures A 1 and A 2 show the PXI 1044 dimensions The holes shown are for the installation of the optional rack mount kits as shown in Figure...

Page 43: ...Appendix A Specifications National Instruments Corporation A 9 NI PXI 1044 User Manual Figure A 2 PXI 1044 Dimensions Bottom in Inches mm 12 700 322 58 2 52 64 0 15 50 393 7 1 01 25 7...

Page 44: ...ons NI PXI 1044 User Manual A 10 ni com Figure A 3 shows the PXI 1044 rack mount kit components Figure A 3 PXI 1044 Rack Mount Kit Components 1 Front Rack Mount Kit 2 PXI 1044 Chassis 3 Optional Rear...

Page 45: ...roller slot Table B 3 shows the P1 J1 connector pinout for the star trigger slot Table B 4 shows the P2 J2 connector pinout for the star trigger slot Table B 5 shows the P1 J1 connector pinout for the...

Page 46: ...AD 13 GND 18 GND SERR GND 3 3V PAR C BE 1 GND 17 GND 3 3V IPMB_SCL IPMB_SDA GND PERR GND 16 GND DEVSEL GND V I O STOP LOCK GND 15 GND 3 3V FRAME IRDY GND TRDY GND 12 14 Key Area 11 GND AD 18 AD 17 AD...

Page 47: ...G1 PXI_TRIG0 DEG GND PXI_TRIG7 GND 15 GND PXI_BRSVA15 GND FAL REQ5 GNT5 GND 14 GND AD 35 AD 34 AD 33 GND AD 32 GND 13 GND AD 38 GND V I O AD 37 AD 36 GND 12 GND AD 42 AD 41 AD 40 GND AD 39 GND 11 GND...

Page 48: ...13 GND 18 GND SERR GND 3 3V PAR C BE 1 GND 17 GND 3 3V IPMB_SCL IPMB_SDA GND PERR GND 16 GND DEVSEL GND V I O STOP LOCK GND 15 GND 3 3V FRAME IRDY BD_SEL TRDY GND 12 14 Key Area 11 GND AD 18 AD 17 AD...

Page 49: ...I_TRIG0 RSV GND PXI_TRIG7 GND 15 GND PXI_BRSVA15 GND RSV PXI_STAR6 PXI_LBR6 GND 14 GND AD 35 AD 34 AD 33 GND AD 32 GND 13 GND AD 38 GND V I O AD 37 AD 36 GND 12 GND AD 42 AD 41 AD 40 GND AD 39 GND 11...

Page 50: ...AD 13 GND 18 GND SERR GND 3 3V PAR C BE 1 GND 17 GND 3 3V IPMB_SCL IPMB_SDA GND PERR GND 16 GND DEVSEL GND V I O STOP LOCK GND 15 GND 3 3V FRAME IRDY BD_SEL TRDY GND 12 14 Key Area 11 GND AD 18 AD 17...

Page 51: ...XI_TRIG0 RSV GND PXI_TRIG7 GND 15 GND PXI_BRSVA15 GND RSV PXI_LBL6 PXI_LBR6 GND 14 GND AD 35 AD 34 AD 33 GND AD 32 GND 13 GND AD 38 GND V I O AD 37 AD 36 GND 12 GND AD 42 AD 41 AD 40 GND AD 39 GND 11...

Page 52: ...e every question receives an answer For information about other technical support options in your area visit ni com services or contact your local office at ni com contact Training and Certification V...

Page 53: ...co 10 12 n nano 10 9 micro 10 6 m milli 10 3 k kilo 103 M mega 106 G giga 109 T tera 1012 Symbols Degrees Equal or greater than Equal or less than Percent Ohms A A Amperes AC Alternating current ANSI...

Page 54: ...iring a more robust mechanical form factor than desktop PCI It uses industry standard mechanical components and high performance connector technologies to provide an optimized system intended for rugg...

Page 55: ...rms the system controller functions including clock sourcing and arbitration for data transfers across the backplane Installing such a device into any other slot can damage the device the PXI backplan...

Page 56: ...apid variations in clock transition times from their nominal regular intervals Units seconds RMS K kg Kilograms km Kilometers L lb Pounds LED Light emitting diode line regulation The maximum steady st...

Page 57: ...rers Association NI National Instruments NI DAQmx National Instruments driver which controls the operation of National Instruments data acquisition DAQ devices NI VISA National Instruments implementat...

Page 58: ...s is still connected to AC power mains star trigger slot This slot is located at slot 2 and has a dedicated trigger line between each peripheral slot Use this slot for a module with ST functionality t...

Page 59: ...National Instruments Corporation G 7 NI PXI 1044 User Manual T TTL Transistor transistor logic U UL Underwriter s Laboratories V V Volts VAC Volts alternating current or Vrms Vpp Peak to peak voltage...

Page 60: ...entions used in the manual vii cooling air cooling of PXI 1044 2 2 air intake figure 2 3 filler panel installation 2 3 setting fan speed 2 3 slot blocker installation 2 3 D diagnostic tools NI resourc...

Page 61: ...gure 1 6 1 7 M maintenance of PXI 1044 3 1 cleaning exterior cleaning 3 2 fan filters 3 2 interior cleaning 3 2 preparation 3 1 resetting the AC mains circuit breaker 3 3 service interval 3 1 static d...

Page 62: ...iew of chassis 1 4 safety ground connecting 2 4 PXI 1044 backplane interoperability with CompactPCI 1 5 local bus 1 6 overview 1 5 peripheral slots 1 6 specifications A 6 star trigger ST slot 1 6 syst...

Page 63: ...ector pinouts table B 3 system reference clock 1 8 T technical support C 1 testing power up 2 4 training and certification NI resources C 1 trigger bus 1 8 troubleshooting NI resources C 1 U unpacking...

Reviews: