background image

2. Choose an unused PXI, PXI Express, or CompactPCI

peripheral slot.

3. Remove the filler panel for the peripheral slot you have

chosen.

4. Touch a metal part on your chassis to discharge any static

electricity that might be on your clothes or body.

5. Insert the PXI/PXI Express card into the selected slot. Use

the injector/ejector handle to fully inject the card into place.

6. Screw the front panel of the PXI/PXI Express card to the

front panel mounting rail of the PXI, PXI Express, or
CompactPCI chassis.

7. Proceed to the 

Verify Your Installation

 section.

Install Your USB Hardware

1. Find an unused High-Speed USB 2.0 port in your computer.
2. Insert the USB cable of your USB-850

x

 CAN or LIN module

into the USB port.

3. You can use a synchronization cable to connect your

USB-850

x

 2-port CAN or LIN module to other National

Instruments synchronization port-equipped hardware. Refer
to the 

Synchronization

 section of 

NI-XNET Hardware

NI-XNET Hardware and Software Installation Guide

  | 

© National Instruments

  | 

7

Summary of Contents for NI-XNET

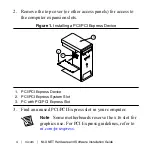
Page 1: ...on media or select National Instruments NI XNET NI XNET Documentation NI XNET Manual chm from the Windows Start menu or NI Launcher The NI XNET software on this installation media supports Microsoft W...

Page 2: ...f your CD DVD ROM drive plays data disks automatically If the installer does not launch automatically navigate to the installation media using Windows Explorer and launch the autorun file from your NI...

Page 3: ...es how to install your hardware on the PCI PCI Express PXI PXI Express and USB buses as well as how to install XNET C Series modules Install Your PCI PCI Express Hardware Caution Before you remove the...

Page 4: ...Device 3 1 2 1 PCI PCI Express Device 2 PCI PCI Express System Slot 3 PC with PCI PCI Express Slot 3 Find an unused PCI PCI Express slot in your computer Note Some motherboards reserve the x16 slot fo...

Page 5: ...AN LIN or FlexRay card RTSI interface to other National Instruments RTSI equipped hardware Refer to the Synchronization section of NI XNET Hardware Overview in the NI XNET Hardware and Software Help f...

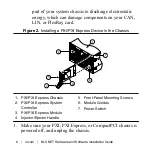
Page 6: ...Device in the Chassis 3 4 5 1 2 6 7 1 PXI PXI Express Chassis 2 PXI PXI Express System Controller 3 PXI PXI Express Module 4 Injector Ejector Handle 5 Front Panel Mounting Screws 6 Module Guides 7 Pow...

Page 7: ...e PXI PXI Express card to the front panel mounting rail of the PXI PXI Express or CompactPCI chassis 7 Proceed to the Verify Your Installation section Install Your USB Hardware 1 Find an unused High S...

Page 8: ...s to install a C Series I O module 1 When using your C Series hardware with a CompactDAQ chassis refer to the chassis user manual for detailed installation instructions 2 When using your C Series hard...

Page 9: ...system install the driver files 2 Launch Measurement Automation Explorer MAX and refresh press F5 or choose View Refresh from the menu Your CAN LIN and FlexRay hardware should be listed now under Dev...

Page 10: ...for information about the Return Merchandise Authorization RMA process Connect the Cables After you have installed the hardware connect your cables to the hardware Refer to the Cabling Requirements s...

Page 11: ...n program installed If you have added anything to a directory created by the installation program the uninstall program cannot delete that directory because it is not empty after the uninstallation Re...

Page 12: ...s Patent Notice at ni com patents You can find information about end user license agreements EULAs and third party legal notices in the readme file for your NI product Refer to the Export Compliance I...

Reviews: