Chapter 2
Installation, Configuration, and Operation
©
National Instruments Corporation
2-3
Connecting Safety Ground
Warning
The PXI-1000B chassis is designed with a three-position NEMA 15-5 style plug
that connects the ground line to the chassis ground. To minimize shock hazard,
make sure your electrical power outlet has an appropriate earth safety ground that
is connected whenever you power up the chassis.
If your power outlet does not have an appropriate ground connection, you
must connect the premise wire safety ground to the chassis grounding
screw located on the rear panel. Refer to Figure 1-2,
, or Figure 1-3,
DC-Capable PXI-1000B Mainframe
,
for a diagram of the chassis
grounding screw. To connect the safety ground, complete the following
steps:
1.
Connect a 16 AWG (1.3 mm) wire to the chassis grounding screw
using a toothed grounding lug. The wire must have green insulation
with a yellow stripe or must be non-insulated (bare).
2.
Attach the opposite end of the wire to permanent earth ground using
toothed washers or a toothed lug.
Connecting to Power Source and Testing Power up
Caution
Do not install modules prior to performing the first power-on test.
If your PXI-1000B has an AC-only input power supply, attach input power
through the rear AC inlet using the appropriate line cord supplied. Refer to
Figure 1-2,
Rear View of the AC-Only PXI-1000B Mainframe
, for a
diagram of the IEC 320 inlet.
If your PXI-1000B has a DC-capable power supply, you can attach an
AC line cord or a DC cord if a DC power source is available.
The power switch allows you to turn on the mainframe or place it in standby
mode. Push the power switch to the On position (if not already on). Observe
that all fans become operational.
Caution
When connecting digital voltmeter probes to the rear D-sub connector, be careful
not to short the probe leads together. Doing so could damage the power supply.
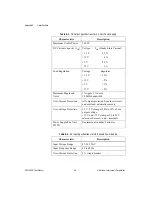
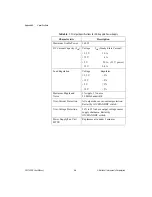
You can use a digital voltmeter to ensure all voltage levels in your
PXI-1000B are within the allowable limits. Referring to Table 2-1, connect
one lead of the voltmeter to a supply pin on the remote power monitoring
!
!


