background image

PXI-1000B AC Power Supply Shuttle Installation Guide

8

ni.com

If the voltages fall within the specified ranges, the chassis complies
with the CompactPCI voltage limit specifications. Notice that the
rear-panel D-sub connector is for checking voltages only. Do not
use these voltages to supply power to external devices.

Remote Power Monitoring and Inhibiting Interface

The PXI-1000B AC power supply shuttle supports remote power
monitoring and inhibiting via a 9-pin D-sub connector on the rear panel.
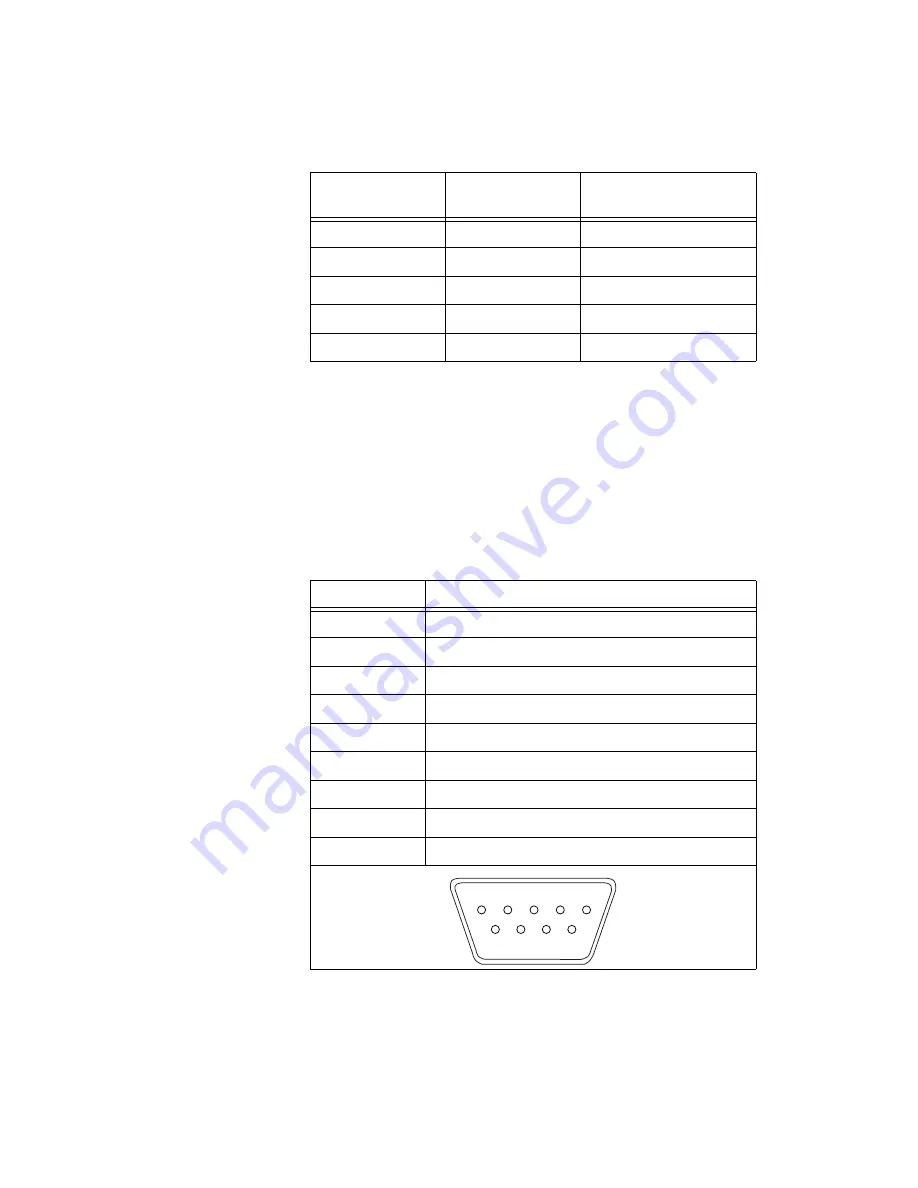
Table shows the pinout of the DB-9 connector.

Table 2.

Power Supply Voltages at Power Monitoring Connector (DB-9)

Pin

Supply

Acceptable Voltage

Range

2

+5 V

4.75 to 5.25 V

4

+3.3 V

3.135 to 3.465 V

6

+12 V

11.4 to 12.6 V

8

12 V

12.6 to 11.4 V

1, 9

Logic Ground

N/A

Table 3.

DB-9 Connector Pinout

DB-9 Pin

Signal

1

Logic Ground

2

+5 V

3

Inhibit Return (DC-capable supply only)

4

+3.3 V

5

Inhibit*

6

+12 V

7

Reserved

8

–12 V

9

Logic Ground

5

4

3

2

1

9

8

7

6

Summary of Contents for PXI 1000B

Page 1: ...GUIDE PXI 1000B AC POWER SUPPLY SHUTTLE Contents Important Information 2 For Your Safety 3 Getting Started 4 Unpacking 4 What You Need to Get Started 4 Key Features 4 Removal Configuration and Instal...

Page 2: ...wner s modification of the product owner s abuse misuse or negligent acts and power failure or surges fire flood accident actions of third parties or other events outside reasonable control Copyright...

Page 3: ...he PXI 1000B AC power supply shuttle Adjustments and service to internal components must be undertaken by qualified service technicians During service of this product the mains connector to the premis...

Page 4: ...items PXI 1000B AC power supply shuttle assembly This installation guide You must provide an AC power cable See Table 1 for a list of cables Key Features The PXI 1000B AC power supply shuttle combines...

Page 5: ...power supply shuttle Figure 2 shows a rear view Figure 1 Isometric View of the PXI 1000B AC Power Supply Shuttle Figure 2 Rear View of the PXI 1000B AC Power Supply Shuttle 1 Module Cooling Air Outle...

Page 6: ...rd from the power supply shuttle on the back of the chassis Identify the six captive screws that attach the power supply shuttle to the chassis Using a Phillips screwdriver loosen the captive screws P...

Page 7: ...rs or a toothed lug Connecting to Power Source and Testing Power Up Caution Remove all PXI modules from the PXI 1000B chassis prior to performing the first power on test 1 Attach the appropriate power...

Page 8: ...PXI 1000B AC power supply shuttle supports remote power monitoring and inhibiting via a 9 pin D sub connector on the rear panel Table 3 shows the pinout of the DB 9 connector Table 2 Power Supply Volt...

Page 9: ...ths Depending on the amount of use and ambient dust levels in the operating environment the filters may require more frequent cleaning Clean dust from the exterior and interior as needed based on the...

Page 10: ...st enough moisture to dampen the cloth Do not wash the rear panel connectors or switches Cover these components while cleaning the power supply shuttle Do not use chemical cleaning agents they may dam...

Page 11: ......

Page 12: ......

Reviews: