2-6
|
ni.com
Chapter 2
Installation and Configuration
Rack Mounting
Rack mount applications require the optional rack mount kits available from National
Instruments. Refer to the instructions supplied with the rack mount kits to install your
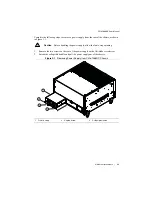
PXIe-1066DC chassis in an instrument rack. Refer to Figure A-3,
Note
You may want to remove the feet and handle from the PXIe-1066DC chassis
when rack mounting. To do so, remove the screws holding the feet and handle in
place.
Connecting to Safety Ground and Power Source
The PXIe-1066DC chassis has a single DC Input connector that supplies input power to both
chassis power supplies. The DC Input connector is on the front panel, as shown in Figure 1-1,
Front View of the PXIe-1066DC Chassis (with Optional Filler Panels)
The chassis ships with an PXIe-1066DC power cord. The cord is a 3 m, three-conductor,
18 AWG cord that requires custom termination. Figure 2-4 shows the cord connector pinout.
You can order an additional or replacement cord from National Instruments, part number
782108-01.
Caution
Connecting Safety Ground (Protective Earth)
The PXIe-1066DC chassis must have a safety ground (protective earth), which is
connected by the installer to the premise safety ground system for safe operation. The
supplied power cord has a green ground wire for this purpose. The safety ground
method shall be reliable and meet applicable safety codes.
Figure 2-4.
DC Input Connector
1
Ground
2
Power (-)
3
Power (+)
3
2
1


