background image

Chapter 2

Configuring and Installing the SCXI Chassis

©

 National Instruments Corporation

2-9

SCXI Chassis User Manual

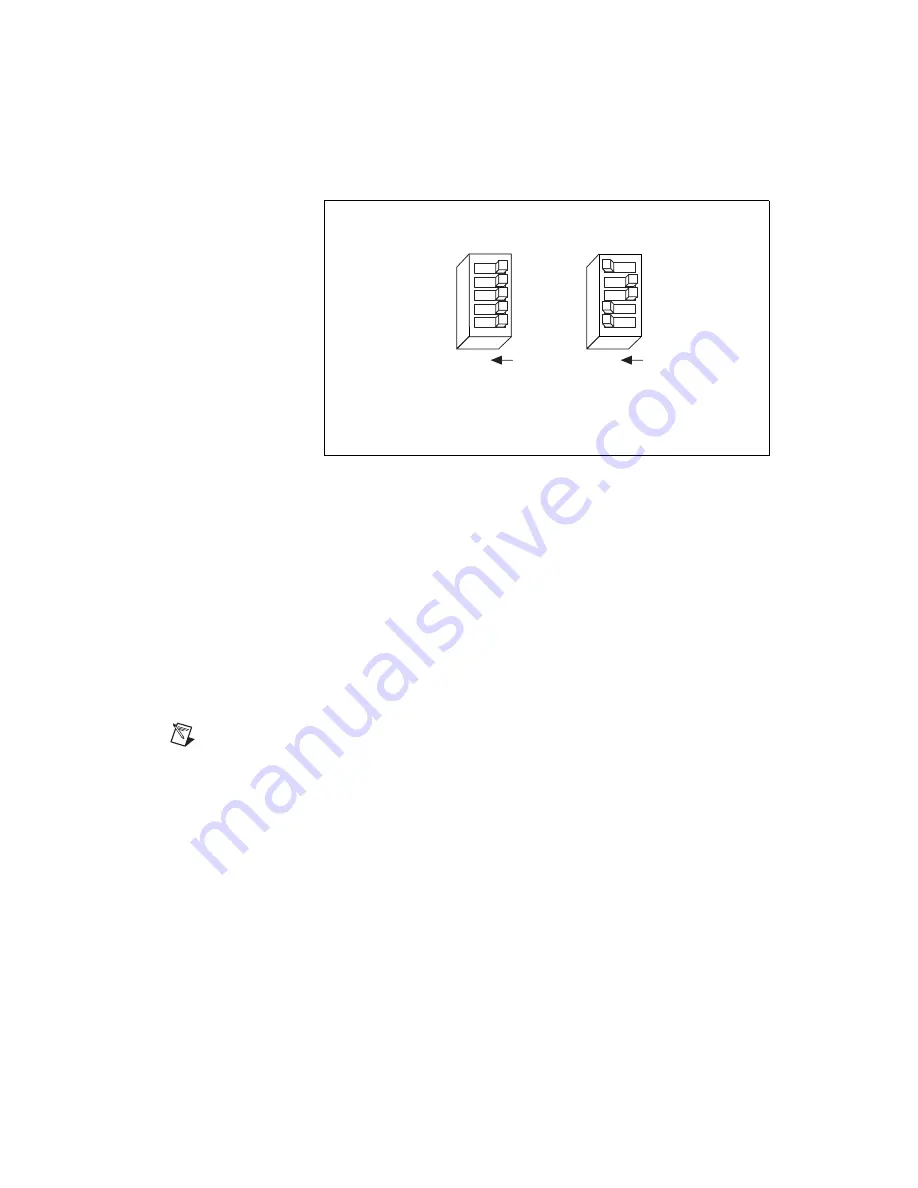
Figure 2-7.  

Address Setting Examples

SCXI-1000DC

Unless you are using multiple chassis and need to configure one or more 
SCXI chassis for a different address, you can skip this section, and the 
SCXI chassis retains the factory-default address of 0.

You can configure the SCXI chassis for one of 32 different addresses so that 
you can connect multiple SCXI chassis to the same control source. Three 
jumpers that determine the chassis address are located behind the front 
panel of Slot 0 just below the Reset button. The chassis address is the sum 
of the values of all the jumpers. Figure 2-8 shows examples of both the 
factory-default setting of address 0 and the jumper settings for address 19.

Note

SCXI-1000DC chassis through revision C do not have address jumpers or switches 

and respond to any address, but you cannot use them in multichassis systems. Revision D 
and later chassis use jumpers on Slot 0 for chassis addressing.

ON

1

2

3

4

5

Address = 0

(Chassis Default)

ON

1

2

3

4

5

Address = 19

Summary of Contents for SCXI-1000

Page 1: ...SCXI TM SCXI Chassis User Manual SCXI Chassis User Manual April 2006 374423L 01...

Page 2: ...2 02 3451 3400 Lebanon 961 0 1 33 28 28 Malaysia 1800 887710 Mexico 01 800 010 0793 Netherlands 31 0 348 433 466 New Zealand 0800 553 322 Norway 47 0 66 90 76 60 Poland 48 22 3390150 Portugal 351 210...

Page 3: ...t Under the copyright laws this publication may not be reproduced or transmitted in any form electronic or mechanical including photocopying recording storing in an information retrieval system or tra...

Page 4: ...ware such as menu items and dialog box options Bold text also denotes parameter names italic Italic text denotes variables emphasis a cross reference or an introduction to a key concept Italic text al...

Page 5: ...2 8 SCXI 1000 1001 2 8 SCXI 1000DC 2 9 Selecting Voltage and Replacing the Fuse for the SCXI 1000 and SCXI 1001 2 11 Selecting the Voltage 2 13 Replacing the Power Entry Module Fuse 2 14 Replacing an...

Page 6: ...1 Rear View Diagram 2 6 Figure 2 6 SCXI 1000DC Rear View Diagram 2 7 Figure 2 7 Address Setting Examples 2 9 Figure 2 8 SCXI 1000DC Chassis Address Jumper Settings 2 10 Figure A 1 Physical Dimensions...

Page 7: ...onal software and equipment About the SCXI Chassis The SCXI 1000 and SCXI 1001 chassis are powered with standard AC power The SCXI 1000DC is powered by any 9 5 to 16 VDC source such as the optional SC...

Page 8: ...entation from ni com manuals Software Programming Choices There are several options to choose from when programming the NI plug in DAQ and SCXI hardware You can use LabVIEW LabWindows CVI Measurement...

Page 9: ...development suite that allows you to design test and measurement applications For Visual Basic developers Measurement Studio features a set of ActiveX controls for using National Instruments DAQ hard...

Page 10: ...computer Use these manuals for hardware installation and configuration instructions specification information about the DAQ hardware and application hints Software documentation Examples of software d...

Page 11: ...l types such as thermocouples resistance temperature detectors RTDs strain gauges high voltage inputs current inputs analog outputs and digital I O signals Cables and terminal blocks with screw termin...

Page 12: ...nition Power switch Powers the chassis on and off Indicator light When lit indicates that the chassis is powered on Reset button Reinitializes Slot 0 and all modules to their power on state when press...

Page 13: ...00 Front View Diagram 1 Address DIP Switches 2 Reset Button 3 Power Switch 4 Indicator Light 5 Front Panel Screws flathead on some revisions 6 Front Panel Screws early revisions only 7 Module Guides 8...

Page 14: ...2 2 SCXI 1000DC Front View Diagram 1 Address Selection Jumpers behind front panel 2 Reset Button 3 Power Switch 4 Indicator Light 5 Front Panel Screws flathead on some revisions 6 Front Panel Screws e...

Page 15: ...ions only 7 Module Guides 8 Front Threaded Strips 9 Backplane 10 Slot 0 Power Supply Table 2 2 SCXI 1000 1001 Chassis Rear View Items Item Description Power entry module IEC receptacle for power input...

Page 16: ...pace connector mounting brackets or adapters Rear threaded strips Secure cable connections mounting brackets or filler panels to the chassis 1 Fan and Filter 2 Fan Screws 3 Rear Threaded Strips 4 Rear...

Page 17: ...try connector J1 Receptacle for power input uses a 9 5 to 16 VDC power source Fuse F1 Power input fuse 6 3 A protects both you and the SCXI chassis in case of a fault in the chassis Fuse F2 5 VDC inte...

Page 18: ...evice has access to the multiplexed output of the module and the outputs of all other multiplexed modules in the chassis In parallel mode you need a separate E M Series DAQ device for each module to s...

Page 19: ...e SCXI chassis for one of 32 different addresses so that you can connect multiple SCXI chassis to the same control source The five switches on the front panel of Slot 0 determine the chassis address S...

Page 20: ...nect multiple SCXI chassis to the same control source Three jumpers that determine the chassis address are located behind the front panel of Slot 0 just below the Reset button The chassis address is t...

Page 21: ...zard wait at least one minute before proceeding to step 3 3 Using a screwdriver remove the four six on some revisions panhead screws from the front panel of Slot 0 4 Remove the six screws from the rea...

Page 22: ...bler to ensure that you have the correct voltage tumbler setting and fuse The SCXI chassis can operate with line voltages of 100 120 220 and 240 VAC The voltage tumbler in the power entry module deter...

Page 23: ...LO 2 F1 5A 125V LittleFuse R251 01 5 TI 120 V 1 T0 5A 250V 5 mm 20 mm SLO BLO 2 F1 5A 125V LittleFuse R251 01 5 TI 220 V Swiss 1 T0 25A 250V 5 mm 20 mm SLO BLO 2 F1 5A 125V LittleFuse R251 01 5 TI 240...

Page 24: ...ord SCXI 1001 100 V Japan 1 T3 0A 250 V 5 mm 20 mm SLO BLO 2 F4A 125V LittleFuse R251 01 5 TI 120 V 1 T3 0A 250 V 5 mm 20 mm SLO BLO 2 F4A 125V LittleFuse R251 01 5 TI 220 V Swiss 1 T1 6A 250 V 5 mm 2...

Page 25: ...SCXI 1001 In addition to the power entry module fuse the analog supply lines on the backplane are fused at 1 5 A on the SCXI 1000 chassis and at 4 A on the SCXI 1001 chassis If you are making your ow...

Page 26: ...Check the fan filter and if it is dirty clean it as described in the Maintaining the Fan Filter section 8 Reinstall the fan and filter Replacing the Fuses on the SCXI 1000DC There are two fuses locate...

Page 27: ...ppropriate fan and filter from the rear of the chassis by following the instructions in the Maintaining the Fan Filter section Be sure to switch the power off and remove the power cord 2 The fuse mark...

Page 28: ...o the Selecting the Voltage section if necessary 5 Insert the female end of the power cord into the power entry module 6 Insert the male end of the power cord into the wall outlet 7 Install the module...

Page 29: ...cabling installation instructions 8 Install any needed front and rear filler panels 9 Power on the chassis 10 Power on the computer connected to the modules 11 Refer to the SCXI Quick Start Guide to c...

Page 30: ...sis and modules Complete the following steps to clean the fan filter s 1 Power off the chassis 2 Remove the power cord from the power entry module 3 Place the chassis face down on a flat surface so th...

Page 31: ...Power dissipation 7 W per slot Supplies SCXI 1000 1000DC SCXI 1101 V Tolerance limits include peaks 18 5 to 25 V 18 5 to 25 V Ripple peak to peak 1 5 V 1 5 V Max load 680 mA 2 04 A V Tolerance limits...

Page 32: ...ent at 9 5 VDC 5 5 A Physical Weight SCXI 1000 3 9 kg 8 lb 10 oz SCXI 1000DC 3 3 kg 7 lb 5 oz SCXI 1001 6 8 kg 14 lb 14 oz Refer to Figures A 1 and A 2 for the physical dimensions of the four slot cha...

Page 33: ...Appendix A Specifications National Instruments Corporation A 3 SCXI Chassis User Manual Figure A 1 Physical Dimensions of the SCXI 1001...

Page 34: ...Appendix A Specifications SCXI Chassis User Manual A 4 ni com Figure A 2 Physical Dimensions of the SCXI 1000 and SCXI 1000DC...

Page 35: ...lectrical equipment for measurement control and laboratory use IEC 61010 1 EN 61010 1 UL 1244 CAN CSA C22 2 No 61010 1 Note For UL and other safety certifications refer to the product label or visit n...

Page 36: ...s follows Low Voltage Directive safety 73 23 EEC Electromagnetic Compatibility Directive EMC 89 336 EEC Note Refer to the Declaration of Conformity DoC for this product for any additional regulatory c...

Page 37: ...ng different voltages into each channel What is causing this problem The SCXI chassis has backplane fuses One or both of these fuses could be blown Refer to the Replacing and Checking Backplane Fuses...

Page 38: ...al Glossary Symbol Prefix Value p pico 10 12 m milli 10 3 k kilo 103 Numbers Symbols degrees negative of or minus ohms plus or minus positive of or plus percent 5 V signal 5 VDC source signal A A ampe...

Page 39: ...into a computer and possibly generating control signals with D A and or DIO boards in the same computer F fuse a protective device that breaks a circuit when a current exceeds a rated value G GND gro...

Page 40: ...nstruments Corporation G 3 SCXI Chassis User Manual L lb pounds O oz ounces S s seconds SCXI Signal Conditioning eXtensions for Instrumentation V V volts VAC volts alternating current VDC volts direct...

Page 41: ...ont view diagrams 2 2 2 3 2 4 front view items table 2 1 rear view diagrams 2 5 2 6 2 7 rear view items table 2 4 2 6 chassis usage considerations 2 7 fuse replacement and check procedure backplane SC...

Page 42: ...ions B 1 hardware and software requirements 1 1 optional equipment 1 5 overview 1 1 SCXI chassis descriptions front view diagrams SCXI 1000 2 2 SCXI 1000DC 2 3 SCXI 1001 2 4 front view items table 2 1...

Page 43: ...cal dimensions figure A 3 rear view diagram 2 6 rear view items table 2 4 source power requirements A 2 voltage selection 2 11 procedure 2 13 voltage selection and fuse ratings by region table 2 12 so...

Reviews: