background image

NI UMI-7774/72 User Guide and Specifications

12

ni.com

1.

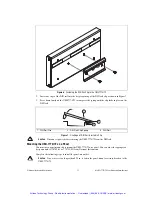
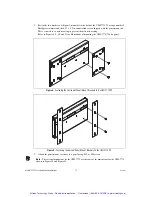
Fasten the two brackets of the panel-mount kit to the back of the UMI-7774/72 using a number 2 
Phillips screwdriver and the 8-32

.25 in. countersink screws shipped with the panel-mount kit. 

These screws have a nylon coating to prevent them from loosening.

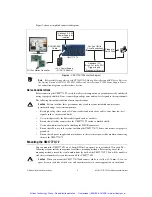
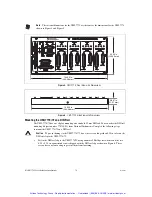
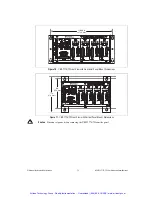
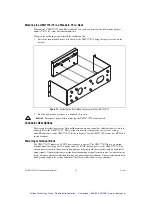
Refer to Figures 8, 9, 10, and 11 for illustrations of mounting the UMI-7774/72 on a panel.

Figure 8.  

Fastening the Horizontal Panel-Mount Brackets to the UMI-7774/72 

Figure 9.  

Fastening the Vertical Panel-Mount Brackets to the UMI-7774/72 

2.

Attach the panel-mount accessory to a panel using 8-32 or M4 screws.

Note

The external dimensions for the UMI-7772 are the same as the dimensions for the UMI-7774, 

shown in Figure 10 and Figure 11.

 NA

TIO

NA

INS

TR

UM

EN

TS

 NA

TIONA

INS

TR

UM

EN

TS

Artisan Technology Group - Quality Instrumentation ... Guaranteed | (888) 88-SOURCE | www.artisantg.com

Summary of Contents for UMI-7774

Page 1: ...service in house repair center WE BUY USED EQUIPMENT Sell your excess underutilized and idle used equipment We also offer credit for buy backs and trade ins www artisantg com WeBuyEquipment REMOTE IN...

Page 2: ...nting the UMI 7774 72 on a Panel 11 Mounting the UMI 7774 72 in a Standard 19 in Rack 14 Connector Descriptions 14 Power Input Terminal Block 14 Connecting Power To the UMI 7774 72 15 Power Status Ind...

Page 3: ...ntrollers The UMI 7772 is a two axis version of the UMI 7774 All illustrations information and specifications in this manual apply to both devices Note For consistency the remainder of this user manua...

Page 4: ...O This feature enables 24 VDC signaling capability Also the isolation can help break ground loops in the system and reduce the effects of noise and voltage transients Global and per axis status LEDs...

Page 5: ...device in an explosive atmosphere or where flammable gases or fumes may be present If you must operate the device in such an environment the device must be in a suitably rated enclosure Operate the de...

Page 6: ...tory requirements and limits for electromagnetic compatibility EMC as indicated in the hardware s Declaration of Conformity DoC 2 These requirements and limits are designed to provide reasonable prote...

Page 7: ...how to install and configure the P7000 series steper drives for use with NI 7330 7340 and NI 7350 motion controllers NI Motion LabVIEW Help Contains LabVIEW VI reference files and provides details abo...

Page 8: ...stepper motors for direct connectivity to the P7000 series stepper drives Go to ni com motion for all available products Optional Equipment National Instruments offers a variety of products for use w...

Page 9: ...ervo drives or the P7000 series stepper drives to the UMI 7774 72 Go to ni com motion for all available products 8 Connect any additional I O to the UMI 7774 72 including limits DIO trigger inputs and...

Page 10: ...cted to the UMI 7774 72 include a braided shield Use hoods with internal metallic shielding for D SUB connectors Ensure that all devices in the system including the UMI 7774 72 drives and motors are p...

Page 11: ...a DIN rail Caution To prevent damage to the UMI 7774 72 do not use screws longer than 0 25 in to fasten the DIN rail clip to the UMI 7774 72 1 Fasten the DIN rail clip to the UMI 7774 72 using a numb...

Page 12: ...isconnect power before removing the UMI 7774 72 from the DIN rail Mounting the UMI 7774 72 on a Panel You must use a panel mount kit to mount the UMI 7774 72 on a panel You can order the appropriate k...

Page 13: ...11 for illustrations of mounting the UMI 7774 72 on a panel Figure 8 Fastening the Horizontal Panel Mount Brackets to the UMI 7774 72 Figure 9 Fastening the Vertical Panel Mount Brackets to the UMI 77...

Page 14: ...om the panel 11 000 in 279 4 mm FAULT FWD HOME REV FAULT FWD HOME REV FAULT FWD HOME REV FAULT FWD HOME REV LIMIT LED FAULT ENABLE LIMIT LED FAULT ENABLE LIMIT LED FAULT ENABLE LIMIT LED FAULT ENABLE...

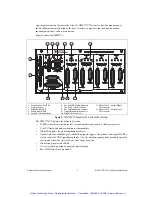
Page 15: ...I O to the UMI 7774 72 This section also describes the polarity active state settings and LED indicators on the UMI 7774 72 Refer to Figure 1 for the UMI 7774 72 connector LED and switch locations Po...

Page 16: ...with the inputs that the drive enable and digital outputs are connected to Viso and Ciso do not provide safety isolation Connecting Power To the UMI 7774 72 The UMI 7774 72 includes a 4 position power...

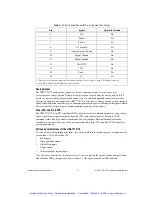
Page 17: ...he UMI 7774 72 has a 15 pin D SUB control connector to which you wire drive command and drive enable signals Figure 14 shows the pin locations of the control connector for each axis Table 2 shows the...

Page 18: ...re National Instruments motion controllers to provide either type of stepper commands Both Step CW and Dir CCW signals are pass through signals Voltage Considerations for the UMI 7774 72 To cause curr...

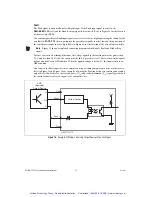
Page 19: ...through the input the voltage applied to the fault input must be greater than 3 5 V and less than 30 V Also the source must be able to provide at least 7 2 mA to turn on the optical isolator and resul...

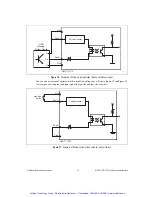
Page 20: ...r to Figure 17 and Figure 18 for examples of wiring the fault input signal to high side and low side switches Figure 17 Example of Wiring a High Side Switch to the Fault Input Current Limiter NPN Sink...

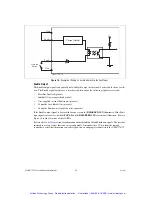
Page 21: ...controller If the Enable output signal is deactivated for any reason the DISABLED LED illuminates If the Fault input signal is also active both the FAULT and the DISABLED LEDs for the axis illuminate...

Page 22: ...a simplifed connection diagram for the Enable Fault and Global Stop signals Figure 19 Fault Enable and Global Stop Wiring Diagram Note If you are connecting the Enable output to inductive loads such a...

Page 23: ...ed Digital Output Circuit and Connection to an External Device Feedback Connector for Each Axis Each axis connected to the UMI 7774 72 has a 25 pin D SUB feedback connector to which you can wire incre...

Page 24: ...se B No 16 Encoder Index No 17 Digital Ground No 18 Digital Ground No 19 Digital Ground No 20 Digital Ground No 21 NC No 22 Ciso Yes 23 Ciso Yes 24 Ciso Yes 25 Ciso Yes Provides 1 A maximum output cur...

Page 25: ...phase relationships by swapping the signal connections and or connecting them to the inverting inputs as required by the application A 5 V output generated by the UMI 7774 72 internal power supply is...

Page 26: ...rive does not have pass through signaling for encoders or if you choose not to use the pass through signaling you can connect the UMI 7774 72 to the encoders directly Limit and Home Inputs The UMI 777...

Page 27: ...tically Isolated Sinking Input Interface Circuit and Connection to Sourcing Output Sensor You can also connect the limit and home inputs to a high side switch Figure 25 shows an example of wiring the...

Page 28: ...beled LIMIT LED The down position of the switch corresponds to active low and the up position of the switch corresponds to active high Note Configuring the limit and home status LEDs on the UMI 7774 7...

Page 29: ...a PNP sensor as shown in Figure 24 or to a high side switch as shown in Figure 28 You can use the isolated power Viso and isolated common Ciso signals on the control connector to power the sensor To c...

Page 30: ...vices or sensors that provide the trigger signals All of the trigger inputs on the UMI 7774 72 are sinking inputs and are optically isolated You can wire the trigger input to a sourcing output device...

Page 31: ...oller and the other end to the 68 pin digital I O connector on the UMI 7774 72 Note To access all of the 32 digital I O signals on the motion controller you can connect the digital I O connector on th...

Page 32: ...nector to power on the sensor Table 9 Digital I O Connector Pin Assignment Pin Signal Optically Isolated 1 Digital Input 0 Yes 2 Digital Input 2 Yes 3 Digital Input 4 Yes 4 Digital Input 6 Yes 5 Viso...

Page 33: ...se current to flow through the digital inputs the voltage applied to the digital inputs must be greater than 3 5 V and less than 30 V Also the source must be able to provide at least 7 2 mA to turn on...

Page 34: ...the energy stored in the inductive load This flyback voltage can damage the outputs and the power supply You must limit flyback voltages at the inductive load by installing a flyback diode across the...

Page 35: ...for more information about the drive Specifications The following specifications apply only to the UMI 7774 72 Consider the specifications for the NI motion controller you are using to obtain a comple...

Page 36: ...mum current limited Maximum pulse rate 100 KHz Minimum pulse detected 10 s Reverse polarity protection Yes 30 V Trigger Inputs Type Optically isolated current sinking Input voltage range 0 to 30 V Inp...

Page 37: ...verse polarity protection Yes 30 V Short circuit and overload protection Yes Step Direction Breakpoint Outputs Compatibility Signal pass through Analog Inputs Compatibility Signal pass through Analog...

Page 38: ...ty certifications refer to the product label or the Online Product Certification section Electromagnetic Compatibility This product meets the requirements of the following EMC standards for electrical...

Page 39: ...he Environment Web page at ni com environment This page contains the environmental regulations and directives with which NI complies as well as other environmental information not included in this doc...

Page 40: ...round Digital Ground Digital Ground Ciso Ciso Ciso Ciso Shutdown Inhibit All NC NC Ciso Viso OUT 6 7 8 9 1 2 3 4 5 Control Connector Ciso Ciso Ciso Global Stop Connector Analog Input 1 Analog Input Gr...

Page 41: ...warranty calibration and other services Visit ni com register to register your National Instruments product Product registration facilitates technical support and ensures that you receive important in...

Page 42: ...service in house repair center WE BUY USED EQUIPMENT Sell your excess underutilized and idle used equipment We also offer credit for buy backs and trade ins www artisantg com WeBuyEquipment REMOTE IN...

Reviews: