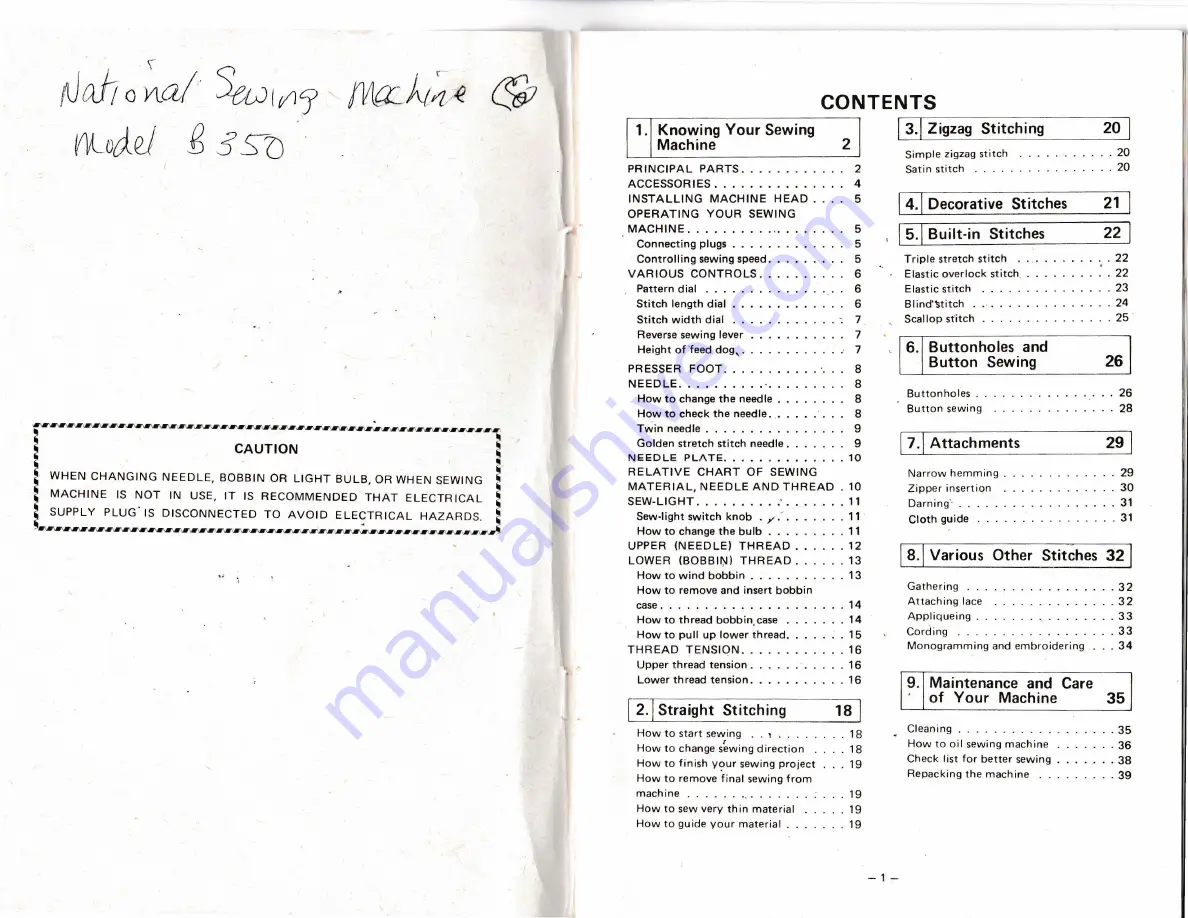
background image

Summary of Contents for B350

Page 1: ...g MODE L VXs65 SE305 E NG LISH 191565 0 15 PRINTED IN TAIWAN...

Page 2: ...OBBIN THBEAD 13 Howtowindbobbin 13 How to remove and insert bobbin case 14 Howtothreadbobbin case 14 Howtopulluplowerthread 15 THREADTENSION 16 Upperthreadtension 16 Lowerthreadtension 16 2 lStraight...

Page 3: ...9 Reverse Sewing Lever 10 Thread Cutter 1 1 Presser Foot Screw 12 Presser Foot Zigzagl 1 3 Needle Ptate lZigzagl 14 Shuttle Hook 1 5 Bobbin Case 16 Feed Dog 17 Needle 18 Needle Clamp Screw 19 Threid G...

Page 4: ...29 26 28 31 30 31 8 I 13 11 27 36 37 Operating Your Sewing Machine CONNECTING PLUGS 1 First connect the three prong plug into the machine 2 Then connect the electric supply plug into a wall outlet Ca...

Page 5: ...rns is varied according to the material and thread must observe the feeding of the material STITCH The zigzag width is regulated by operating the stitch width dial Numerals beside the dial represent t...

Page 6: ...se presser foot 3 Loosen Presser foot thumb screw and remove presserfoot Place groot ed side of the new presser foot against the flat of the presser bar Tighten thumb screw 4 5 HOW TO CHANGE THE NEEDL...

Page 7: ...e bulb and swing face plate to close NCTE 1 Disconnect electric pltig f rom wall outlet before removing bulb 2 Always use COBRECT SPARE BULB MAXIMUM INPUT OF LAMP 12 W 110 1 15 V AREA 15 w 2201240 v A...

Page 8: ...read guides 6 Thread needle from front to back and draw the thread out about 2 inches 5 cm NOTE IF THE THREADING ORDER IS NOT CORRECT THREAD BBEAKAGE STITCH SKIPPING WRINKLING OF FABRIC WILL OCCUR Tig...

Page 9: ...ing out of case C lf bobbin case is not placed back in machine properly it will come out f rom the shuttle immediately af ter starting to sew 1 Raise needle and Presser foot to the highest Posi tion W...

Page 10: ...y To decrease tension Turn the screw coun ter clockwase very sl ightlY INCORRECT STITCH B ___ 1lr l Hr lll Tension of upper and lower threads should be equal just sufficiently strong to lock both thre...

Page 11: ...ching is used to reinforce stitches near the edge of material or wherever reinforcement is needed 1 This is done by stitching to the edge of material then stopping 2 Depress Reverse Sewing Lever and s...

Page 12: ...es or de corative stitches NOTE lt is recommended that a test sample be made before starting to sew PATTERN DIAL STITCH LENGTH DIAL STITCH WIDTH DIAL PRESSER FOOT NEEDLE PLATE FEED DOG NEEDLE 1 For SA...

Page 13: ...ont and in back of presser foot as shown in illustration JOINING STITCH 1 Elastic stitch is used to join material together 2 Place material edge to edge under presser foot 3 Sew together using elastic...

Page 14: ...idth Dial set at 5 2 Sew material on bias placing material under the presser foot so that straight stitches are sewn on seam line and zigzag stitches are sewn slightly over seam edge 3 This work requi...

Page 15: ...eft side row Turn the dial to the right and set at B Sew predetermined length Stop machine and raise the needle 1 2 3 Step C Back end of bar tack I c 1 Turn the dial to the left and set at C same posi...

Page 16: ...k of button and tie For ieavier material use the following method to sew on buttons 1 Place a needle on the button as shown in illustra tion and then sew on button as you would regular ly see above 2...

Page 17: ...guiding zipper foot along the zipper teeth you will stitch close to eeige of zipper in correct Position 5 To sew opposite side of zipper loosen thumb screw and position zipper oot right or left 30 31...

Page 18: ...or a decorative stitch is used to sew lace it will be most decorative 2_ i s 1 rt t t V d l r rr 1 I 32 33 Appliqueing PATTERN DIAL STITCH LENGTH DIAL STITCH WIDTH DIAL PRESSER FOOT NEEDLE PLATE FEED...

Page 19: ...dering l EMBROIDEBING 1 Stitch outline of design by moving embroidery hoop accordingly 2 Fill in design stitch from outline of design to inside and from inside to edge of outline alternately until des...

Page 20: ...ve thread and riviih presser loot up run machine fast Then wipe up any excess oil 36 37 Occasionally remove the top cover by oiling points as illustrated Also apply loosening two sc ews loosening two...

Page 21: ...ing is not correct 2 Needle eye is not smooth 3 Upper thread is too large for needle eye 4 Upper thread tension is too tight 5 Needle is inserted incorrectly IF LOWER THREAD BREAKS 1 Lower lhread is e...

Reviews: