Each carton contains one top section, one bottom section
(larger trees include one or more middle sections) and
two tree stands.
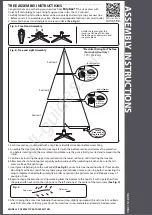
1. Revolving tree stand is already attached to bottom
section center pole. Stand comes with legs folded in
downward position; four locking pins are packed
separately. Before use, each leg must be pulled up
from lower position and locked into place.
Bring a leg completely up and insert a locking pin into
the hole of the leg (Figure 1). Repeat this procedure for
remaining three legs.
Note that a folding metal tree stand is included to use
in place of the revolving stand if desired. Assembly
instructions are located below.
2. With tree in desired position for display, rest your foot
on the tree stand and pull the section sleeve up and off.
3. Insert the top tree section into the lower tree assembly
and remove the section sleeve (Figure 2).
Trees with Middle Section(s)
Some of the taller trees will include one or more middle
sections. Each section will be numbered in ascending
order. The tree bottom section (which inserts into tree
stand) will be number
1
. The next section as you build
up, will be number
2
. Section
3
will follow until
assembly is completed by inserting tree top section.
Insert the middle section(s) as necessary removing
the sleeve one section at a time (Figure 3). Remove
sleeve from the top section and insert it into the
section below.
4. Branches should fall into place following removal of
sleeve. If any branches remain upright, gently lower
them into proper position.
5. Connect the electrical cord from the tree center pole
to the receptacle of the revolving stand. Plug the
electrical cord from the stand into a power supply.
IMPORTANT NOTE:
It is important that the
electrical cord from the
center pole remains
above the thumb
screws of the revolv-
ing stand. Be sure to
bundle the excess
cord and attach it to a
bottom branch using
a tie wrap or similar
device (Figure 4).
Fig. 3
Fig. 1
Fig. 2
BULB REPLACEMENT INSTRUCTIONS
1. Unplug light string from power source.
2. Pull up on the Base Lock™ unlatching the bulb from the
bulb socket. Gently pull the bulb straight out (Figure 5).
3. Before inserting the new bulb into socket,
make sure that the two wires on either side
of the bulb base are straight up and flush
with the base (diagram at right).
4. Carefully insert new bulb into socket and
push down Base Lock until it snaps into place (Figure 6).
Fig. 5
Fig. 6
FUSE REPLACEMENT INSTRUCTIONS
1. Unplug light string from power source.
2. Fuses are located in light string plug. Slide the fuse
access cover away from cord side (in direction of
arrow, Figure 7) exposing fuses.
3. Remove fuses from compartment and examine.
Replace burnt out fuse with new one.
4. Close fuse compartment by sliding access cover
back in towards cord side of plug (Figure 8
).
Fig. 7
Fig. 8
STORAGE
Remove the tree stand. Bring all branches to their original upright/compressed position
and secure each section in its protective sleeve. All tree parts can be placed in original
carton and should be stored in a cool, dry area.
During tree assembly or disassembly, DO NOT DIS-
CONNECT any of the factory connected light strings
that are located on the center pole or within the tree.
Using the optional Folding Tree Stand
Remove the revolving stand by loosening the wing nuts.
Open the folding tree stand and insert the eye bolt. Insert
bottom section pole into tree stand making sure it is fully
seated. Tighten eye bolt until section is held securely.
Plug the electrical cord from the tree into a power supply.
TIE WRAP
BRANCH ROD
Fig. 4
National Tree Company
2 Commerce Drive, Cranford, New Jersey 07016 USA
www.nationaltree.com
Made in China


