background image

About the Digital Microscope 

 
The manual for your new digital microscope is in three parts.  This first part describes the basic nomenclature and 
functions of the microscope, which can be used as a fully functional microscope, independent of the camera.  The 
second part is the “Important Supplement to Documentation” describing loading of your CD.  The third part is the Motic 
Images Quick Start Guide located on your CD, which provides detailed documentation for installation and operation of 
the Motic Images software.  In order to achieve optimum results, it is important that you carefully read these 
documentation manuals before operating your microscope or camera.   
 

UNPACKING 

 
1.  Your microscope is packed with the following components, all of which have been checked at the factory.  

Carefully remove all components and check against this list.  Retain styrofoam container in case microscope must 
be transported or returned to factory for any reason. 


A. Microscope 

body 

B.  Two WF10x eyepieces 
C.  Two rubber eyecups 
D.  Four objective lenses: DIN achromatic 4x, 10x, 40xR, 100xR oil immersion 
E.  1.25 N.A. Abbe condenser with iris diaphragm 
F.  Three filters: blue, green, yellow 
G.  Specimen holder for mechanical stage 
H.  12VDC switching power supply, operates on 100v-240v, 50H/60H 
I. Power 

cord 

J.  CD Motic Images software 
K.  Two instruction manuals:  this one and separate supplement documentation 
L. Calibration 

slide 

M.  USB cable (for connecting to computer) 
N.  S-video cable (for connecting to high resolution video monitor) 
O.  RCA cable (for connecting to standard resolution video or projector) 
P. Dustcover 
Q. Warranty 

card 

 
2.  If it becomes necessary to ship the microscope for any reason, repack it in the styrofoam container, and then pack 

the styrofoam in another corrugated shipping container for optimum protection.  Use of the styrofoam alone will not 
provide adequate protection in transit, and will void your warranty. 


A. 

NOTICE:

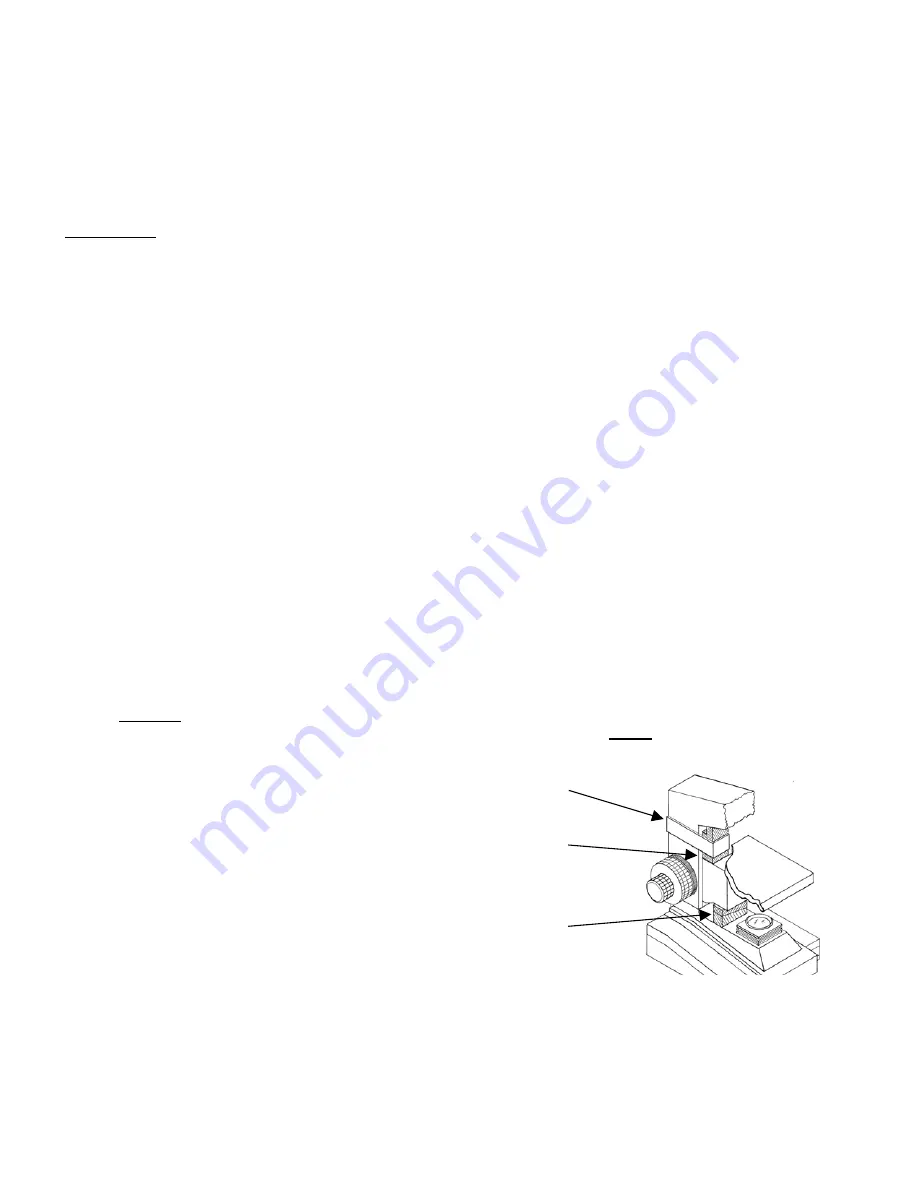
  To protect focus mechanism during shipment, two black plastic wedges (b) and one black plastic 

block (c) are inserted at strategic points as indicated.  These plastic parts 

MUST

 be removed prior to operating 

microscope.  Failure to do so will result in damage to focusing mechanism and will void your warranty. 


(c)

(b)

(a)


1.  Remove two black velcro straps (a). 
2.  Remove wedge (b) by pulling apart the 
     two parts of wedge in opposite directions.    

  3.   Lower stage by rotating coarse focus 


                     knob in counter-clockwise direction. 
                     in counter-clockwise direction 
               4.   Remove block (c) from stand. 
               5.   These components should be retained  

        with styrofoam container. 


B.  Carefully remove from the stand all tape and packing material used to protect microscope components during 

shipment.  Remove black objective plugs from nosepiece. 
 

C.  Unwrap components, making certain that lens surfaces do not come in contact with dust, dirt, fingerprints.   

Damage to optical surfaces can result from such contaminants, and reduce image quality. 


Summary of Contents for DC3-163

Page 1: ... YOUR MICROSCOPE SERIAL NUMBERS 1 Microscope serial number This number etched on back arm of microscope is the number under which your warranty is registered 2 Microscope DM number This number found on a white sticker on the bottom of the microscope is used for logging on the Motic web site which gives you the ability to download free software upgrades 3 Motic CD DM number This number is to be use...

Page 2: ...older to stage Knobs controlling X and Y movement of mechanical stage Revolving nosepiece Viewing head of microscope Sliding interpupillary adjustment grips located on both left and right side of diopter scale Three position sliding rod Interpupillary scale Eyepiece LED indicator light White balance button Tension adjustment knob DC power plug Camera On Off S video plug RCA plug USB plug Power On ...

Page 3: ...arate supplement documentation L Calibration slide M USB cable for connecting to computer N S video cable for connecting to high resolution video monitor O RCA cable for connecting to standard resolution video or projector P Dustcover Q Warranty card 2 If it becomes necessary to ship the microscope for any reason repack it in the styrofoam container and then pack the styrofoam in another corrugate...

Page 4: ... any lens surface Insert eyepieces into the eyepiece tubes 5 Filters Swing out filter holder and insert 32mm diameter blue filter OPERATION Your microscope is fully functional as a standard microscope The following instructions apply to operation of the microscope Refer to Supplement to Documentation and Quick Start Guide located on your CD for installation of the software and operation of the cam...

Page 5: ...adjustment of viewing head a Look through microscope and adjust distance between the two eyepiece tubes by grasping the sliding mounts to left and right of eyepieces and sliding together or apart b When a full field of view is observed through both tubes and images blend into one interpupillary distance is corrected for your eyes Check the interpupillary scale and note index reading for future ref...

Page 6: ... prevent damaging the front lens element and specimen slide d In order to obtain maximum resolution of the 100x oil immersion lens it is necessary to apply immersion oil between the coverglass of slide and front lens of the objective 1 Use of a very small amount of immersion oil is required 2 All air bubbles must be removed from between lens and slide by rotating nosepiece back and forth MICROSCOP...

Page 7: ...ed viewing all parts that come in contact with oil must be cleaned Failure to do so could permanently damage the 100x oil immersion objective lens Use of xylene to clean immersion oil off lens surfaces is recommended ...

Page 8: ...ng a camel hairbrush Or use air to blow dust and lint off surfaces Use of compressed air in a can available at any computer supply store is a good source of clean air C Cleaning eyepiece lenses Do not remove eyepiece from eyepiece tube Clean only the outer surface Breathe on lens to dampen surface then wipe with lens paper Do not wipe lens surface while dry as lenses are scratched very easily Wipe...

Page 9: ...o DC power jack Lamp burned out Replace lamp Lamp flickers Lamp loose in socket Push lamp pins into lamp socket Image does not focus Cover slip on specimen slide too thick Use 0 17mm thick cover slip Slide upside down Place slide on stage with cover slip facing up Image does not remain in focus Stage drops down from its own weight Adjust tension of coarse focus knob Poor resolution image not sharp...

Page 10: ...efects in material and workmanship under normal use and service for 90 days from date of purchase Other than set forth above National hereby disclaims all warranties express or implied of fitness for a particular purpose While it is not necessary to register your purchase of a microscope any camera or software must be registered by completing and mailing the warranty registration card enclosed wit...

Reviews: