background image

5. Header

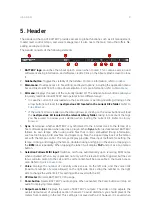
The Header at the top of BATTERY provides access to global functions such as Kit management,

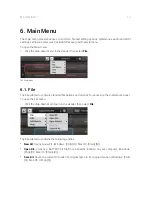
master level control, tempo, and voice management. It also hosts the main menu that offers file,

editing, and layout options.
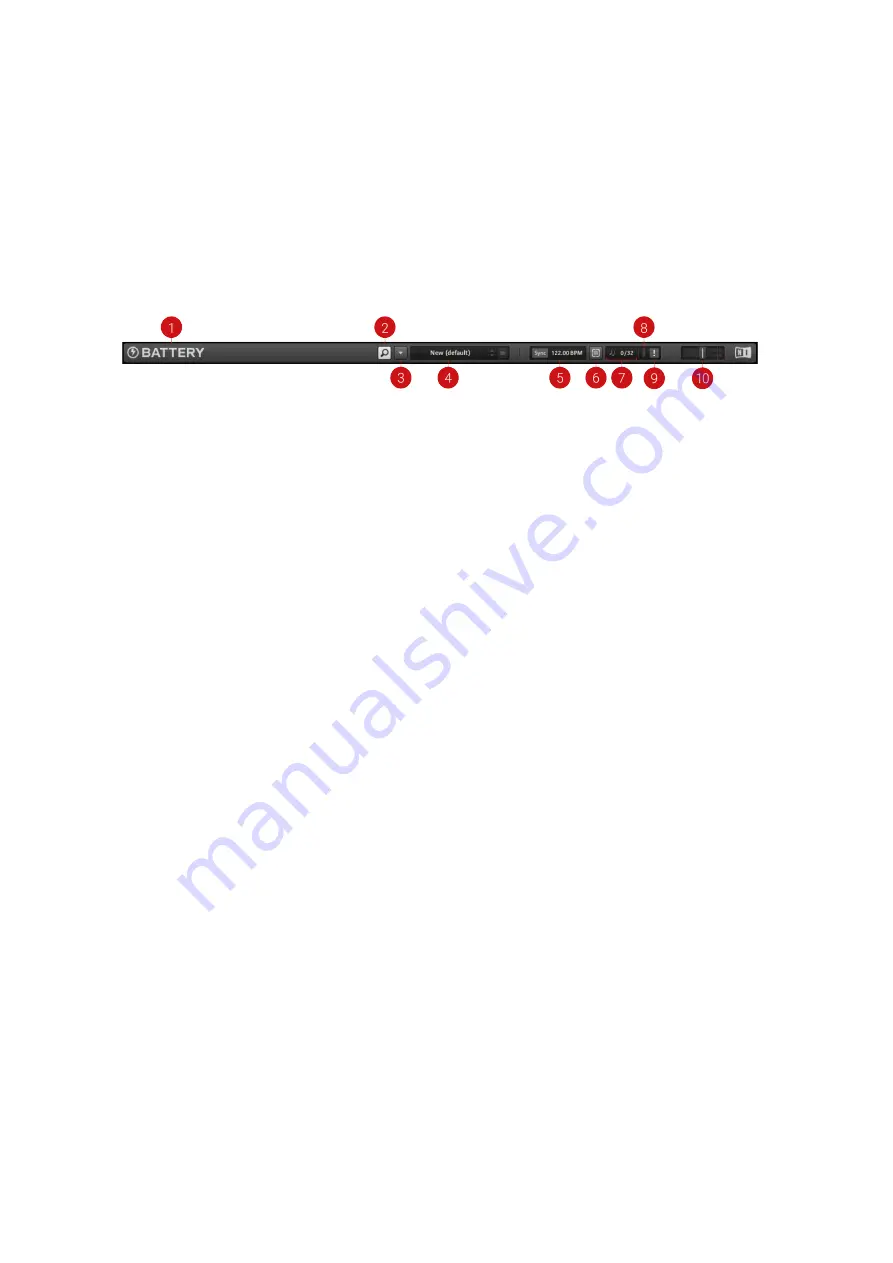
The Header consists of the following elements:

1.

BATTERY  logo

:  Launches  the  About  splash  screen  when  clicked.  This  contains  version  and

software licensing information, and software credits. Click on the About splash screen to close

it.

2.

Sidebar button

: Toggles the visibility of the Sidebar. For more information, refer t

Sidebar

.

3.

Main menu

: Provides access to file, editing, and layout options, including the application menu

bar and links to BATTERY's online documentation. For more information, refer to 

Main Menu

.

4.

Kit menu

: Displays the name of the currently loaded Kit. The adjacent arrow buttons allow you

to quickly load Kits into BATTERY and operates in two different ways:

In case the current Kit was loaded via the File Browser or per drag-and-drop, clicking on the

arrow buttons will load the 

next/previous Kit located in the current Kit's folder

. Refer to

Files Browser

.

If the current Kit was loaded via the Library Browser, clicking on the arrow buttons will load

the 

next/previous Kit located in the relevant Library folder

, taking into account the tags

you  have  used  to  narrow  your  selection  when  loading  the  current  Kit.  Refer  to 

Library

Browser

.

5.

Sync

: Determines whether BATTERY is synchronized to the internal clock to the tempo of a

host software application when used as a plug-in. When 

Sync

 button is deactivated, BATTERY

follows  its  own  tempo.  When  using  audio  files  that  contain  embedded  timing  information,

such as REX loops, ACID wav files, and Apple Loop files, the loop will play back at the tempo

set with the tempo control. The tempo display provides three input methods for setting the

tempo: clicking and dragging the tempo, double-clicking and typing in the value, or tapping on

the 

BPM

 label repeatedly. When tapping the label it will display 

TAP

 and act as a tap tempo

button.

6.

Selection  Follows  MIDI  Input

:  Switches  cell  focus  automatically  upon  receiving  MIDI  notes

when activated. When a key is pressed, not only will the relevant cell be triggered, but the cell

focus will also switch to the cell, and the cell's content will be accessible in the Quick Access

area. Refer t

Quick Access Area

.

7.

Voice

:  Displays  the  number  of  currently  active  voices  on  the  left  side,  and  the  voice  limit

(maximum number of voices allowed) on the right side. Click + drag the number on the right

side to change the voice limit. This setting will be saved with the Kit.

8.

CPU meter

: Monitors BATTERY's CPU usage.

9.

Panic button

: Resets BATTERY's audio engine. When activated, the Panic button will stop all

audio from playing immediately.

10.

Output Level slider

: Displays the levels of BATTERY's outputs. The slider on top adjusts the

overall Output Level of all output section channels. To avoid distortion, you should prevent the

meters from metering in the red. This setting is not saved with a Kit; however, it is saved when

HEADER

8

Summary of Contents for BATTERY 4

Page 1: ......

Page 2: ...p 12 7 Sidebar 13 7 1 Library Browser 13 7 2 Files Browser 15 7 3 Automation Page 17 8 Cell Matrix 19 8 1 Using the Cell Matrix 19 8 2 Cell States 19 8 3 Cell Colors 21 8 3 1 Color Scheme 21 8 3 2 Cha...

Page 3: ...3 5 MIDI Echo 49 13 6 Humanize 50 14 Editor Page 51 14 1 Wave Editor 51 14 2 Loop Editor 53 14 3 Mapping Editor 54 15 Master Page 56 15 1 Using Buses and Master Effects 56 15 2 Buses 57 15 3 Reverb 57...

Page 4: ...16 5 Cell Rendering 72 16 6 Usage Data 74 17 Audio and MIDI Settings 75 17 1 Audio Page 75 17 2 Routing Page 76 17 3 MIDI Page 77 18 Missing Samples 79 19 Supported File Types 80...

Page 5: ...einafter referred to as Native Instruments Native Instruments NI and associated logos are registered trademarks of Native Instruments GmbH Mac macOS GarageBand Logic and iTunes are registered trademar...

Page 6: ...hip hop music with a radically intuitive workflow that focuses on creativity Instantly find and arrange sounds with a new tag based browser and route powerful new effects with drag and drop simplicity...

Page 7: ...software interface elements Brackets References keys on a computer s keyboard The following three icons represent different types of information The light bulb icon indicates a useful tip suggestion o...

Page 8: ...an instrument track For more information refer to Setting up BATTERY as Plug in in a DAW 3 1 Installing BATTERY Before you can make music with BATTERY you must install the necessary software using Nat...

Page 9: ...puters the correct path for VST plug ins needs to be selected in Native Access prior to installation Learn more in this support video on our website VST Plug in Administration on Windows Computers To...

Page 10: ...Access Area 5 Edit area Provides advanced editing effects modulation MIDI features and routing options The Edit area is organized in six pages accessed by clicking on the respective tab Main page Fea...

Page 11: ...Master page Consists of group effects controls for the Reverb and Delay send effects and Buses for routing and mixing cells with additional effects processing Refer to Master Page OVERVIEW OF BATTERY...

Page 12: ...ized to the internal clock to the tempo of a host software application when used as a plug in When Sync button is deactivated BATTERY follows its own tempo When using audio files that contain embedded...

Page 13: ...using BATTERY as a plug in in a session with a host software and will be recalled the next time you load that session HEADER 9...

Page 14: ...contains standard file options and an entry for accessing the preferences panel To open the File menu Click the drop down Main menu in the Header then select File The File submenu contains the followi...

Page 15: ...a good choice if you want a transportable patch for example when collaborating with another musician 6 2 Edit The Edit submenu provides access to the Preferences and Audio and MIDI Settings To open th...

Page 16: ...on and other sources of information To open the Help menu Click the drop down Main menu in the Header then select Help The Help submenu contains the following entries Launch Native Access Launches the...

Page 17: ...structure for sound files and Kits You can bookmark your favorite locations and import files to BATTERY s Library from the Files browser For more information refer to Files Browser 3 Automation page...

Page 18: ...the tags in the Category window and select whether to display factory samples or your own user samples with the Factory User buttons 2 Factory User Selects between Factory and User option to determin...

Page 19: ...ew output level using the slider 9 Info button Displays additional information for the item selected in the Selection Results window 10 Edit button Opens the Edit panel where you can edit category tag...

Page 20: ...y visited locations clock icon Opens a list of currently visited locations Click on an entry to open it in the Selection Results window 3 Selection Results window Displays the folder content of the cu...

Page 21: ...application These destinations are reflected by the Host and MIDI tabs in the Automation pane The Host button is used to assign BATTERY parameter controls to automation control IDs in a host applicat...

Page 22: ...then drag and drop the selection cross hair onto a parameter control in the user interface The relevant parameter control will then be assigned to the control element on your MIDI controller If BATTER...

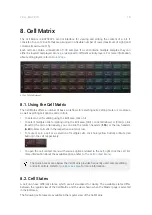
Page 23: ...g the Edit area Ctrl click Windows or Cmd click macOS the cells Alternatively you can click the column headers 1 16 or the row headers A H to select all cells in the respective column or row To mute o...

Page 24: ...ciated to a cell it will light up No samples loaded When no samples are loaded in a cell the Cell Matrix background is shown The following cell states are available in the Cell Matrix when the Master...

Page 25: ...igned to a cell or a selection of multiple cells to match your own Kits to the official color scheme or create your own custom color schemes 8 3 1 Color Scheme The color scheme used for the Factory Ki...

Page 26: ...u For more information refer to Cell Matrix 8 4 The Cell Context Menu The cell context menu provides various options related to the cell To open the context menu right click on a cell in the Cell Matr...

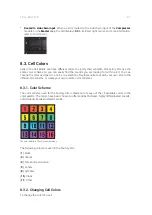
Page 27: ...ile nbcl on your hard drive Cut Cell Cuts the cell including its content and settings to the clipboard Copy Cell Copies the cell including its content and settings to the clipboard Paste Cell s Pastes...

Page 28: ...Click and drag up down anywhere in the waveform to zoom in out on the sample respectively Click and drag left right anywhere in the waveform to scroll left right in the sample 2 Sample selector Displ...

Page 29: ...and drag the slider up down to adjust the level Shift click drag to finely adjust this parameter Key Range control Determines the MIDI note s that trigger the cell For example a Key Range of C2 C2 me...

Page 30: ...of the section header let you choose between two basic types of volume envelope AHDSR Attack Hold Decay Sustain Release which is represented by the left envelope symbol and AHD Attack Hold Decay which...

Page 31: ...tandard mode with Amount Decay 1 Break and Decay 2 controls which is represented by the left envelope symbol and easy mode with only an Amount and a Decay control which is represented by the right env...

Page 32: ...city will not affect the pitch of the triggered cell for instance no matter how hard you hit the key or pad the cell will always play at its original pitch Turning the knob to the right will translate...

Page 33: ...e Speed Changes the playback rate independently of pitch The length values are expressed as a percentage of the original length for example 100 plays back the sound at the original speed 200 doubles t...

Page 34: ...audio signal The Compressor module contains the following parameters and controls The Compressor module Power Activates deactivates the module VU meter Displays the amount of gain reduction in real ti...

Page 35: ...of signal to be sent to the Delay module on the Master page Reverb Determines the amount of signal to be sent to the Reverb module on the Master page Refer to Master Page for instructions on adjusting...

Page 36: ...cell Rendering effects is useful for creating new sounds but also for reducing the CPU load To apply an effect to a cell in real time 1 Select the cell you want to apply the effect to by clicking on...

Page 37: ...ains two submenus for Factory and User content To save the current effect settings as a User preset 1 Click the arrow icon next to the module name to open the Preset menu 2 Select Save Preset 3 Enter...

Page 38: ...Preset menu that enables you to load factory presets or save and recall your own user presets Mode Selector Selects one of three available saturation modes Classic Drums and Tape Gain Adjusts the inpu...

Page 39: ...EQ module shapes the frequency content of signals not unlike equalizers You can use it to polish and clean up sounds or add color and resonances The filter modes offer a selection of different filter...

Page 40: ...s the width of the frequency band around the filter frequency that is attenuated or boosted Output Adjusts the output level of the module 11 5 2 3 Band EQ 3 Band EQ mode is a classic parametric equali...

Page 41: ...a 6 dB octave slope Ldr 2P 2 pole ladder filter with a 12 dB octave slope Ldr 4P 4 pole ladder filter with a 24 dB octave slope Daft Aggressive 2 pole filter with a 12 dB octave slope The following co...

Page 42: ...ow which signals will be attenuated Reso with a value greater than 0 this control will boost a small frequency range around the cutoff frequency and Gain controls the amplitude increase after the filt...

Page 43: ...ds increase overall loudness or distort the signal This module contains the following parameters and controls Module On Off Activates or deactivates the module Preset menu arrow button Opens the Prese...

Page 44: ...o emphasize or attenuate the transients of your audio material by manipulating its attack and sustain phases Unlike compressors and limiters it does not use the level of your signal to decide when to...

Page 45: ...Output Adjusts the output level of the module EFFECTS PAGE 41...

Page 46: ...time improvisation and signal warping recorded as automation data for later playback 12 1 LFO 1 and LFO 2 The LFOs Low Frequency Oscillators provide a periodic modulation effect The LFO 1 and LFO 2 mo...

Page 47: ...l remain at its maximum level Set this to 10 30ms to add punch to a signal Decay knob Adjusts the time it takes for the envelope to fall from the held level to the sustain level Sustain knob Adjusts t...

Page 48: ...es the depth of the effect on the modulation destination The range is from 0 to 100 If any combination of modulations exceeds an effect level of 100 the value will be limited to the maximum value Modu...

Page 49: ...MIDI Input module Curve Adjusts the velocity curve for a cell using handles MIDI channel Specifies whether a cell should receive data from all MIDI channels or only a specific MIDI channel with this...

Page 50: ...otes to choke if the voice group runs out of voices You can choose from Kill Any Removes any note Kill Oldest Removes the earliest note played Kill Newest Removes the last note played Kill Highest Rem...

Page 51: ...l is triggered Usually a cell is triggered upon receiving a MIDI note which is expressed by the default settings of Trigger being set to Note On and Condition being set to Always in this module The Ce...

Page 52: ...ess the Learn button the MIDI symbol button in the Quick Access area refer to Quick Access Area then hit a key twice on your MIDI keyboard You have just assigned all selected cells to be triggered by...

Page 53: ...gered sample is also shortened so even though many notes are triggered the voice count is reasonable Geiger Counter Produces a random Geiger like effect 13 5 MIDI Echo The MIDI Echo module can be used...

Page 54: ...es might not be audible 13 6 Humanize The Humanize module can add slight randomization to the sonic characteristics and the timing of your performance The Humanize module contains the following option...

Page 55: ...more information refer to Loop Editor 3 Mapping Editor Allows you to edit sample layers and define velocity trigger zones for the sample layers in a cell enabling you to restrict sample layers trigger...

Page 56: ...field From that menu you can select the sample layer to be displayed and edited in the Waveform Control Refer to Quick Access Area for further information on the Sample Picker 4 Wave Editor Opens the...

Page 57: ...tor 3 Add Loop icon Adds a loop to your sample In case of more than one loop in your sample click on an individual Loop Region selector to select it for editing 4 Layer Selector Displays the name of t...

Page 58: ...o that cell the sample will always be triggered The Mapping Editor allows you to restrict sample layers to be triggered only within certain velocity zones The visual representation of the velocity zon...

Page 59: ...ack when clicking on its Sample Block in the Mapping grid 3 Snap When activated moving velocity limits snaps to velocity limits of neighboring layers 4 Sample Block Provides a visual representation of...

Page 60: ...page or one of the other pages in the Edit area is opened For more information refer to Cell States 15 1 Using Buses and Master Effects The Master page offers a number of basic workflows for routing c...

Page 61: ...ng of cells Each bus features the same set of effects as the Master The buses area contains the following controls Bus 1 Bus 4 The four buses each have their own level control and set of effects The l...

Page 62: ...zed spaces Turning the control to the right changes the size from small to large HP Adjusts the cutoff frequency of the high pass filter applied to the effect signal LP Adjusts the cutoff frequency of...

Page 63: ...ttenuates the reverb s high frequency content Stereo Adjusts the stereo width of the reverb effect gez va 15 4 Delay The Delay send effect is an echo effect that can be used to add depth to the sound...

Page 64: ...controls Module On Off Activates or deactivates the module Preset menu arrow button Opens the Preset menu that enables you to load factory presets or save and recall your own user presets Mode select...

Page 65: ...BW Adjusts the Q factor or resonance of the respective frequency band The Q factor determines the width of the frequency band around the filter frequency that is attenuated or boosted Gain Adjusts th...

Page 66: ...AR filter types 15 5 5 Bandpass Bandpass mode is a resonant filter that attenuates frequency content above and below the cutoff frequency creating a thinner and more focused sound It offers four diff...

Page 67: ...r Setting Gain to high values can be used to apply a soft saturation effect This control is not available when selecting the Ldr filter types 15 5 7 Effect Effect mode is a collection of special filte...

Page 68: ...it onto the SC Source area Threshold Compressor Adjusts the threshold level of the compressor When the control signal rises above the threshold gain reduction at a ratio set using the Ratio control i...

Page 69: ...use the level of your signal to decide when to come into effect but rather modifies the envelopes of every attack and sustain phase A notable benefit of this processing is that it affects all parts o...

Page 70: ...pe Gain Adjusts the input level of the module effectively controlling the amount of saturation applied to the signal Warmth Adjusts the level of low frequency content in the signal This control is onl...

Page 71: ...n Gain Adjusts the input level of the module effectively controlling the amount of limiting applied to the signal Release Adjusts the release time which is the time it takes the limiter to stop applyi...

Page 72: ...s multiprocessor performance audio outputs reverb settings and defining the directory for edited samples For more information refer to Engine Loading Provides various options for opening kits and samp...

Page 73: ...ix All cells set to Use Default Color in their context menu will use the color specified in this menu Cell Triggering On Mouse Click Check this option to trigger cells via mouse click Velocity Sets th...

Page 74: ...Y s Factory Library User Sets the location of your additional user libraries Use the Add and Remove buttons to add and remove entries Rescan Rescans the currently highlighted library folder in the lis...

Page 75: ...n Reverb Sample Rate Sets the sample rate for the convolution reverb mode of the Reverb module on the Master page Experiment with the settings to see which ones provide the best results for you Latenc...

Page 76: ...eing spread out across multiple cells in the Cell Matrix Expand Loop Slices to Individual Cells Imports each slice to an individual cell when loading a loop file Certain file types such as REX files A...

Page 77: ...is setting for example when you have a bass sample playing in half note steps from C1 to C2 and the Note Number is set to Upper the rendered cell will be tuned according to the tuning of the bass samp...

Page 78: ...Native Instruments helping us improve our products The Usage Data tab contains the following option Preferences Usage Data page Usage Data Tracking Sets the option to track and send anonymous usage d...

Page 79: ...ect the Audio and MIDI Settings entry from the File menu in the application menu bar or via the application menu button in the header The Audio and MIDI Settings panel contains three pages Audio Routi...

Page 80: ...ts the buffer size used for the audio processing High latency settings reduce the CPU load but increase the time it takes to process the audio input which can cause a noticeable lag when playing in re...

Page 81: ...the right column to select the desired outputs via a drop down menu 17 3 MIDI Page The MIDI page allows you to set up the MIDI input and output ports that you want to use with BATTERY The MIDI page co...

Page 82: ...elds in the Status column which displays the current status of the corresponding port Outputs Displays a list of all the available MIDI outputs of your system You can activate deactivate each output b...

Page 83: ...for the missing samples Resolve Manually Point to Folder button Sets a specific folder on your computer to scan for the missing samples Point to Files button Lets you point directly to the new locati...

Page 84: ...t2 Cell Matrix Cell BATTERY 2 cel Cell Audio Files File Type Related Software File Extension Drag and Drop Targets WAV mono stereo wav Cell Waveform Control Mapping Grid Convolution Reverb Display WAV...

Reviews: