background image

ZephIR user manual QP1009-582 v2

© Natural Power 2008

10

th

 June 2008

Page 30

Scheduled Data Downloads

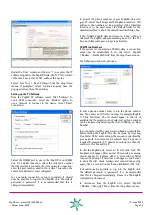
It is possible to automate the data download process to 

provide regular wind speed downloads from a ZephIR unit 

without user interaction. To do this, select ‘Scheduled 

Data Download’ from the ZephIR menu. Note that in this 

case, the user should not be dialled or logged into the 

ZephIR unit.

If the connection is over GSM, select the ‘System Requires 

Dial-In’ box and either enter a phone number by hand 

or click the ‘Select’ button to choose a pre-programmed 

phone number from the ZephIR dialer. See the installation  

documentation for more information.

Set the time between data downloads in hours in the 

‘Time Between Updates’ box.

If only averaged data is required, check the ’10 minute 

averages’ box. This will download wind [speed] data, 

averaged over 10 minutes and will be much faster.

Finally the ‘Most Recent Reference’ box must be filled in. 

If data has already been downloaded from the unit, enter 

the largest reference retrieved here. Otherwise, enter a 

value of 0. This box will automatically update after every 

download to ensure that data is only download once.

Click ‘Test’ to perform an initial test of the settings 

provided. Notification will be given when the test has 

completed or if the test fails.

Once the settings are confirmed click ‘Start’ to begin the 

countdown timer and automated collection of data.

To end data collection, click the ‘Stop’ button.

If ‘convert to CSV’ is selected then a CSV file will 

automatically be produced for each WND file created.

Other Customer Data

If an external device is plugged into the auxiliary port 

of the ZephIR unit, data from it will be logged to the 

compact flash. This is known as ‘other customer data’.  

See the ‘Data on Request’ section of this data sheet for 

information on downloading it.

To see how much data has been collected select ‘Other 

Customer Data > Query Stored Data’ from the ‘ZephIR’ 

menu.

To delete this data select’ Other Customer Data > Delete 

Stored Data’ from the ‘ZephIR’ menu.

Latest Reference

The current reference, i.e. the one which will be applied 

to the next wind speed reading, can be reviewed by 

selecting ‘Get Current Reference’ from the ‘ZephIR’ menu.

Exporting to CSV

When wind data has been downloaded from the ZephIR it 

will be stored in a proprietary .wnd format for playback in 

the ZephIR software. This can be converted to a CSV file 

that is compatible with Excel as follows:

• 

Select ‘Open Wind Data File’ from the ‘File’ menu. 

• 

Select the .wind file to convert.

• 

Select ‘Export to CSV’ from the ‘File’ menu.

• 

Select the filename to export to.

• 

The user will be prompted to include field names. It 

is recommended to allow this.

• 

Export is complete.

Summary of Contents for ZephIR

Page 1: ...phIR user manual QP1009 582 v2 Natural Power 2008 10th June 2008 Page 1 Natural Power ZephIR Operations Maintenance Manual Any questions Support line 44 0 7824 347 588 Email ZephIR help naturalpower c...

Page 2: ...nfiguration Software Installation Configuration Data Download Wind Data Playback Part C System Overview Pages 33 40 General Information Laser Safety Site Selection Taking care of ZephIR Power Systems...

Page 3: ...Natural Power 2008 10th June 2008 Page 3 Part A Shipping Packing List Battery Pod Shipping Check List Battery Pod Packing List Electronics Pod Shipping Check List Electronics Pod Packing List Optics P...

Page 4: ...QUANTITY DIMENSIONS mm WEIGHT 1 Battery Pod 1 550 dia x 290 length 76kg 2 Tripod Foot 3 70 dia x 200 length 1kg ea 3 Met Mast 1 150 dia x 300 length 2kg 1 2 2 2 3 Transit case Transit Case Lid Case di...

Page 5: ...cked in by Date in Battery pod box Checked In Missing In Checked Out Missing Out Base Taped battery leads Battery Link cable Batteries in position Battery clamp Check labels Screws in battery terminal...

Page 6: ...ctronics Pod 1 450 dia x 390 length 31kg 2 Electronics Pod Louvres 1 100 x 200 x 390 1kg 3 Power Supply 1 300 x 120 x 200 5kg 4 System Cabling Pin Head bolts Spare Pin Head bolts 12 0 5kg 5 Met Statio...

Page 7: ...no SIM card in modem Check label on inside of front panel Power supply legs Power supply mating connector Washer pump assembly Water pipe from cap to non return valve Screws 5 off M8x35 Optics Electro...

Page 8: ...NTITY DIMENSIONS mm WEIGHT 1 Optics Pod 1 345 dia x 690 length 38 9kg 2 Tripod Mount 3 150 x 250 x 100 3 6kg 3 Tripod Leg 3 80 dia x 600 length 2 5kg 2 2 2 1 1 3 3 3 Transit case Transit Case Lid Case...

Page 9: ...me Checked in by Date in Optics pod box Checked In Missing In Checked Out Missing Out 3 x leg castings Leg casting screws 12 off M8x30 3 x leg assemblies Optics pod with louvre attached Check labels W...

Page 10: ...n Quick start assembly guide Battery Pod and Tripod Configuration Electronics Pod Configuration Optics Pod Configuration Met Station and Met Mast Configuration System Interconnections System Power up...

Page 11: ...ZephIR user manual QP1009 582 v2 Natural Power 2008 10th June 2008 Page 11 Quick Start Assembly Guide...

Page 12: ...ZephIR user manual QP1009 582 v2 Natural Power 2008 10th June 2008 Page 12...

Page 13: ...ZephIR user manual QP1009 582 v2 Natural Power 2008 10th June 2008 Page 13...

Page 14: ...emoving the batteries Backup batteries included with ZephIR contribute to 44kg of weight in the system Prior to movement of the battery Pod it is recommended that the batteries are removed and re inse...

Page 15: ...until the batteries are secure 10 Once the batteries are all connected then the lid assembly can be connected to the 2 XLR connectors and then screwed into place using 12 M8x30 Pinhead Allen screws N...

Page 16: ...The louvre on the rear of the pod is not fitted at this point 2 System connections The Electronics Pod is the central hub for all system interconnections power supplies are fed from the battery pod t...

Page 17: ...is included Once the optics pod is placed in the correct orientation the unit is secured using six PinHead allen screws located around the circumference of the unit 2 System connections The Optics Pod...

Page 18: ...s pod mounting plate 2 Alignment of the Met Station Prior to alignment of the Met Station the cable assembly QP0000 649 should be connected to the met station and tightened On completion of the Met Ma...

Page 19: ...and tripod configuration has been completed System Interconnections Overview The Electronics Pod is the central hub for all system interconnections power supplies are fed from the battery pod to the e...

Page 20: ...the detector signal acquisition 7 E5 Fans QP0000 617 provides interconnection between the electronics pod the fans situated on both the optics pod and the electronics pod 8 E6 to GSM GPS QP0000 617 pr...

Page 21: ...nsertion of a user supplied SIM card The modem is located within the customer interface enclosure behind a secondary panel which must be removed to gain access to the SIM card This panel is removed by...

Page 22: ...l pop up a window showing the status of the ZephIR internal storage These flags should be checked after power on and changing the flash card If any of the compact flash status indicators is Serious Fa...

Page 23: ...ronix Software This step is only required to use the ZephIR over a network or direct PC Laptop connection Device Installer Double click on Device Installer on the USB Stick This will launch the instal...

Page 24: ...launch the installer to place the Comm Port Redirector on the PC Run the Comm Port Redirector by selecting Start Programs Lantronix CPR 4 1 CPR Manager The following window should open Select Comm Por...

Page 25: ...is selected the ZephIR will automatically be set to the PCs time and date whenever a login is performed GSM Phone Numbers If the system is connected via GSM modem a connection must now be established...

Page 26: ...ttings required for a particular site the user must select the Config option from the ZephIR menu and enter the appropriate heights for data collection into the five locations In the event that less t...

Page 27: ...cing Dew Threshold This activates the ZephIR automatic wash wipe function A setting of 5 will enable the wash wipe while a setting of 1 will disable it It is recommended that the wash wipe only be dis...

Page 28: ...g it an SMS This can be done from a mobile phone or an Internet SMS utility Configuration In order to correctly configure the modem an SMS containing the GPRS settings must be sent to it The ZephIR so...

Page 29: ...IR unit A valid login will be required before this can take place If the data is to be downloaded over GSM a dial up connection is also required Please see the ZephIR Installation document for informa...

Page 30: ...be given when the test has completed or if the test fails Once the settings are confirmed click Start to begin the countdown timer and automated collection of data To end data collection click the Sto...

Page 31: ...o begin playback The pause double lines control will stop playback and allow it to continue from the same place by clicking play The stop square control will stop playback and reset the reference to z...

Page 32: ...the drop down menus Once playback has begun the settings in the playback frame can be changed on the fly Statistics will be displayed in the status bar If Process RAW data is selected then fit data w...

Page 33: ...packet averaging boundary For example a ten minute averaged packet would start 1 10 00 h mm ss even if the first packet in the set came from 1 10 03 NUMBER OF POINTS IN FIT AVERAGE NUMBER OF PACKETS I...

Page 34: ...user manual QP1009 582 v2 Natural Power 2008 10th June 2008 Page 34 Part C System Overview General Information Laser Safety Site Selection Taking care of ZephIR Power Systems System Configuration Ref...

Page 35: ...d is recommended on at least a weekly basis The data will get over written on a 3 day cycle for the RAW data and 365 day cycle for the wind data In addition to the wireless communication interface a T...

Page 36: ...S TRIPOD MET MAST TOTAL 39kg 31kg 32kg 44kg 7kg 1kg 154kg OPERATING TEMPERATURES 25O C to 40O C SYSTEM POWER REQUIREMENTS 28v DC 100W continuous 0O C to 25O C MAINS POWER SUPPLY INPUT RANGE OUTPUT 100...

Page 37: ...the system 1 Power Supply Primary power requirements for the ZephIR system require a 110 240v a c input via the supplied Power Supply Unit QP1007 653 or directly from a regulated 28v d c power supply...

Page 38: ...nt window is damaged in anyway support from your Service Engineer whose contact details are listed at the back of the manual should be sought A replacement window may be required in extreme circumstan...

Page 39: ...ged or partially discharged the charging of the batteries will add a further 72VA power requirement Peak power requirements for the system are 28v d c 240 VA To ensure that system components are not d...

Page 40: ...s available Primary power supply for ZephIR system operation including appropriate RCD Washer fluid Compass GPS It is recommended that the initial set up of ZephIR is undertaken at the users premises...

Page 41: ...ZephIR user manual QP1009 582 v2 Natural Power 2008 10th June 2008 Page 41 Part D Operation GSM Communications Flash Card removal and replacement...

Page 42: ...SM Modem specification ZephIR systems incorporates a GSM GPRS TC65T Siemens Quad band modem 2 ZephIR dial up application Systems are supplied with the ZephIR dial up application This software applicat...

Page 43: ...removing the flash card the ZephIR should be shutdown This can be done by pressing the power button on the rear of the unit or selecting Power Off from the application software Action menu The panel i...

Page 44: ...er manual QP1009 582 v2 Natural Power 2008 10th June 2008 Page 44 Part E User In Field Maintenance User Maintenance Washer system filling and operation Dessicator replacement Service Schedule Spare Pa...

Page 45: ...below for instructions on changing the desiccant Remove customer Interface panel and undertake following o Remove electronics pod desiccator and replace desiccant o Check system indicators and ensure...

Page 46: ...asher system Filling of the washer is best performed before the site visit if there is no water available on site The 20ltr water tank should allow up to 180 days of wash wipe operations between refil...

Page 47: ...ptics pod the first is located on the top face of the system next to the window wiper as shown in the figure below Step 1 Power the unit down and then place an adjustable spanner over the main desicca...

Page 48: ...e the best method is to finger tighten the desiccator and then take the adjustable spanner and tighten it until you feel the seal being made The remaining breather desiccator in this pod is located at...

Page 49: ...Step 2 When the desiccator is fully removed then using a flat blade screw driver remove the top section of the unit to expose the desiccant crystals inside Pour out the crystals and dispose of them i...

Page 50: ...with the correct blade for the system the correct part number can be found in the spares list Step1 Firstly lift the wiper arm away from the window as in the photo below Step 2 Holding the wiper arm...

Page 51: ...otor washer pump external cables external and internal fans scanner motor focus assembly batteries battery pod PCB and the laser itself Spare parts list The following items are considered to be a usef...

Page 52: ...ZephIR user manual QP1009 582 v2 Natural Power 2008 10th June 2008 Page 52 Part F Health and Safety General overview Shipping and the ZephIR Battery Pod IP explanation and Ratings...

Page 53: ...ed by QinetiQ and guidance is offered to minimise the risk of injury or equipment failure This hazard assessment is not comprehensive and other hazards may arise as a result of how the systems are sit...

Page 54: ...and sign posting Emissions The ZephIR system is a Class 1 eye safe laser product conforming to IEC EN 60825 1 It operates by scanning a continuous laser beam and measuring the Doppler shift of laser l...

Page 55: ...Electric Storage Not Classified as Hazardous for Sea Transport Air ICAO IATA Proper Shipping Name Batteries Non Spillable Electric Storage Not Classified as Hazardous for Air Transport Battery disconn...

Page 56: ...tools wires etc with a diam eter of thickness greater than 1 0mm 4 Protection from entry by solid objects with a diameter or thickness greater than 1 0mm 5 Protection from the amount of dust that wou...

Page 57: ...t seen by user Battery pod base labels battery pod warning symbols Shows system orientation for setting up relative to North Battery label showing serial number and electrical requirements Optics pod...

Page 58: ...nd electrical requirements Electrical power supply labels Electrical power supply and label showing serial number and electrical requirements Electrical power supply warning label Electrical power sup...

Page 59: ...ser manual QP1009 582 v2 Natural Power 2008 10th June 2008 Page 59 Part G Troubleshooting Guide and FAQ s Green LED panel descriptors Red LED panel descriptors Basic fault finding SMS Messages Contact...

Page 60: ...and A12 approx 5secs later Red LED Descriptors On the user access panel there can be seen a series of red LED s these are used to show information about how the system is running and also show if the...

Page 61: ...ure a good connec tion is made 3 Ensure that a standard cross over network cable is being used 4 If the network cable is unknown then replace with a new or known working cable 5 Check the configuratio...

Page 62: ...sends a text next time 3 Contact your Service Support Engineer 4 Contact your Service Support Engineer 5 ZephIR is overheating check the pod temps and ambient temp 6 Unit has no power and the batterie...

Page 63: ...ZephIR user manual QP1009 582 v2 Natural Power 2008 10th June 2008 Page 63 Unable to download data ZephIR is not storing data...

Page 64: ...hIR will continue to run but operation may be impaired Please check the ZephIR as soon as possible Consider power ing it down in the mean time Note that if the modem is the faulty component then the s...

Page 65: ...ulties with your ZephIR it may become necessary to contact your local Service Support Engineer for further assistance Below are the contact details of your local Service Support Engineer NAME ZephIR S...

Reviews:

Related manuals for ZephIR